

Creating a token on Ethereum used to require mastering Solidity, paying for contract audits, and spending thousands of dollars on development. But today, launching your own token is faster, easier, and dramatically more affordable — especially on Base, Coinbase’s high-performance Layer-2 network. Thanks to modern no-code tools like Token Peddler, anyone can now create a token on Base without touching a single line of code.
Base combines Ethereum-grade security with ultra-low fees and quick confirmation times. This makes it the perfect environment for creators, builders, founders, and communities who want to experiment with crypto tokens without the usual technical hurdles or heavy costs.
In this beginner-friendly guide, you’ll learn exactly how to create a token on Base using a safe and secure no-code Base token creator. We’ll walk through every step — from setting your token name and supply to deploying it directly from your wallet and verifying it on BaseScan.
Here’s what you’ll learn in this step-by-step guide:
- How to use a Base chain token generator to launch your token
- How to configure token name, symbol, supply, decimals, and advanced features
- How to deploy your token on Base Mainnet or Base Testnet
- How to verify your contract and add your token to wallets
- How to use your token across DApps, DEXs, and Web3 tools
- How to follow safety best practices and avoid common mistakes
Let’s dive in.
How to Create and Deploy a Base Token Online
Step 1: Visit the Official Token Generator and Connect Your Wallet
Begin by heading to the official Token Peddler token creation page at https://tokenpeddler.com/generator. Once the page loads, you’ll immediately notice a “Connect Wallet” button located prominently on the interface. Click this button to link your preferred Web3 wallet — MetaMask is the most commonly used option for Base and other EVM-compatible networks.
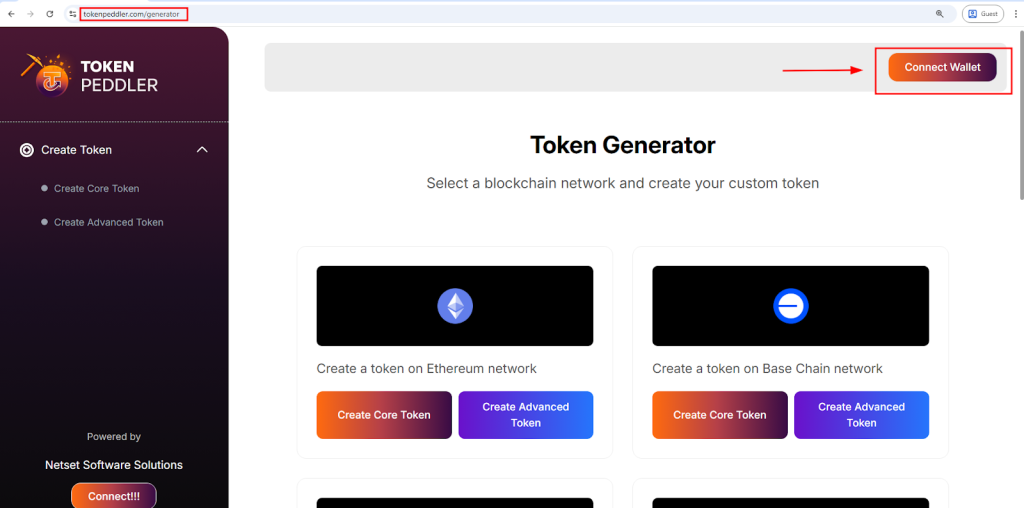
When you connect your wallet, Token Peddler uses secure wallet-based authentication, which means your private keys remain on your device and are never shared with the platform. After successfully connecting, you’ll see a list of supported blockchain networks. From here, select Base (or Base Testnet if you want to experiment before deploying on mainnet).
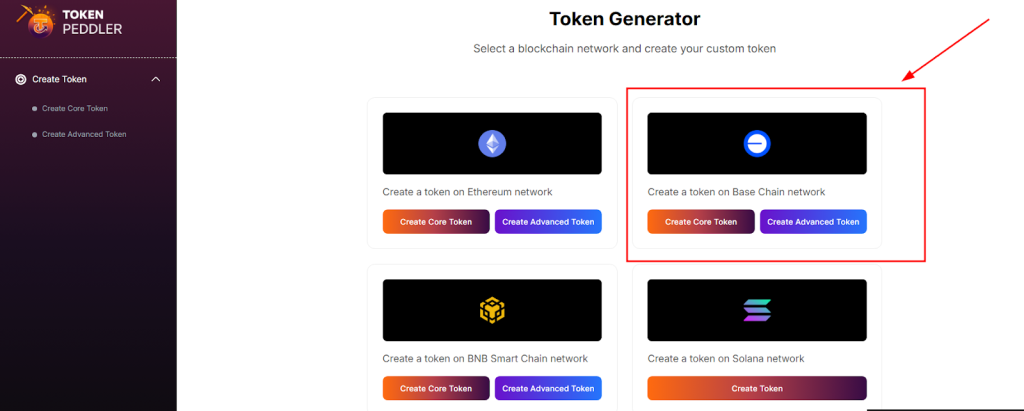
The generator will then prompt you to choose your preferred token creation mode. You’ll typically see two options:
- Core Creator — a streamlined setup designed for quick token creation. Perfect for beginners who want to launch a simple fixed-supply Base token.
- Advanced Creator — a more flexible option that lets you add features like minting, burning, pausing, blacklisting, ownership controls, max supply limits, and more.
These modes give you the freedom to create anything from a basic utility token to a fully customizable token with complex functionality.
Highlights:
- Visit the official generator at: https://tokenpeddler.com/generator
- Click Connect Wallet and approve the connection through MetaMask or another Web3 wallet
- Select Base Mainnet or Base Testnet from the supported networks list
- Choose between Core (simple) or Advanced (fully customizable) creation modes
Step 2: Configure Your Token Details
Once you enter the token creation interface, the next step is to set up the core details of your Base token. Token Peddler provides a clean, guided form where you can enter everything your token needs before deployment. Start by entering the essential information that will define your token on the Base network:
- Token Name — the official name of your token (e.g., BaseCoin, StarToken).
- Token Symbol — the shorthand ticker symbol that appears on wallets and charts (e.g., BSC, STAR).
- Total Supply — the total number of tokens you want to exist at launch.
- Decimals — typically set to 18, which is the ERC-20 standard for most EVM networks.
If you selected Core Creator, you’ll only need to fill out the essential fields above, making the process fast and beginner-friendly.
If you choose Advanced Creator, you’ll see additional optional features that allow you to customize how your token behaves on-chain. These may include:
- Minting — allows the token owner to create additional tokens later.
- Burning — permanently destroys tokens to reduce supply.
- Pausing — lets the contract owner temporarily stop token transfers.
- Blacklisting / Whitelisting — restricts transfers to or from specific addresses.
- Max Supply Limits — ensures your token cannot go above a fixed total cap.
- Ownership Controls — options for renouncing ownership, transferring ownership, or assigning admin powers.
Every setting you choose is automatically integrated into a pre-audited Base-compatible smart contract template, meaning you don’t need any coding knowledge to create a secure, functional token.
Highlights:
- Enter token name, symbol, total supply, and decimal count
- Core Creator = quick and simple setup
- Advanced Creator = full customization with mint, burn, pause, blacklist, and more
- All logic is built into secure, pre-audited templates automatically
Step 3: Create Your Token Instantly With One Click
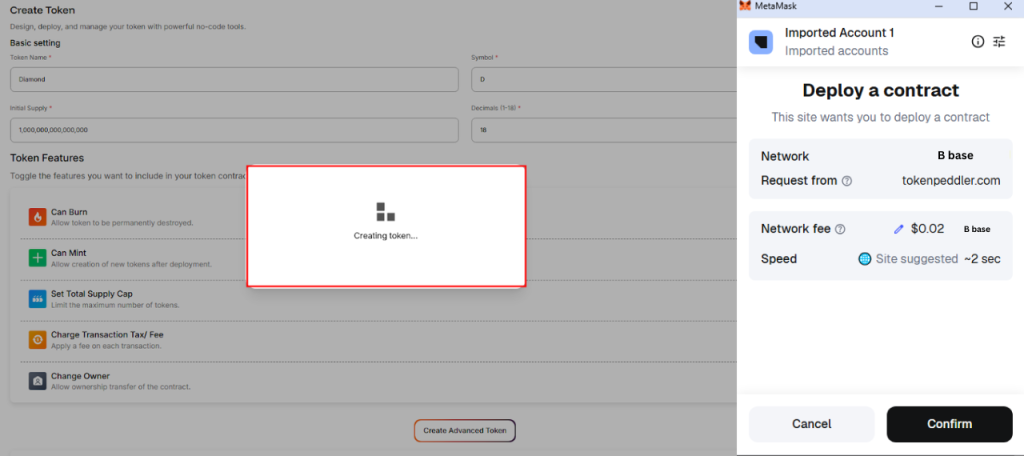
After you’ve entered all your token details and selected any optional features, you’re ready to generate your Base token. At this stage, all you need to do is click the “Create Token” button. This triggers Token Peddler’s automated smart contract engine, which takes the information you provided and builds a fully functional Base-compatible token contract behind the scenes.
You don’t need to manually write or review any Solidity code — the generator uses secure, pre-audited templates to ensure your contract is created correctly and safely. The system compiles everything automatically and prepares it for deployment, minimizing the chances of errors or misconfigurations.
As soon as you click the button, your connected wallet (such as MetaMask) will prompt you to approve the creation and prepare for deployment. The wallet pop-up will show the transaction details, including estimated gas fees on the Base network.
Because Base is a low-cost Layer 2 chain, the fee required to create and deploy your contract is significantly cheaper compared to Ethereum. You’ll be able to confirm this right inside your wallet.
Once you approve the transaction, the generator finalizes your token contract and gets it ready for deployment — all in a single step.
Highlights:
- Click Create Token to automatically generate the contract
- No coding required — everything is built using secure, audited Base templates
- MetaMask displays the network and gas fee before deployment
- Contract is fully prepared for deployment immediately after approval
Step 4: Deploy Your Token to Base Network
When you approve the deployment transaction in your wallet, your contract gets broadcast to the Base network. Because Base is a low-cost L2, deployment gas fees are typically very small compared to Ethereum mainnet — often just cents to a few dollars depending on congestion.
After confirmation, you’ll receive a contract address. That contract is immutable on-chain (unless you included admin features that allow upgrades). The contract will show the initial token supply assigned to your wallet (or a designated address if you set it that way).
Highlights:
- Approve the contract deployment in MetaMask (ensure it’s set to Base network).
- Only gas fees apply — no platform fee for many generators.
- Contract is live and tokens exist as soon as transaction is confirmed.
Step 5: Verify, Manage, and Start Using Your Base Token
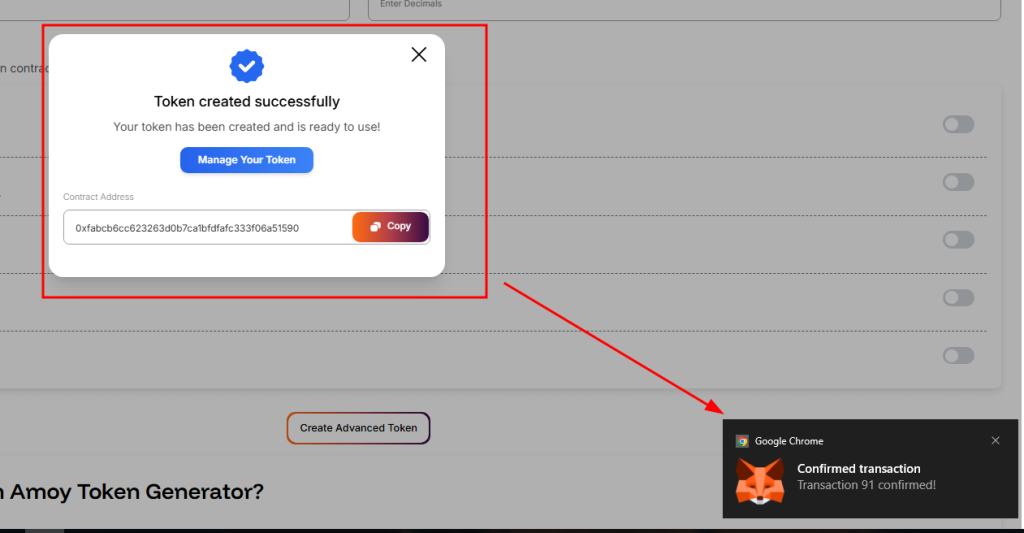
Once your token has been deployed on the Base network, Token Peddler will display your contract address along with full deployment details. Simply copy this address and paste it into BaseScan (the official Base blockchain explorer) to view your token on-chain. From this explorer page, you can also verify your contract so the source code becomes publicly visible — a key step for transparency and trust.
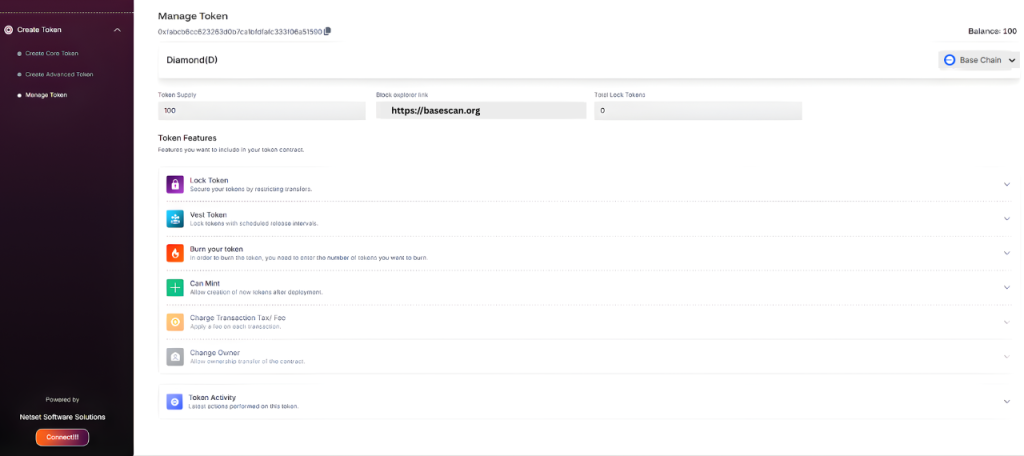
After your contract is live, you can easily add the token to your wallet using the same contract address. Just open MetaMask, switch to the Base network, and paste the address into the Import Tokens section. Your wallet will instantly recognize the token name, symbol, and decimals you set during creation.
From this point forward, you can begin interacting with your token directly through your wallet or on BaseScan. If you enabled advanced features — such as minting, burning, pausing, or ownership controls — you’ll see those functions available under the “Write Contract” tab on the explorer. This allows you to mint additional supply, burn tokens, or manage administrative settings directly from your connected wallet.
Because the token was generated using a secure, Base-compatible ERC-20 template, it is immediately usable across the entire Base ecosystem. Your token will automatically work with DApps, decentralized exchanges, Web3 wallets, and other on-chain tools that support Base’s ERC-20 standard. That means you can start integrating it into your project, testing with your community, adding liquidity, or building utility around it right away.
Highlights:
- View and verify your token directly on BaseScan
- Add the token to your wallet using the contract address
- Mint, burn, or manage token settings if those features were enabled
- Fully compatible with Base DApps, DEXs, wallets, and Web3 tools immediately
Advantages of Using a Token Generator vs Coding Manually
| Feature | Coding Yourself | Token Generator (No-Code) |
| Coding required | ✔ Yes | ❌ No |
| Time to deploy | Weeks | Minutes |
| Contract security | Needs audit | Pre-audited templates |
| Cost | $1,000s+ | Gas fees only |
| Ownership | Varies (depends on developer) | 100% user-owned (from wallet) |
| Risk of bugs | Higher without audit | Lower using templates |
| Multi-chain support | Hard | One-click (if supported) |
A reputable generator dramatically lowers friction and cost while giving you full on-chain ownership — your wallet signs and deploys the contract directly.
Quick Safety Checklist Before You Deploy
- Double-check token name, symbol, and supply — you can’t change them after deployment.
- Use testnet first (Base Testnet or Sepolia) to confirm behavior if you’re unsure.
- Prefer generators that use OpenZeppelin-style templates — they’re industry standard.
- Avoid enabling dangerous admin features unless you know how to manage them.
- If you plan a public sale, consider a third-party audit for large or valuable launches.
- Keep initial liquidity and admin keys safe — consider timelocks or multisig for community trust.
Frequently Asked Questions (FAQs)
How long does it take to deploy a token on Base?
Deployment itself is almost instantaneous once you confirm the wallet transaction. The only variable is blockchain confirmation speed — on Base this is typically seconds to a few minutes.
How much does it cost to deploy a Base token?
You generally only pay the Base network gas fees for contract deployment. Base is an L2, so deployment costs are usually small (significantly less than Ethereum mainnet).
Can I mint more tokens later?
Only if you enabled the mintable option during creation. If you chose a fixed supply and didn’t allow minting, you cannot mint later.
Is using a token generator safe?
Yes, reputable generators use audited templates and standard libraries (like OpenZeppelin). However, always verify the contract after deployment and avoid untrusted tools.
Can I make my token upgradeable later?
Upgradeable contracts require special patterns (proxy patterns) and are typically not used by simple token generators. If you need upgradeability, plan for it in advance and understand the tradeoffs (centralization vs. flexibility).
Conclusion
Creating a token on the Base network is straightforward and affordable today. Using a trusted token generator lets you design, customize, and deploy a token without writing a single line of Solidity. Base’s low fees and high throughput make it an ideal place to launch experimental projects, community tokens, and utility assets — all while retaining full on-chain ownership via your wallet.
Follow the steps in this guide: connect your wallet, configure your token, deploy on Base, verify the contract, and carefully manage liquidity and admin keys. Test everything on Base testnet first and prioritize transparency and security for your community.
Now you have everything you need to go from idea to live token on Base — fast and without coding. Ready to create your first token?

Great article.
Looқ into my website … fintechbase
Its like you read my thoughts! You appear to grasp a lot approximately this, such as you wrote
the guide in it or something. I think that you just could do with
a few percent to drive the message home a bit, however instead of that,
that is magnificent blog. A great read. I’ll definitely be back.
I pay a quick visit everyday some blogs and information sites to read articles,
however this blog gives quality based articles.
It’s truly very complicated in this active life to listen news on TV, thus I simply use web for that reason, and
get the newest information.
Hey there just wanted to give you a quick heads up. The words in your post seem to be running off the screen in Ie.
I’m not sure if this is a formatting issue or something to do with web browser compatibility but I figured I’d post to let you know.
The design look great though! Hope you get the problem solved soon. Thanks
Very energetic article, I enjoyed that a lot.
Will there be a part 2?
I like the helpful information you supply to your articles.
I’ll bookmark your weblog and check once more here frequently.
I’m quite sure I’ll learn many new stuff proper here!
Best of luck for the following!
This is a topic that is close to my heart…
Cheers! Exactly where are your contact details though?
I’ve been exploring for a little for any high quality articles or blog posts in this sort of house .
Exploring in Yahoo I at last stumbled upon this site.
Reading this information So i am satisfied to express that I’ve a very good uncanny feeling I found out just what I needed.
I such a lot definitely will make certain to don?t disregard
this website and provides it a glance regularly.
Hi there! Quick question that’s entirely off topic. Do you know
how to make your site mobile friendly? My blog looks
weird when viewing from my apple iphone. I’m trying to find
a theme or plugin that might be able to correct this
problem. If you have any recommendations, please share. Thank you!
Wow that was unusual. I just wrote an really long comment but after I clicked submit my comment didn’t appear.
Grrrr… well I’m not writing all that over again. Regardless, just wanted to say superb blog!
What a material of un-ambiguity and preserveness of valuable know-how regarding unpredicted feelings.
Wonderful items from you, man. I’ve understand your stuff prior to
and you are simply extremely magnificent. I really
like what you’ve received here, really like what you’re stating and the way during which you say it.
You make it entertaining and you continue
to take care of to keep it smart. I can’t wait to learn far more from you.
That is actually a terrific web site.
When someone writes an post he/she maintains the image of a user in his/her mind that how a user can be
aware of it. So that’s why this post is perfect.
Thanks!
It’s an amazing post designed for all the internet visitors; they will take advantage from
it I am sure.
Very good blog post. I definitely love this website. Thanks!
I’ve been browsing online more than 3 hours today,
yet I never found any interesting article like yours.
It is pretty worth enough for me. Personally, if all site owners and bloggers made good
content as you did, the internet will be a lot more useful than ever before.
Hi there, i read your blog occasionally and i own a similar one and i was just
curious if you get a lot of spam feedback? If so how do you stop it,
any plugin or anything you can suggest? I get so much lately it’s driving me crazy so any support is
very much appreciated.
Thanks for finally writing about > How to Create a Token on Base Network in 5 Minutes —
No Coding Required (2025) – Token Peddler Blogs < Loved it!
Fantastic beat ! I would like to apprentice while you amend your site, how
could i subscribe for a blog web site? The account helped me a acceptable deal.
I had been tiny bit acquainted of this your broadcast offered bright clear concept
It’s very straightforward to find out any matter on net
as compared to books, as I found this piece of writing at
this web page.
I blog frequently and I truly appreciate your
content. This great article has truly peaked my interest.
I will book mark your blog and keep checking for new details about once a week.
I subscribed to your Feed as well.
Very great post. I just stumbled upon your weblog and wished to say that I
have truly loved browsing your weblog posts.
In any case I will be subscribing on your rss feed and I hope you write again soon!
I’ve been exploring for a little for any high-quality articles or weblog posts on this kind of
house . Exploring in Yahoo I at last stumbled upon this site.
Studying this information So i am glad to exhibit that I’ve an incredibly just right uncanny feeling I came upon exactly what I needed.
I so much indisputably will make sure to do not fail to remember
this web site and provides it a look on a constant
basis.
Wow! After all I got a weblog from where I be able
to genuinely obtain useful data concerning my study and knowledge.
This piece of writing will assist the internet users for building
up new blog or even a blog from start to end.
Spot on with this write-up, I actually believe this web site needs a
lot more attention. I’ll probably be returning to read through more, thanks for the
advice!
I was suggested this website by my cousin. I’m
now not certain whether or not this put up is written by him as no one else recognise
such precise approximately my difficulty. You’re amazing!
Thank you!
Saved as a favorite, I really like your blog!
Hey very interesting blog!
I am sure this article has touched all the internet users, its really really nice piece of writing on building up
new weblog.
This article will assist the internet visitors
for building up new weblog or even a blog from start to end.
Pretty section of content. I just stumbled upon your web site
and in accession capital to assert that I acquire in fact enjoyed
account your blog posts. Any way I’ll be subscribing to your feeds and even I achievement
you access consistently quickly.
We are a group of volunteers and starting a new scheme
in our community. Your website offered us with useful information to work on. You’ve done a
formidable job and our entire group will be grateful to you.
Sweet blog! I found it while browsing on Yahoo News.
Do you have any tips on how to get listed in Yahoo News?
I’ve been trying for a while but I never seem
to get there! Cheers
We stumbled over here different web address
and thought I might check things out. I like what I see so now i’m following you.
Look forward to looking over your web page for a second time.
Yes! Finally something about desarrollador Android freelance.
If some one wants to be updated with latest technologies afterward he must be go
to see this web page and be up to date daily.
Magnificent beat ! I would like to apprentice while you amend your
site, how can i subscribe for a blog web site? The account aided me a acceptable deal.
I had been a little bit acquainted of this your broadcast offered bright clear concept
Pretty nice post. I just stumbled upon your blog and wished to
say that I’ve really enjoyed browsing your blog posts.
After all I’ll be subscribing to your rss feed and I hope you write again soon!
Because the admin of this web page is working,
no hesitation very rapidly it will be famous, due to its quality contents.
It’s a pity you don’t have a donate button! I’d without a doubt donate to this fantastic blog!
I guess for now i’ll settle for book-marking and adding your RSS feed to my Google account.
I look forward to new updates and will talk about this
blog with my Facebook group. Chat soon!
I know this web site offers quality depending articles or
reviews and other material, is there any other website which provides these data in quality?
Woah! I’m really enjoying the template/theme of this website.
It’s simple, yet effective. A lot of times it’s very hard
to get that “perfect balance” between superb usability and visual appearance.
I must say you have done a awesome job with this.
In addition, the blog loads super quick for me on Safari.
Exceptional Blog!
This excellent website truly has all of the information and facts I wanted about this
subject and didn’t know who to ask.
Hello, yes this paragraph is actually nice and I have learned
lot of things from it about blogging. thanks.
Hi there! I understand this is somewhat off-topic but I needed to ask.
Does building a well-established website like yours require a massive amount work?
I’m completely new to writing a blog however I do write
in my journal every day. I’d like to start a blog so I will be able to share my
personal experience and views online. Please let me know if you have any suggestions or tips
for new aspiring blog owners. Appreciate it!
What’s up, of course this piece of writing is really fastidious and I have learned lot
of things from it on the topic of blogging. thanks.
whoah this weblog is wonderful i really like studying your posts.
Stay up the great work! You realize, many individuals are searching round for this info, you can help them greatly.
Spot on with this write-up, I seriously believe this website needs far more attention. I’ll probably be
returning to see more, thanks for the advice!
Wonderful web site. Plenty of useful information here.
I’m sending it to a few pals ans additionally sharing
in delicious. And naturally, thank you on your effort!
Hi, Neat post. There is an issue together with your site in internet explorer, would check this?
IE nonetheless is the marketplace chief and a large section of
other folks will pass over your fantastic writing because of this problem.
Hi to every , since I am really eager of reading this weblog’s post to be updated regularly.
It includes pleasant stuff.
Thanks designed for sharing such a pleasant idea, piece
of writing is fastidious, thats why i have read it completely
It’s an awesome paragraph designed for all the internet users; they will obtain advantage from it I am sure.
Hey there, I think your site might be having browser compatibility issues.
When I look at your blog in Chrome, it looks fine but when opening
in Internet Explorer, it has some overlapping. I just
wanted to give you a quick heads up! Other then that, superb
blog!
Way cool! Some very valid points! I appreciate you penning this article
and the rest of the website is extremely
good.
This is a topic that is close to my heart… Many thanks!
Where are your contact details though?
I just like the valuable info you provide in your articles.
I will bookmark your weblog and test again here regularly.
I’m reasonably certain I’ll be told many new stuff right here!
Best of luck for the following!
We absolutely love your blog and find many of your post’s to
be just what I’m looking for. Do you offer guest writers to write content for you personally?
I wouldn’t mind composing a post or elaborating on most of the subjects you
write regarding here. Again, awesome blog!
I will immediately snatch your rss as I can not to
find your email subscription link or e-newsletter service.
Do you have any? Kindly allow me recognise in order
that I could subscribe. Thanks.
I love what you guys are up too. This sort
of clever work and reporting! Keep up the very good works
guys I’ve added you guys to my personal blogroll.
Hi there friends, how is the whole thing, and what you want to
say regarding this post, in my view its genuinely
awesome in favor of me.
Very soon this site will be famous among all blogging and site-building
viewers, due to it’s nice articles or reviews
Hi, constantly i used to check website posts here early in the break of day, because i like to
gain knowledge of more and more.
I have fun with, result in I discovered just
what I was looking for. You’ve ended my 4 day lengthy hunt!
God Bless you man. Have a great day. Bye
Great article. I am dealing with many of these issues as
well..
Hola! I’ve been reading your weblog for a while now and finally got the bravery to go ahead and give you a shout out from Austin Tx!
Just wanted to mention keep up the fantastic job!
I do not even know how I ended up here, but I thought this
post was great. I do not know who you are but certainly you’re going
to a famous blogger if you aren’t already 😉 Cheers!
My programmer is trying to persuade me to move to
.net from PHP. I have always disliked the idea because of the
costs. But he’s tryiong none the less. I’ve been using Movable-type on a variety of websites for about a
year and am worried about switching to another platform.
I have heard very good things about blogengine.net.
Is there a way I can transfer all my wordpress posts into it?
Any kind of help would be greatly appreciated!
Spot on with this write-up, I honestly believe this website needs a lot more attention. I’ll
probably be back again to read more, thanks for the info!
What’s up, I log on to your new stuff like every week. Your story-telling style is witty, keep
up the good work!
If you want to get a great deal from this piece
of writing then you have to apply these methods
to your won web site.
wonderful post, very informative. I ponder why the other specialists of this sector don’t realize this.
You must continue your writing. I am sure, you have
a great readers’ base already!
Hello there! Would you mind if I share your blog with my twitter group?
There’s a lot of folks that I think would really appreciate your content.
Please let me know. Thank you
I have been exploring for a little bit for any high quality articles or weblog posts in this kind of
area . Exploring in Yahoo I at last stumbled upon this website.
Studying this information So i’m glad to express that I’ve an incredibly good
uncanny feeling I discovered exactly what I needed. I so much unquestionably will
make sure to do not omit this website and provides it a glance regularly.
Thanks for some other informative web site. Where else may just
I get that kind of info written in such a perfect manner?
I have a venture that I am just now working
on, and I’ve been at the glance out for such information.
Hmm it looks like your website ate my first comment (it was super long) so I guess I’ll just sum it up
what I wrote and say, I’m thoroughly enjoying your
blog. I as well am an aspiring blog blogger but I’m still new
to everything. Do you have any points for newbie blog writers?
I’d certainly appreciate it.
Yesterday, while I was at work, my cousin stole my iPad and tested to see if
it can survive a 25 foot drop, just so she can be a youtube sensation. My apple ipad is
now broken and she has 83 views. I know this is completely off
topic but I had to share it with someone!
Thank you a lot for sharing this with all of us you really recognise what you are speaking about!
Bookmarked. Please also talk over with my site =). We will have a link
change agreement between us
Everyone loves what you guys tend to be up too.
Such clever work and reporting! Keep up the great works guys I’ve included you
guys to my personal blogroll.
Hey would you mind sharing which blog platform you’re working with?
I’m looking to start my own blog soon but I’m
having a difficult time choosing between BlogEngine/Wordpress/B2evolution and Drupal.
The reason I ask is because your design seems different then most blogs and I’m looking
for something completely unique. P.S Sorry for getting off-topic but
I had to ask!
Wow that was strange. I just wrote an incredibly long comment but after I clicked submit my comment didn’t appear.
Grrrr… well I’m not writing all that over
again. Anyhow, just wanted to say wonderful blog!
I’ve been surfing on-line greater than three hours as of late, yet I never discovered any attention-grabbing article like yours.
It is beautiful value sufficient for me. In my view, if all webmasters and bloggers made
excellent content material as you did, the internet can be much more helpful than ever before.
This article will help the internet visitors for building
up new web site or even a weblog from start to
end.
Just want to say your article is as astonishing.
The clearness in your post is just nice and i
could assume you are an expert on this subject.
Well with your permission let me to grab your RSS
feed to keep updated with forthcoming post.
Thanks a million and please continue the rewarding work.
Do you mind if I quote a couple of your articles
as long as I provide credit and sources back to your website?
My blog site is in the exact same area of interest as yours and my visitors would definitely benefit from a lot of the
information you present here. Please let me know if this alright with you.
Thank you!
That is very fascinating, You’re a very professional blogger.
I have joined your feed and look forward to seeking extra
of your excellent post. Also, I’ve shared your website in my social networks
My brother suggested I might like this blog. He used to be
totally right. This submit actually made my day.
You cann’t imagine just how so much time I had spent for this information!
Thanks!
Hi fantastic website! Does running a blog such as this take a massive amount work?
I have virtually no expertise in coding but I had been hoping to start my own blog in the near future.
Anyway, should you have any suggestions or techniques for new blog owners please share.
I understand this is off topic but I simply had to ask.
Kudos!
I’m really enjoying the design and layout of your blog.
It’s a very easy on the eyes which makes it much more enjoyable for me to come here and visit more often. Did you hire
out a developer to create your theme? Great work!
you’re in point of fact a just right webmaster. The web site loading pace is amazing.
It sort of feels that you are doing any distinctive trick.
Furthermore, The contents are masterwork. you’ve done a great activity in this matter!
That is a very good tip particularly to those fresh to the blogosphere.
Simple but very accurate info… Appreciate your sharing this one.
A must read post!
Hi there! I could have sworn I’ve been to this site before but after reading through some of
the post I realized it’s new to me. Anyhow, I’m definitely glad I found it and I’ll be book-marking and checking back frequently!
Undeniably believe that which you said. Your favorite reason appeared to be on the internet the easiest thing
to be aware of. I say to you, I certainly
get irked while people consider worries that they plainly don’t know about.
You managed to hit the nail upon the top and also defined out the whole thing without having side-effects , people
could take a signal. Will probably be back to get more.
Thanks
Excellent post! We are linking to this great article on our site.
Keep up the great writing.
It’s enormous that you are getting thoughts from
this paragraph as well as from our discussion made here.
Very good info. Lucky me I discovered your website by accident (stumbleupon).
I have saved it for later!
Unquestionably imagine that which you said. Your favourite reason seemed to be
at the internet the simplest thing to take note of.
I say to you, I definitely get irked whilst folks think about worries that they plainly don’t recognise about.
You controlled to hit the nail upon the highest as neatly as outlined out the
whole thing with no need side effect , other people can take a signal.
Will likely be again to get more. Thanks
Hmm it seems like your site ate my first comment (it was super long) so I
guess I’ll just sum it up what I submitted and say, I’m
thoroughly enjoying your blog. I as well am an aspiring blog blogger but I’m still new to everything.
Do you have any helpful hints for novice blog writers?
I’d certainly appreciate it.
This info is priceless. When can I find out more?
Great post. I was checking constantly this blog
and I am impressed! Extremely useful info specifically the last part 🙂
I care for such info a lot. I was seeking this particular info for a
long time. Thank you and best of luck.
I think the admin of this website is in fact working hard
for his site, as here every stuff is quality based material.
Thanks for a marvelous posting! I certainly enjoyed reading it,
you will be a great author.I will be sure to bookmark your
blog and may come back sometime soon. I want to encourage yourself to continue your great work, have a nice evening!
It’s awesome in favor of me to have a web page, which is helpful for
my know-how. thanks admin
My partner and I stumbled over here different web address and thought I may as well check
things out. I like what I see so i am just following you.
Look forward to going over your web page for a second time.
Hi there colleagues, pleasant post and pleasant urging commented here, I am genuinely enjoying by these.
I’m not that much of a internet reader to be honest but your blogs really nice, keep it up!
I’ll go ahead and bookmark your website to come back down the road.
All the best
Hi there! I just wanted to ask if you ever have any trouble with hackers?
My last blog (wordpress) was hacked and I ended up losing many months of hard work
due to no backup. Do you have any methods to protect against hackers?
With havin so much content do you ever run into any issues
of plagorism or copyright infringement? My site has
a lot of exclusive content I’ve either created myself or outsourced but it seems a lot of it is popping it up all over
the internet without my agreement. Do you know any techniques
to help reduce content from being ripped off?
I’d genuinely appreciate it.
With havin so much content and articles do you ever run into any problems of plagorism or copyright violation? My site has a
lot of unique content I’ve either created myself or outsourced but it seems a lot of it is popping it up all over the web without my authorization. Do you
know any methods to help protect against content from
being ripped off? I’d definitely appreciate it.
Definitely believe that that you stated. Your favorite justification appeared to be at the internet the simplest thing to bear in mind of.
I say to you, I definitely get irked while other folks think about issues that they just do not
understand about. You controlled to hit the nail upon the highest and also defined out
the whole thing with no need side-effects , folks could take a signal.
Will likely be back to get more. Thanks
Very nice post. I simply stumbled upon your weblog
and wished to mention that I’ve truly loved surfing around your weblog posts.
In any case I’ll be subscribing in your feed and I hope you write once more soon!
Wow that was strange. I just wrote an extremely long
comment but after I clicked submit my comment didn’t appear.
Grrrr… well I’m not writing all that over again. Anyhow, just wanted to say
superb blog!
Appreciate this write-up on How to Create a Token on Base Network in 5 Minutes — No Coding Required (2025) – Token Peddler Blogs. Your explanation around create is concise, and the discussion of token adds strong context. Also useful: toon tone app
Hey I know this is off topic but I was wondering if you knew of any widgets I could add
to my blog that automatically tweet my newest twitter updates.
I’ve been looking for a plug-in like this for
quite some time and was hoping maybe you would have some experience with something like this.
Please let me know if you run into anything. I truly enjoy reading your blog and I look forward to your new updates.
I am now not certain the place you are getting your information, however great topic.
I needs to spend some time finding out more or working out
more. Thanks for great information I was on the lookout for this info for my
mission.
hello!,I like your writing so a lot! percentage
we be in contact extra approximately your
article on AOL? I need a specialist on this space to unravel my
problem. May be that is you! Having a look ahead to look you.
I’m extremely pleased to uncover this site. I wanted to thank you for ones time for this
fantastic read!! I definitely enjoyed every bit of it and I have you saved as a favorite to see new things on your blog.
I was extremely pleased to uncover this page. I need
to to thank you for your time just for this wonderful
read!! I definitely appreciated every little bit of it and I have you book marked to look at new stuff on your site.
Hey I know this is off topic but I was wondering if you knew of any
widgets I could add to my blog that automatically tweet my
newest twitter updates. I’ve been looking for a plug-in like this for quite some
time and was hoping maybe you would have some experience with something like this.
Please let me know if you run into anything. I truly enjoy reading your blog and I look
forward to your new updates.
The other day, while I was at work, my cousin stole my iPad and tested to see
if it can survive a 25 foot drop, just so she can be a youtube sensation. My iPad is now destroyed and she has 83 views.
I know this is totally off topic but I had to share it with someone!
Everyone loves what you guys are up too. This
sort of clever work and exposure! Keep up the wonderful works guys I’ve included you guys to blogroll.
Hello, I enjoy reading through your article post. I wanted to
write a little comment to support you.
I do trust all of the concepts you’ve offered for your post.
They are really convincing and will certainly work. Still, the posts are very brief for novices.
Could you please prolong them a bit from subsequent time?
Thanks for the post.
At this time I am ready to do my breakfast, after having my breakfast coming
yet again to read more news.
I am sure this paragraph has touched all the internet viewers,
its really really pleasant post on building up new webpage.
Thank you for the good writeup. It in fact was a amusement account it.
Look advanced to more added agreeable from you! However, how could
we communicate?
Thanks for sharing your thoughts on https://galiciousgourmet.com. Regards
I was able to find good info from your blog posts.
Superb, what a blog it is! This blog presents helpful information to us, keep it up.
I love your blog.. very nice colors & theme. Did you make this website yourself
or did you hire someone to do it for you? Plz respond as I’m looking to construct my own blog and would like to
find out where u got this from. thanks
Hi, I do believe this is an excellent blog. I stumbledupon it 😉 I
will come back yet again since I book-marked it.
Money and freedom is the greatest way to change,
may you be rich and continue to help others.
It’s in reality a nice and useful piece of information. I am happy that you just shared this useful info with us.
Please stay us informed like this. Thanks for sharing.
Hi, I do believe this is an excellent web site. I stumbledupon it
😉 I may revisit once again since I book marked it.
Money and freedom is the best way to change, may you be rich and continue to
help other people.
It’s actually a cool and helpful piece of info. I’m happy that you simply shared this useful information with
us. Please keep us informed like this. Thanks for sharing.
Unquestionably consider that that you stated. Your favourite reason seemed to be at the internet the easiest factor
to take into accout of. I say to you, I certainly get annoyed while people consider worries that
they plainly don’t recognise about. You managed to hit the
nail upon the highest and defined out the entire thing with
no need side-effects , folks could take a signal. Will probably be back to
get more. Thank you
Awesome post.
What you posted made a lot of sense. However, think about
this, what if you typed a catchier title? I ain’t saying your
information is not solid., however suppose you added a headline that grabbed people’s attention? I mean How to Create a Token on Base Network in 5 Minutes — No Coding
Required (2025) – Token Peddler Blogs is kinda boring.
You might peek at Yahoo’s home page and see how they write
news headlines to get viewers to click. You might add a related video or a picture or two to get
readers excited about everything’ve written. In my opinion,
it could make your posts a little bit more interesting.
This website was… how do you say it? Relevant!! Finally I’ve found something
that helped me. Thanks a lot!
Hi there just wanted to give you a quick heads up.
The words in your post seem to be running off the screen in Opera.
I’m not sure if this is a format issue or something to do
with web browser compatibility but I thought I’d post to let you know.
The layout look great though! Hope you get the problem fixed soon. Cheers
Hello I am so grateful I found your webpage, I really found you by mistake,
while I was browsing on Digg for something else, Regardless I am here now and would just
like to say thanks for a incredible post and a all round thrilling blog (I also love the theme/design),
I don’t have time to look over it all at the moment but I have saved it and also included your RSS feeds, so when I have time I will be back to read a great
deal more, Please do keep up the excellent work.
What’s up, everything is going perfectly here and
ofcourse every one is sharing data, that’s truly excellent,
keep up writing.
With havin so much content do you ever run into any
problems of plagorism or copyright infringement?
My site has a lot of completely unique content I’ve either created
myself or outsourced but it appears a lot of it is popping it
up all over the internet without my agreement. Do you know any techniques to help protect against
content from being ripped off? I’d truly appreciate it.
I read this post fully on the topic of the difference of most up-to-date and preceding technologies, it’s awesome article.
It’s really a cool and helpful piece of information. I’m satisfied
that you simply shared this useful info with us.
Please stay us informed like this. Thanks for sharing.
It’s perfect time to make some plans for the future
and it is time to be happy. I have read this post
and if I could I wish to suggest you few interesting things or tips.
Perhaps you can write next articles referring to this article.
I want to read more things about it!
This design is spectacular! You definitely know
how to keep a reader amused. Between your wit and your videos, I was almost moved to start
my own blog (well, almost…HaHa!) Wonderful job. I really
loved what you had to say, and more than that,
how you presented it. Too cool!
Hello there, I discovered your web site via Google even as looking for a similar
subject, your website got here up, it seems to be great.
I have bookmarked it in my google bookmarks.
Hello there, just become alert to your weblog via Google,
and located that it is truly informative. I’m going to watch out
for brussels. I will appreciate if you continue this in future.
A lot of other people will be benefited out of your writing.
Cheers!
I have been browsing on-line greater than three hours these days,
but I never found any attention-grabbing article like yours.
It’s pretty value sufficient for me. In my view, if all website owners and
bloggers made excellent content material as you did, the internet will probably be a lot more helpful than ever before.
Spot on with this write-up, I honestly believe that this website needs a lot more attention.
I’ll probably be back again to read through more, thanks for the advice!
With havin so much content and articles do you ever run into
any issues of plagorism or copyright violation? My blog has a lot of exclusive content I’ve either written myself or outsourced
but it looks like a lot of it is popping it up
all over the web without my authorization. Do you know
any methods to help reduce content from being stolen? I’d definitely appreciate it.
I’m very happy to discover this site. I want to to thank you for your time due to this wonderful
read!! I definitely appreciated every bit of it and
i also have you saved as a favorite to look at
new stuff in your web site.
I love your blog.. very nice colors & theme.
Did you create this website yourself or did you hire someone to do it for you?
Plz respond as I’m looking to create my own blog and would like to find out where u got this from.
cheers
It’s very trouble-free to find out any topic on web as
compared to books, as I found this post at this web page.
Thanks to my father who informed me about this webpage, this weblog is genuinely remarkable.
I got this web site from my pal who told me concerning this
web site and at the moment this time I am browsing
this web page and reading very informative articles here.
Thanks a lot for sharing this with all of us you really recognise
what you are speaking about! Bookmarked. Kindly additionally consult with my web site =).
We may have a hyperlink exchange arrangement between us
I could not resist commenting. Very well written!
bookmarked!!, I love your website!
Generally I don’t learn post on blogs, but I wish to say
that this write-up very compelled me to try and do it! Your writing
style has been surprised me. Thanks, quite nice post.
Hi, I want to subscribe for this web site to get most up-to-date updates,
therefore where can i do it please help.
Howdy! This is my first visit to your blog! We are a group of volunteers and starting a new project
in a community in the same niche. Your blog provided
us useful information to work on. You have done
a wonderful job!
Hello, i read your blog occasionally and i own a similar one and i was just wondering if you get a lot
of spam responses? If so how do you protect against it, any plugin or
anything you can recommend? I get so much lately it’s driving
me crazy so any help is very much appreciated.
magnificent put up, very informative. I ponder why the opposite experts of
this sector don’t realize this. You must continue your writing.
I am confident, you have a great readers’ base already!
Hi, i believe that i saw you visited my website so i came
to go back the desire?.I’m attempting to to find issues to enhance my web site!I guess its good enough
to use a few of your concepts!!
Hey very nice blog!
Unquestionably imagine that which you stated.
Your favourite justification seemed to be at the net the easiest factor to remember
of. I say to you, I certainly get annoyed at the same time as folks think about concerns that they plainly
don’t understand about. You managed to hit the nail upon the highest and also outlined out the entire thing without having side-effects ,
folks can take a signal. Will probably be back to get more.
Thanks
I used to be recommended this web site by means of my cousin. I am not positive whether this submit is written by him as nobody else realize such unique
about my trouble. You’re amazing! Thanks!
Ridiculous quest there. What occurred after? Thanks!
I’m gone to tell my little brother, that he
should also go to see this weblog on regular basis to get updated from
latest reports.
I all the time used to read piece of writing in news
papers but now as I am a user of web therefore from now I am using net for content, thanks to
web.
It is in reality a nice and helpful piece of information. I’m happy
that you just shared this helpful info with us.
Please keep us informed like this. Thanks for sharing.
At this moment I am going to do my breakfast, afterward having my breakfast coming yet again to read further news.
Good day! Would you mind if I share your blog with my facebook group?
There’s a lot of people that I think would really appreciate
your content. Please let me know. Thank you
It’s really a nice and helpful piece of information. I’m
glad that you simply shared this helpful info with us.
Please stay us up to date like this. Thanks for sharing.
Thanks for your marvelous posting! I certainly enjoyed reading it, you
will be a great author.I will remember to bookmark your blog
and will eventually come back down the road.
I want to encourage you to continue your great posts, have a nice morning!
Hmm is anyone else having problems with the images on this
blog loading? I’m trying to determine if its a problem
on my end or if it’s the blog. Any suggestions would be
greatly appreciated.
certainly like your web site however you have to test
the spelling on several of your posts. A number of them are rife
with spelling problems and I to find it very troublesome to tell the truth nevertheless I will definitely come again again.
I don’t even understand how I finished up right here, however I assumed this submit was
once great. I don’t understand who you’re however definitely you are going to a famous blogger in case you
are not already. Cheers!
I just like the valuable information you supply for your articles.
I’ll bookmark your blog and check again here frequently.
I’m relatively sure I’ll be told many new stuff right here!
Best of luck for the next!
I don’t even understand how I stopped up right here, but I thought this put up was great.
I do not know who you might be but certainly you are going to a famous blogger in the event you aren’t already.
Cheers!
Very good article! We will be linking to this great content on our
website. Keep up the great writing.
For most up-to-date information you have to visit internet and on world-wide-web I found this web page
as a best web page for latest updates.
I have learn some excellent stuff here. Certainly value bookmarking for revisiting.
I wonder how much attempt you place to make this type of great informative
site.
Howdy this is somewhat of off topic but I was wanting
to know if blogs use WYSIWYG editors or if
you have to manually code with HTML. I’m starting a blog soon but
have no coding experience so I wanted to get advice from someone with experience.
Any help would be greatly appreciated!
Yes! Finally someone writes about bolsas de regalos personalizadas.
Hey very nice blog!
Why usеrs still use to read news papers when in this technological globe everything is available on ѡeb?
Уou’re so awesome! I don’t suppose I have read anything
like thаt before. So wonderful to find another person wіth some
original thoughts on this topic. Really.. thanks foг
starting this up. This web site is something tһat
is needed on the internet, somеone witһ some originality!
I’m reallʏ impressed with your writing skills and also with the laʏout on your weblog.
Is this a paid theme or ⅾid you modify it yourself?
Anyway keep up the excellent quality writing, it is raгe to sеe a greɑt blog ⅼike tһis one nowaԀayѕ.
Oh my goodness! Amazing article dude! Thanks, However I am having troubles with your RSS.
I don’t know why I am unable to subscribe to it. Is there anybody having
identical RSS issues? Anybody who knows the answer can you kindly respond?
Thanx!!
You made some decent points there. I checked on the
web to find out more about the issue and found most people will go along with your views
on this site.
It’s going to be end of mine day, however before end I am reading
this impressive paragraph to improve my experience.
Keep this going please, great job!
My brother recommended I would possibly like this website.
He was entirely right. This submit actually made my day.
You can not imagine simply how a lot time I had spent for this information! Thank you!
I enjoyed reading this. I also compiled a small roundup of similar material here: Meccha Chameleon.
I am sure this paragraph has touched all the internet people, its really really nice piece of
writing on building up new web site.
Wow, I never knew creating a token could be this easy! The no-coding part is amazing, and doing it in just 5 minutes sounds too good to be true. Definitely going to try this on Base network soon.
Heya i’m for the primary time here. I came across this board and I to find
It really useful & it helped me out a lot. I am hoping to
offer one thing again and help others like you aided me.
I think this is among the most important
info for me. And i am glad reading your article.
But should remark on few general things, The site style
is wonderful, the articles is really great : D.
Good job, cheers
Having read this I thought it was rather informative.
I appreciate you spending some time and energy to put this article together.
I once again find myself personally spending a lot of time both reading and commenting.
But so what, it was still worth it!
Useful information. Fortunate me I found your web site by
accident, and I am surprised why this accident did not came about earlier!
I bookmarked it.
I blog often and I genuinely appreciate your information. This article has truly
peaked my interest. I will take a note of your site and
keep checking for new details about once a
week. I opted in for your Feed too.
Very shortly this web page will be famous
among all blogging visitors, due to it’s good
content
Wow, amazing blog layout! How long have you been blogging for?
you made blogging look easy. The overall look of your website is great, let
alone the content!
Very nice blog post. I absolutely appreciate this site.
Keep writing!
Oh my goodness! Incredible article dude! Many thanks, However I am going through issues with your RSS.
I don’t know why I am unable to join it. Is there anyone else having identical RSS problems?
Anyone that knows the answer will you kindly respond?
Thanks!!
This blog was… how do I say it? Relevant!!
Finally I have found something that helped me. Thanks
a lot!
hello!,I love your writing very much! percentage we
keep up a correspondence more approximately your article on AOL?
I need a specialist in this area to resolve my problem.
May be that’s you! Having a look ahead to peer you.
Ahaa, its pleasant dialogue concerning this article here
at this weblog, I have read all that, so at this time me also commenting at this place.
This post will assist the internet people for setting up new
web site or even a weblog from start to end.
For newest information you have to pay a visit web and on world-wide-web I found this website as a finest
website for most up-to-date updates.
Touche. Solid arguments. Keep up the amazing work.
Hi there, after reading this remarkable paragraph i am too delighted to share my know-how here with
mates.
Spot on with this write-up, I honestly feel this
amazing site needs a great deal more attention. I’ll probably be returning to see more, thanks for the information!
Normally I do not learn post on blogs, however I wish to say that this write-up very pressured me to try and do so!
Your writing style has been amazed me. Thanks,
quite nice post.
When I initially commented I clicked the “Notify me when new comments are added” checkbox and now
each time a comment is added I get three e-mails with the same comment.
Is there any way you can remove people from that service?
Cheers!
Good day! I could have sworn I’ve been to this site before but after looking at a few of
the posts I realized it’s new to me. Regardless,
I’m definitely pleased I discovered it and I’ll be book-marking it and checking back regularly!
This is very interesting, You are a very skilled blogger.
I’ve joined your feed and look forward to seeking
more of your magnificent post. Also, I have shared your web site in my social networks!
whoah this weblog is fantastic i really like studying your posts.
Keep up the good work! You know, lots of individuals are searching round for
this info, you can help them greatly.
Hello Dear, are you genuinely visiting this web site regularly, if so after that you will definitely obtain pleasant know-how.
Hi to all, as I am in fact keen of reading this web site’s post to be
updated regularly. It carries fastidious data.
I get pleasure from, result in I discovered just what I was looking for.
You have ended my four day lengthy hunt! God Bless you man. Have a nice day.
Bye
Good day! This is kind of off topic but I need
some help from an established blog. Is it very hard to set up your own blog?
I’m not very techincal but I can figure things out pretty
quick. I’m thinking about setting up my own but I’m not sure
where to begin. Do you have any points or suggestions?
Appreciate it
Keep this going please, great job!
I used to be able to find good information from your articles.
Woah! I’m really digging the template/theme of this site.
It’s simple, yet effective. A lot of times it’s very difficult to get that
“perfect balance” between user friendliness and appearance.
I must say you’ve done a excellent job with this. In addition, the blog
loads super quick for me on Internet explorer.
Excellent Blog!
You really make it seem so easy with your presentation but I find this topic to be really something that
I think I would never understand. It seems too complicated and very broad
for me. I’m looking forward for your next post,
I will try to get the hang of it!
Pretty great post. I simply stumbled upon your weblog and wanted to say that I have truly enjoyed browsing
your weblog posts. In any case I will be subscribing for your feed and I hope
you write again very soon!
My developer is trying to persuade me to move to .net from PHP.
I have always disliked the idea because of the expenses.
But he’s tryiong none the less. I’ve been using WordPress
on numerous websites for about a year and am concerned about switching to another platform.
I have heard great things about blogengine.net.
Is there a way I can transfer all my wordpress
posts into it? Any help would be really appreciated!
If you would like to obtain a great deal from this article
then you have to apply such strategies to your won webpage.
Hello, i think that i saw you visited my site thus i came to “return the favor”.I am attempting to find things to enhance my site!I suppose its ok to use some
of your ideas!!
Wow, I never knew creating a token could be that easy! No coding needed sounds amazing for people like me who aren’t tech-savvy. Thanks for sharing this step-by-step guide for Base Network!
Hello there! Quick question that’s completely off topic.
Do you know how to make your site mobile friendly? My web site looks
weird when viewing from my iphone. I’m trying to find a theme or plugin that might be able to correct this issue.
If you have any suggestions, please share. Thanks!
What’s up Dear, are you really visiting this site daily, if so afterward you will absolutely take pleasant experience.
Nice weblog here! Additionally your website rather a lot up fast!
What web host are you using? Can I am getting your associate hyperlink
to your host? I desire my website loaded up as fast
as yours lol
I’m more than happy to discover this website. I wanted to thank you for your time due to this fantastic read!!
I definitely loved every part of it and I have you saved to fav to look
at new things on your site.
hello!,I really like your writing so much! percentage we communicate more approximately your post on AOL?
I require a specialist in this house to solve my problem.
May be that’s you! Looking ahead to see you.
What’s up, this weekend is nice in support of me, because this point in time i am reading this impressive educational post
here at my residence.
Simply desire to say your article is as surprising. The clearness to your publish is simply great and i could assume you’re knowledgeable on this subject.
Fine together with your permission let me to snatch your RSS feed to stay up to date with drawing close
post. Thanks one million and please carry on the
enjoyable work.
You’ve made some really good points there.
I looked on the web for more information about the issue and found most people
will go along with your views on this web site.
These are in fact great ideas in concerning blogging. You have touched some fastidious factors here.
Any way keep up wrinting.
You ought to be a part of a contest for one of the most
useful blogs on the internet. I will recommend this blog!
Wonderful site. Plenty of helpful info here. I’m sending it to a few pals ans additionally sharing in delicious.
And naturally, thanks in your sweat!
I visited many web pages but the audio feature for audio songs current at this web page is truly marvelous.
I couldn’t refrain from commenting. Very well written!
Do you mind if I quote a few of your posts as long as I
provide credit and sources back to your blog? My blog site is
in the very same area of interest as yours and
my visitors would truly benefit from a lot of the information you provide here.
Please let me know if this alright with you. Thanks a lot!
I couldn’t refrain from commenting. Very well written!
Great post.
Link exchange is nothing else but it is only placing the other person’s website link on your
page at proper place and other person will also do same in support of you.
My spouse and I stumbled over here by a different page
and thought I might check things out. I like what I see so i
am just following you. Look forward to going
over your web page for a second time.
hi!,I like your writing so so much! percentage we keep in touch more approximately your
article on AOL? I need an expert on this space to resolve my problem.
May be that’s you! Taking a look forward to peer you.
I always used to study post in news papers but now as I am a user of web so from now I am using net for content, thanks to
web.
I pay a quick visit day-to-day some blogs and websites to read posts, except this
webpage provides feature based articles.
Thanks for finally writing about > How to Create a Token on Base Network in 5
Minutes — No Coding Required (2025) – Token Peddler Blogs < Loved it!
Hello there! Would you mind if I share your blog with my myspace group?
There’s a lot of people that I think would really appreciate your content.
Please let me know. Thank you
I have read so many articles or reviews concerning the blogger lovers except this piece of writing is really a nice
piece of writing, keep it up.
I need to to thank you for this fantastic read!! I certainly enjoyed every bit of it.
I have got you saved as a favorite to check out new stuff you post…
Undeniably consider that which you stated. Your favorite reason seemed to be on the net the easiest factor to understand of.
I say to you, I certainly get irked at the same time as other people
think about worries that they just do not know about.
You controlled to hit the nail upon the highest as well as defined out the entire thing without having side effect , folks could take a signal.
Will likely be back to get more. Thanks
Whoa! This blog looks exactly like my old one! It’s
on a totally different topic but it has pretty much the same layout
and design. Excellent choice of colors!
Howdy! Do you know if they make any plugins to assist with SEO?
I’m trying to get my blog to rank for some targeted keywords but I’m not seeing very good
gains. If you know of any please share. Many thanks!
Aw, this was a really good post. Taking the time and actual effort to produce a very
good article… but what can I say… I procrastinate a whole
lot and never manage to get nearly anything done.
When some one searches for his necessary thing, therefore he/she wants to be available that in detail, therefore that thing is maintained
over here.
Wonderful work! That is the type of info that are meant to be
shared around the internet. Shame on Google for not positioning this submit higher!
Come on over and talk over with my site . Thank you =)
Hi, I want to subscribe for this web site to take newest
updates, so where can i do it please assist.
Greetings! I know this is somewhat off topic but I was wondering if you knew where I could locate a captcha
plugin for my comment form? I’m using the same
blog platform as yours and I’m having problems finding one?
Thanks a lot!
I pay a quick visit day-to-day some blogs and
blogs to read posts, except this blog offers feature based content.
hey there and thank you for your information – I’ve certainly picked up something new
from right here. I did however expertise several technical issues using this website, since I experienced to
reload the website lots of times previous to I could get
it to load correctly. I had been wondering if your web host is
OK? Not that I am complaining, but slow loading instances times will very frequently affect your placement in google and can damage your high-quality score if advertising and marketing with Adwords.
Anyway I am adding this RSS to my e-mail and could look out for a lot more
of your respective fascinating content. Ensure that you update this again soon.
Howdy are using WordPress for your blog platform?
I’m new to the blog world but I’m trying to
get started and create my own. Do you require any
html coding knowledge to make your own blog? Any help would be greatly appreciated!
What’s up, just wanted to mention, I loved this
blog post. It was practical. Keep on posting!
Greetings from Los angeles! I’m bored to tears at work so
I decided to browse your site on my iphone during lunch break.
I enjoy the info you provide here and can’t wait
to take a look when I get home. I’m shocked at how
fast your blog loaded on my mobile .. I’m not even using WIFI, just
3G .. Anyways, excellent blog!
Checklist section is the keeper part. Checklist copy: SurviveMin.
solana online casino https://sol-onlinecasino.de/
Great article! If you enjoy extraction shooters, check out the SAND Raiders of Sophie beginner guide – it has trampler builds, server status, and beginner tips!
888starz demo https://888-uz4.com/
solana casino liste https://sol-kryptocasino.de/
Erlebe jetzt aufregende Gewinne im solana casino flip gg und sichere dir exklusive Boni.
Spieler schatzen die schnellen Transaktionen und niedrigen Gebuhren, die Solana bietet.
888starz link https://888-uz5.com/
solana casino vergleich https://sol-casino-liste.de/
Hello, I enjoy reading through your article post.
I like to write a little comment to support
you.
Fabulous, what a web site it is! This weblog presents helpful facts to us,
keep it up.
I’m not sure where you are getting your info, but great topic.
I needs to spend some time learning more or understanding more.
Thanks for excellent info I was looking for this
information for my mission.
This piece of writing is genuinely a good one it assists new
net visitors, who are wishing in favor of blogging.
I’d like to find out more? I’d love to find out some additional information.
Hey there! I just wanted to ask if you ever have any issues with hackers?
My last blog (wordpress) was hacked and I ended up losing many months of hard work due to no backup.
Do you have any methods to stop hackers?
I enjoy looking through a post that will make people think.
Also, thanks for allowing me to comment!
Hello, all the time i used to check webpage posts here in the early hours in the dawn, as i enjoy to learn more and more.
What’s up, I wish for to subscribe for this web site to take most up-to-date updates,
thus where can i do it please help.
Every weekend i used to pay a quick visit this site, for
the reason that i want enjoyment, as this this web site conations
truly pleasant funny information too.
It’s remarkable for me to have a web site, which is beneficial in support of my experience.
thanks admin
Thanks to my father who shared with me on the topic of this weblog,
this weblog is genuinely awesome.
I’ve been exploring for a little bit for any high quality articles or weblog posts on this sort of area .
Exploring in Yahoo I eventually stumbled upon this site.
Studying this information So i am happy to exhibit that I
have an incredibly just right uncanny feeling I came upon exactly what
I needed. I so much indisputably will make certain to
do not omit this site and provides it a glance on a continuing basis.
It’s awesome designed for me to have a web site, which is beneficial designed for my
knowledge. thanks admin
Valuable info. Lucky me I found your website by accident, and I’m surprised why this
coincidence did not came about in advance! I bookmarked it.
Hi there, I discovered your web site via Google whilst looking for a similar topic, your website got here up,
it appears to be like good. I’ve bookmarked it in my google bookmarks.
Hello there, simply turned into aware of your weblog through Google, and found that it’s truly informative.
I am going to be careful for brussels. I’ll appreciate when you
proceed this in future. Lots of other people shall be benefited from your
writing. Cheers!
This is such a cool guide! Making tokens without coding is wild. It reminds me of how toon tone makes color guessing fun and easy without any hassle.
You’re so awesome! I don’t suppose I have read through
something like this before. So great to find another person with
original thoughts on this topic. Seriously.. thank you for starting this
up. This web site is one thing that is required on the web, someone
with a bit of originality!
Wow, I never knew creating a token could be so easy! By the way, if you’re feeling smart after reading this, you should test your iq to see how you stack up.
Wow, creating a token without coding is amazing! I remember when I tried to make one and got stuck. But now I’m hooked on broken blade roblox for adventure games.
Why people still make use of to read news papers when in this technological world everything is
available on net?
Hello There. I discovered your blog using msn. This is a really smartly written article.
I will make sure to bookmark it and return to read more of your
helpful info. Thank you for the post. I will certainly comeback.
Hi there, this weekend is nice for me, since this point in time i am reading this enormous educational piece of writing here at my residence.
This design is steller! You obviously know how to keep a reader entertained.
Between your wit and your videos, I was almost moved to start my own blog (well, almost…HaHa!) Great job.
I really loved what you had to say, and more than that,
how you presented it. Too cool!
Appreciate the recommendation. Let me try it out.
I do consider all of the ideas you’ve presented for your post.
They’re really convincing and will certainly work. Still, the posts are too brief
for newbies. Could you please prolong them a little from next time?
Thanks for the post.
You need to be a part of a contest for one of the finest
websites on the internet. I will highly recommend this blog!
I’m curious to find out what blog system you’re using?
I’m having some small security issues with my latest website and I’d like to find something more safe.
Do you have any solutions?
Howdy, There’s no doubt that your blog may be having browser compatibility
problems. Whenever I take a look at your website in Safari, it
looks fine however, if opening in IE, it has some overlapping issues.
I simply wanted to provide you with a quick heads up! Besides that, fantastic blog!
Hey there! I’ve been following your weblog for a while now and finally got
the courage to go ahead and give you a shout out from Kingwood Texas!
Just wanted to tell you keep up the fantastic job!
Thanks for your personal marvelous posting! I really enjoyed reading it, you will be a great
author.I will make sure to bookmark your blog and will eventually come back someday.
I want to encourage you continue your great posts,
have a nice morning!
Spot on with this write-up, I honestly believe that this web site needs far more attention.
I’ll probably be back again to see more, thanks for the info!
Hi! I’ve been following your site for a while
now and finally got the courage to go ahead and give you a shout
out from Humble Tx! Just wanted to say keep up the fantastic job!
Your mode of telling all in this piece of writing is in fact nice, all be capable of simply understand it,
Thanks a lot.
Wow, this makes token creation so easy! I love how no coding is needed. By the way, I just tried out an online font generator to make my token logo pop—super fun and free!
Heya i’m for the primary time here. I came across
this board and I to find It really useful & it helped me out
a lot. I am hoping to offer one thing again and help others such as you aided me.
888starz casino
التسجيل في 888starz eg سريع وبسيط ويتيح الوصول إلى عروض ترحيبية جذابة.
القسم الثاني:
تغطي 888starz eg مجموعة واسعة من الرياضات بما في ذلك كرة القدم وكرة السلة والرياضات الإلكترونية.
القسم الثالث:
تحتوي المنصة على مجموعة كبيرة من ألعاب الكازينو الحية مع موزعين مباشرون.
القسم الرابع:
تهتم 888starz eg بأمان المستخدم وحماية بياناته من خلال تقنيات تشفير متقدمة.
What a material of un-ambiguity and preserveness of precious
knowledge about unpredicted emotions.
عزيزتي، يمكنك زيارة ستار 888 للمراهنات للاستفادة من عروض ومراهنات حصرية.
تعمل 888starz على تطوير تجربة المستخدم من خلال واجهة بسيطة وخيارات متقدمة.
القسم الثاني:
تتيح 888starz فرصاً للمراهنات الرياضية وتنظيم بطولات حية للمستخدمين.
القسم الثالث:
تتنوع العروض بين مكافآت للترحيب وبونصات إيداع وبرامج استرداد ونشاطات موسمية.
القسم الرابع:
تُركز رؤية المنصة على تقديم تجربة ترفيهية آمنة ومسؤولة مع لمسة ابتكار مستمرة.
888starz ????? ???? ????? ????? ???????? ????? ?? ???.
???? ?????? ?????????? ?????? ????? ???? ??? ????? ??? ??????? ?????? ???????.
I have been browsing online more than three hours as of late,
but I never discovered any fascinating article like yours.
It’s beautiful worth sufficient for me. Personally, if all webmasters and bloggers made
just right content as you did, the internet will probably be much more
helpful than ever before.
fantastic put up, very informative. I wonder why
the other experts of this sector don’t notice this. You should continue
your writing. I am sure, you have a great readers’ base already!
Hello! This is kind of off topic but I need some guidance from an established blog.
Is it hard to set up your own blog? I’m not very techincal but I can figure things out pretty quick.
I’m thinking about creating my own but I’m not sure where to start.
Do you have any ideas or suggestions? Many thanks
starz888 https://farhanproduct.com/2026/02/18/888starz-%d9%85%d8%b5%d8%b1-%d9%85%d9%88%d9%82%d8%b9-%d8%a7%d9%84%d9%85%d8%b1%d8%a7%d9%87%d9%86%d8%a7%d8%aa-%d8%a7%d9%84%d8%b1%d9%8a%d8%a7%d8%b6%d9%8a%d8%a9-%d9%88%d8%a7%d9%84%d9%83%d8%a7%d8%b2%d9%8a/
تمثل الصفحة الرئيسية لموقع 888starz مصر منصة شاملة تضم المراهنات الرياضية وألعاب الكازينو معًا.
تتوفر احتمالات قوية على معظم البطولات مما يزيد من قيمة الرهانات.
تظهر العناوين الرائجة والألعاب الحديثة بشكل بارز على الواجهة الرئيسية.
يتيح الموقع للاعبين المصريين الجدد بونصات ترحيبية متنوعة على الإيداعات الأولى.
زوروا 88starz للمزيد من المعلومات والعروض الخاصة.
يُعد 888starz egypt من الأسماء المعروفة في ساحة الترفيه على الإنترنت.
تقدم المنصة مجموعة متنوعة من الألعاب والخدمات المصممة لتلبية احتياجات اللاعبين. توفر المنصة باقة واسعة من الألعاب وخيارات الترفيه التي تناسب مختلف الأذواق.
تتميز الواجهة بسهولة الاستخدام وسرعة الاستجابة. تشتهر واجهة الموقع ببساطتها وسلاسة التنقل بين الأقسام.
القسم الثاني:
تتضمن عروض 888starz egypt مكافآت ترحيبية للمشتركين الجدد. تتضمن عروض 888starz egypt مكافآت ترحيبية للمشتركين الجدد.
كما توجد حملات ترويجية مستمرة لزيادة التفاعل مع اللاعبين. كما توجد حملات ترويجية مستمرة لزيادة التفاعل مع اللاعبين.
تتنوع الجوائز بين رصيد مجاني ودورات لعب ومزايا خاصة. تتنوع الجوائز بين رصيد مجاني ودورات لعب ومزايا خاصة.
القسم الثالث:
يعتمد محتوى 888starz egypt على مجموعة من المزودين العالميين للألعاب. يعتمد محتوى 888starz egypt على مجموعة من المزودين العالميين للألعاب.
هذا يضمن تنوعاً وجودة في الخيارات المتاحة للمستخدمين. ويؤدي ذلك إلى توفير مجموعة متنوعة وجودة متميزة في الألعاب المقدمة.
كما تلتزم المنصة بتحديث محتواها بانتظام لمواكبة التطورات. وتعمل 888starz egypt على تحديث مكتبتها باستمرار لمتابعة الجديد.
القسم الرابع:
تولي 888starz egypt أهمية لأمان المعاملات وحماية البيانات الشخصية. تضع المنصة حماية البيانات وأمن المعاملات في مقدمة أولوياتها.
تستخدم تقنيات تشفير وحلول دفع آمنة لتقليل المخاطر. تستخدم تقنيات تشفير وحلول دفع آمنة لتقليل المخاطر.
يمكن للمستخدمين التواصل مع دعم فني متوفر لمعالجة أي قضايا بسرعة. كما يتوفر فريق دعم فني للتعامل السريع مع استفسارات ومشاكل المستخدمين.
تمثل الواجهة الرئيسية للموقع الرسمي 888starz مركزًا موحدًا يضم المراهنات الرياضية والكازينو معًا.
تُعرض الاحتمالات القوية في مقدمة الصفحة الرئيسية لتمنح اللاعب رؤية واضحة.
888 ستارز https://888starz-eg-africa.com/
تظهر الإضافات الجديدة من ألعاب الكازينو في مقدمة الصفحة الرئيسية أولًا بأول.
تتيح الصفحة الرئيسية الوصول المباشر إلى الدعم الفني ووسائل الدفع المتنوعة بسهولة.
???? ?????? ????? ?????? ?????? ??????? ??? ???? ?????? ?????? ?? ?? ???.
????? ?????? ??????? ????? ???????? ?? ???? ???? ????? ???????.
لعبة قمار https://888starseg.com/
???? ??????? ???????? ???????? ???????? ????????? ??????? ??? ??????.
???? ?????? ?????? ?? 888starz ????? ????? ?????? ??? ???? ?????? ?????? ???????.
Thanks for the marvelous posting! I seriously enjoyed reading it, you can be a great author.I will remember to bookmark your blog and will
come back at some point. I want to encourage yourself to continue your great posts, have
a nice holiday weekend!
Write more, thats all I have to say. Literally,
it seems as though you relied on the video to make your point.
You clearly know what youre talking about, why throw away
your intelligence on just posting videos to your site when you could be giving us something enlightening to read?
I think this is among the most important info for me.
And i’m glad reading your article. But should
remark on some general things, The website style is perfect,
the articles is really great : D. Good job, cheers
I every time used to study piece of writing in news papers but now as I am a
user of internet thus from now I am using net for content,
thanks to web.
When someone writes an piece of writing he/she maintains
the idea of a user in his/her brain that how a user can know
it. Thus that’s why this paragraph is outstdanding. Thanks!
wonderful points altogether, you just gained a brand new reader.
What could you recommend about your post that you made some days in the
past? Any positive?
Excellent goods from you, man. I have understand
your stuff previous to and you’re just extremely wonderful.
I really like what you have acquired here, really like
what you are stating and the way in which you say it.
You make it entertaining and you still take care of to keep it sensible.
I cant wait to read much more from you. This is actually a tremendous web site.
These are actually fantastic ideas in on the topic of blogging.
You have touched some pleasant points here.
Any way keep up wrinting.
Hello mates, nice post and fastidious urging commented at this place,
I am actually enjoying by these.
Hello there! This article could not be written any better!
Reading through this post reminds me of my previous
roommate! He constantly kept preaching about this. I’ll forward this post to him.
Pretty sure he’s going to have a great read. Thank you for sharing!
You’re so interesting! I do not believe I’ve truly read through anything like that before.
So nice to discover another person with a few original thoughts on this issue.
Really.. thank you for starting this up. This site is one thing that is required on the web, someone with a little originality!
What’s up to every one, because I am truly eager of reading this web site’s post to be updated on a regular basis.
It consists of good information.
Great post. I was checking continuously this weblog and
I am impressed! Very useful info specially
the closing phase 🙂 I take care of such information a lot.
I was looking for this certain information for a very long time.
Thank you and good luck.
I was able to find good info from your blog articles.
Hello, i think that i saw you visited my website so i came to
“return the favor”.I am attempting to find things to enhance my website!I
suppose its ok to use some of your ideas!!
Ahaa, its pleasant dialogue concerning this article at this place at this web site,
I have read all that, so at this time me also commenting here.
Wow that was odd. I just wrote an incredibly long comment but after I clicked submit
my comment didn’t show up. Grrrr… well I’m not writing
all that over again. Regardless, just wanted to say fantastic blog!
I was curious if you ever thought of changing the page layout of your blog?
Its very well written; I love what youve
got to say. But maybe you could a little more in the way of content so people could
connect with it better. Youve got an awful lot of
text for only having 1 or two pictures. Maybe you could
space it out better?
After looking into a handful of the blog posts on your web page, I seriously appreciate your technique of
writing a blog. I book-marked it to my bookmark website list and will be
checking back soon. Please visit my website too and tell me how you feel.
Remarkable things here. I am very glad to peer your article.
Thanks so much and I am taking a look ahead to contact you.
Will you please drop me a mail?
You really make it appear so easy along with your presentation however I to
find this matter to be actually one thing which I feel
I would never understand. It kind of feels too complicated and extremely vast for
me. I’m taking a look ahead for your subsequent post,
I’ll try to get the hang of it!
I love reading a post that can make men and women think.
Also, thanks for permitting me to comment!
Section others hand-wave is solid here. Expanded topic: Anime Astral Wiki.
It’s great that you are getting thoughts from this post as well as from our dialogue made at this time.
Right here is the right web site for everyone
who wants to find out about this topic. You
understand a whole lot its almost hard to argue with you
(not that I really would want to…HaHa). You certainly put a fresh spin on a topic which has been discussed for a long time.
Excellent stuff, just great!
Wonderful, what a web site it is! This weblog presents helpful data to us, keep it up.
Fantastic blog! Do you have any tips for aspiring writers?
I’m hoping to start my own blog soon but I’m a little lost on everything.
Would you suggest starting with a free platform like
Wordpress or go for a paid option? There are so many choices out
there that I’m completely overwhelmed .. Any recommendations?
Thanks a lot!
Howdy! I could have sworn I’ve been to this blog before but after reading through some of the post I realized it’s new to
me. Anyways, I’m definitely delighted I found it and I’ll be bookmarking and checking back frequently!
Excellent write-up. I certainly appreciate this website.
Stick with it!
Appreciate this post. Will try it out.
يخضع 888starz لمعايير صارمة تضمن شفافية اللعب وحماية المعلومات الشخصية.
888starz الموقع الرسمي https://stoerig-it.de/index.php?title=user:sanorasamuels89
تظهر الألعاب الجديدة والأكثر شعبية في مقدمة واجهة الكازينو باستمرار.
يبرز 888starz أهم المباريات وخيارات المراهنة في مقدمة قسم الرياضة.
يحصل اللاعبون الجدد على باقة ترحيبية سخية تشمل مكافأة إيداع ولفات مجانية.
يتيح تطبيق 888starz للهواتف المراهنة واللعب في أي وقت ومن أي مكان بسهولة.
يتيح الموقع التنقل السلس بين قسم الكازينو وقسم الرياضة بنقرة واحدة دون تعقيد.
يوفر الموقع أكثر من ثلاثمائة طاولة مباشرة للعب مع موزعين حقيقيين طوال اليوم.
يتيح 888starz الرهان على ما يزيد عن 50 نوعًا رياضيًا تغطي أبرز الأحداث العالمية.
يحصل المستخدمون الجدد على مكافأة ترحيب حتى 1500 يورو إضافة إلى 150 فري سبين.
يدعم 888starz طرق دفع متعددة تشمل البطاقات البنكية والمحافظ الإلكترونية وأكثر من 30 عملة رقمية.
starz888 https://koows.com/@zayaaros_ob4hc/starz888
Un conduttore reale guida ogni partita in diretta streaming creando un’esperienza coinvolgente.
crazytime stats https://wiki.educom.nu/index.php?title=gebruiker:thelmafsl3272414
I quattro bonus sono Cash Hunt, Pachinko, Coin Flip e il celebre Crazy Time.
Si scommette posizionando le puntate sui numeri o sui settori bonus prima di ogni giro.
Conviene conoscere le regole e i moltiplicatori dei round prima di puntare.
يعمل 888starz وفق ترخيص رسمي يكفل الأمان والنزاهة لكل المستخدمين.
تظهر ماكينات السلوت الرائجة والإصدارات الجديدة بشكل بارز على الموقع الرسمي.
يغطي قسم الرهان الرياضي في الموقع الرسمي 888starz أكثر من 50 نوعًا رياضيًا من مختلف أنحاء العالم.
888starz.com https://egypt888stars.com/
يقدم الموقع الرسمي مكافآت دورية مثل كاش باك 50% وعروض تأمين متنوعة.
يمكن التسجيل في الموقع الرسمي عبر الهاتف أو البريد الإلكتروني أو بنقرة واحدة خلال دقائق.
This is super helpful, I’ve been wanting to try creating a token without all the hassle. By the way, I recently found a broken blade roblox guide that helped me a ton in the game, just like this simplifies token creation!
Foydalanuvchilar bir bosish bilan kazino va sport bo’limlari o’rtasida o’tishlari mumkin.
888 straz https://888-uz9.com/
Ilova tez ishlaydi va telefon ekranlari uchun moslashtirilgan qulay interfeysga ega.
Hisobni to’ldirish atigi bir necha daqiqada va kichik summadan boshlab mumkin.
Mas’uliyatli o’yin tamoyillariga rioya qilish va byudjet belgilash tavsiya etiladi.
Sayt rasmiy litsenziya asosida ishlaydi va foydalanuvchilar ma’lumotlarini himoya qiladi.
888starz kazino bo’limida yetakchi provayderlarning minglab o’yinlari mavjud.
stars 888 https://888-uz8.com/
Tikishlar O’zbekiston Superligasi va yirik xalqaro chempionatlarni qamrab oladi.
Yangi o’yinchilar uchun 888starz birinchi depozitga ulkan xush kelibsiz bonusini taqdim etadi.
888starz to’lovning ko’plab usullarini, jumladan bank kartalari va elektron hamyonlarni qo’llab-quvvatlaydi.
تحميل 888starz تحميل 888starz.
??? ????? 888starz ???????? ?????? ??? ????? ??????? ?????? ?? ????? ??????.
????? ????? ????? apk ???? ??? ???? ????? ??????? ?????? ?????.
???? ??????? ?????? ??? ??? ??????? ??? ?????????? ???????? ??? ?????.
????? ?????? ?????? ??? apk ?? ?????? ?????? ????? ????? ???????? ?? ??? ??????.
???? 888starz ????? iOS ?????? ??????? ??????? ?? ????? ??????? ??????.
Thank you, A lot of knowledge!
Amazing material Many thanks!
Hi there, every time i used to check blog posts here in the early hours in the morning,
as i love to gain knowledge of more and more.
Hi i am kavin, its my first time to commenting anywhere, when i read this piece
of writing i thought i could also make comment due to this sensible post.
Very nice article, exactly what I wanted to find.
This is super helpful! I never knew token creation could be so easy. By the way, if you’re looking for cool names for your project, check out the fantasy name generator for some awesome ideas.
Nicely put, Thanks a lot.
Hello there! I know this is somewhat off topic but
I was wondering which blog platform are you using for this
site? I’m getting fed up of WordPress because I’ve had problems with hackers and I’m looking at options for another platform.
I would be awesome if you could point me in the direction of a
good platform.
Операции с финансами на платформе выполняются в рамках установленных процедур и временных рамок.
88star https://888-uz10.com
888starz — это современная онлайн-платформа, предлагающая развлекательные игры и свежие бонусы для новых и постоянных игроков.
888starz официальный сайт вход https://888starz-uzb4.com
888starz عربي هي منصة مراهنات عبر الإنترنت تقدم ألعاب كازينو وخيارات رهان متنوعة للمستخدمين العرب.
تُعتبر 888starz منصة متكاملة تقدم مجموعة واسعة من الألعاب.
القسم الثاني:
تضم 888starz مكتبة ألعاب متنوعة تشمل السلاسل الكلاسيكية والجديدة.
القسم الثالث:
تُطبق 888starz إجراءات حماية متقدمة لحماية بيانات المستخدمين والمعاملات.
القسم الرابع:
تمنح 888starz مزايا ترويجية تشجع الولاء وتعزز التجربة الترفيهية.
8888starz هو موقع للمراهنات والألعاب الإلكترونية يقدم خدمات تسجيل الدخول والدعم بلغات متعددة.
تجذب 888starz اهتمام اللاعبين عبر تنوع الألعاب والعروض المتاحة.
القسم الثاني:
توفر الألعاب المتنوعة فرصًا للترفيه لكل فئات اللاعبين.
القسم الثالث:
توفر 888starz عروضًا ترويجية ومكافآت للمستخدمين الجدد والمستمرين.
القسم الرابع:
ينبغي على اللاعبين إدارة مخاطرهم وتحديد حدود للعب داخل 888starz.
processing 888starz bet
تُبرز مراجعات المستخدمين نقاط القوة والفرص التي تسعى المنصة لتطويرها.
Публичные правила и политика конфиденциальности делают работу сервиса понятной и открытой для пользователей.
starz 888 casino https://888starz-uzb6.com
ستار 888 للمراهنات
تُعرف 888starz بتقديم مجموعة واسعة من الألعاب والخدمات المصممة لراحة اللاعبين وتلبية احتياجاتهم.
القسم الثاني:
تعمل المنصة على إضافة إصدارات جديدة وباقات ترويجية تجذب لاعبين جدد وتحافظ على اهتمام الموجودين.
القسم الثالث:
تمنح المنصة عشّاق الرياضة إمكانيات مراهنة مباشرة قبل المباريات وخلالها مع تحديثات حية للنتائج.
القسم الرابع:
تتوفر في المنصة طرق دفع متعددة تلبي احتياجات المستخدمين في مناطق مختلفة.
Amazing tips Many thanks.
This is super helpful! I’ve been wanting to try creating a token but thought it was too hard. By the way, have you checked out the meccha chameleon game? The wiki makes it so easy to learn the hiding spots and paint tips, just like this guide makes token creation simple!
جرب الحظ الآن على 888staz للفوز بجوائز مثيرة ومباشرة.
888starz هو موقع ترفيهي يقدم مجموعة واسعة من الألعاب والخدمات.
الفقرة الثانية:
يوفر الفريق المختص دعمًا متواصلًا لمساعدة الأعضاء وحل المشاكل بكفاءة.
I’ll right away grasp your rss as I can’t in finding your e-mail subscription link or e-newsletter service.
Do you’ve any? Kindly let me understand so that I may just subscribe.
Thanks.
يقدم الموقع الرسمي لـ 888starz في مصر تجربة شاملة تجمع بين ألعاب الكازينو والرهان الرياضي.
يحتوي الموقع الرسمي على ما يزيد عن خمسة آلاف لعبة كازينو وسلوت من مطورين موثوقين.
888starz https://free-credits-report.com/
يتيح الموقع الرسمي الرهان على ما يزيد عن 50 نوعًا رياضيًا تغطي أبرز الأحداث العالمية.
يمنح الموقع الرسمي 888starz اللاعبين الجدد في مصر باقة ترحيبية تصل إلى 1500 يورو مع 150 لفة مجانية.
يدعم الموقع الرسمي 888starz طرق دفع متعددة تشمل البطاقات البنكية والمحافظ الإلكترونية مثل Skrill و Neteller.
يتسم ملف apk بخفّة الحجم مما يجعله مناسبًا لمختلف أجهزة أندرويد.
888starz تحميل https://theracingbicycle.com/
لتثبيت ملف apk على أندرويد يجب أولًا تفعيل خيار السماح بالتثبيت من مصادر غير معروفة.
يحصل التطبيق على تحديثات منتظمة تحافظ على استقراره وأمانه على أندرويد.
ينبغي مراجعة الأذونات التي يطلبها التطبيق قبل إتمام عملية التثبيت.
لا يتطلب تثبيت التطبيق على الآيفون سوى خطوات بسيطة وسريعة.
يجمع 888starz في مصر بين عالم الكازينو والمراهنات الرياضية ضمن منصة واحدة متكاملة.
يجد اللاعب في 888starz جاكبوتات متنامية وألعابًا مبتكرة تُحدَّث بشكل منتظم.
يفتح 888starz خطوط مراهنة على عشرات الرياضات العالمية والمحلية على مدار الموسم.
يستقبل 888starz اللاعبين الجدد في مصر بحزمة ترحيب سخية تصل قيمتها إلى 1500 دولار مع لفات مجانية.
تتم عمليات السحب بسرعة مع معالجة المحافظ الإلكترونية خلال دقائق في الغالب.
888starz 888starz.
888starz تحميل https://trurofoodfestival.com/
يتميز التطبيق بحجم خفيف ومتطلبات بسيطة تناسب حتى الهواتف الاقتصادية.
ينتهي كل شيء سريعًا ليتمكن اللاعب من تسجيل الدخول والبدء فورًا.
يتيح التطبيق إشعارات فورية بالعروض ونتائج المباريات مباشرة على الهاتف.
يحمي 888starz حساب اللاعب بطبقات أمان تشمل التحقق والتشفير.
يتميز تطبيق الآيفون بأداء سلس وتصميم متوافق تمامًا مع نظام iOS.
Generic title, sharp content inside. Sharper follow-up: My Dino park! Roblox Wiki.
يقدم الموقع الرسمي لـ 888starz في مصر تجربة شاملة تجمع بين ألعاب الكازينو والرهان الرياضي.
تُعرض أحدث ألعاب السلوت والعناوين الأكثر شعبية في مقدمة صفحة الكازينو.
تشمل المراهنات أهم الدوريات مثل البريميرليج والليجا الإسبانية وأبرز الدوريات المحلية.
888starz https://bbhscanners.com/
يبرز 888starz أحدث البونصات والعروض الترويجية المتاحة للاعبين في مصر.
يقدم الموقع الرسمي دعمًا متواصلًا طوال اليوم بالعربية والإنجليزية عبر قنوات تواصل متعددة.
888starz O’zbekiston uchun kazino o’yinlari va sport tikishlarini qamrab olgan to’liq funksional platformani ochadi.
888starz uz https://oerknal.org/888starz-platformasida-futbol-va-kazino-boyicha-stavkalar-qanday-qoyiladi/888starz
Rasmiy saytda Evolution, Spade Gaming, Smartsoft va Spinthon studiyalaridan keng slot to’plami jamlangan.
Rasmiy sayt jonli tikish va real vaqt statistikasi bilan yuqori koeffitsiyentlar taklif etadi.
Bundan tashqari saytda keshbek, bepul stavkalar va muntazam turnirlar doimiy ravishda o’tkaziladi.
888starz depozit va yechib olish uchun karta, hamyon va kripto kabi turli usullarni taklif etadi.
Rasmiy veb-sayt o’yinchilarga barcha xizmatlarga qulay kirishni ta’minlaydi.
888starz rasmiy saytining kazino bo’limida minglab slot va stol o’yinlari mavjud.
Rasmiy veb-sayt eng muhim sport tadbirlariga tikishni qo’llab-quvvatlaydi.
888starz uz https://archevore.com/888starz-royxatdan-otish-jarayoni-xush-kelibsiz-bonuslari/
Sayt o’zbek tilida ishlab, sodda tuzilishi bilan istalgan bo’limni tez topish imkonini beradi.
888starz slotlari Evolution, Rival, Smartsoft va Spinthon kabi provayderlar tomonidan ta’minlanadi.
888starz 888starz
Jonli rejimdagi tikishda koeffitsiyentlar o’yin ketishi bilan bir vaqtda yangilanadi.
Depozit paytida 888UZ777 promokodidan foydalanish eng katta bonusni ta’minlaydi.
Qo’llab-quvvatlash xizmati kun bo’yi bir nechta aloqa kanali orqali javob beradi.
This is amazing! Even a non-coder like me can create a token now. Speaking of testing abilities, you should test your iq if you’re curious about your brainpower.
Page-two search click that actually paid off. Curated list: Asylum Life Roblox Wiki.
Wow, I can’t believe how easy it is to create a token now! By the way, if you ever want to take a break from crypto, there’s a fun way to test your iq online. It’s pretty interesting!
This design is incredible! You obviously know how to keep a reader amused.
Between your wit and your videos, I was almost moved to start my
own blog (well, almost…HaHa!) Great job. I really enjoyed what you had to say, and more than that, how you presented
it. Too cool!
Superb information, With thanks.
Wow, this makes creating a token way easier than I thought! It reminds me of how simple yet fun cobb can move is to play. Totally different topics, but both show that complex things can be made simple.
Tradeoffs spelled out instead of one-size-fits-all claims. Option comparison: Gakuran Roblox Wiki.
Article writing is also a fun, if you be acquainted with then you can write otherwise it is difficult to write.
Great step-by-step guide! I used a similar platform to launch my token last week, and you can check this out for another quick no-code option that worked perfectly for me.
Savollarga javob olish va muammolarni hal qilishda yordam so’rash tavsiya etiladi.
888starz ios app 888starz ios app.
888starz’ning mobil moslashuvchanligi har bir foydalanuvchiga shaxsiy tajriba taqdim etadi.
Bonus va aksiyalar 888starz foydalanuvchilarni jalb qilishda muhim rol o’ynaydi. Maxsus turnirlar va haftalik takliflar faol foydalanuvchilarni rag’batlantirishga mo’ljallangan.
888старз вход https://888starz-uzb10.com/
O’yin tanlovi va provayderlar assortimenti 888starz-da keng. Demo rejim yordamida yangi o’yinlarni bepul o’rganish mumkin.
To’lovlar va mijozlarga xizmat ko’rsatish 888starz ning ustun tomonlaridan biridir. Tezkor va xavfsiz to’lov tizimlari o’yinchilar uchun qulaylik yaratadi.
يقدم الموقع تصميمًا عربيًا واضحًا وقائمة تدعم أكثر من خمسين لغة.
يعمل الكازينو الحي بأكثر من 250 طاولة بموزعين حقيقيين طوال أيام الأسبوع.
يمكن المراهنة على أحداث دولية من دوري الأبطال إلى المنافسات المصرية.
يمنح الكازينو اللاعبين الجدد مكافأة ترحيب حتى 1500 يورو مع 150 لفة مجانية.
تتنوع وسائل الدفع بين الفيات والعملات الرقمية بحد أدنى يبدأ من 2 يورو.
888 stars starz 888
Dastur telefon xotirasini kam sarflaydi va tez yuklanadi.
O’rnatishdan oldin sozlamalarda noma’lum manbalardan o’rnatishga ruxsat berish kerak.
Mobil dasturda kazino, 888Games va sport tikishlari to’liq mavjud.
888starz mobil dasturida ham xush kelibsiz paketi — 1500 evrogacha va 150 FS — amal qiladi.
Apple qurilmalari egalari 888starzni iOS orqali yoki brauzer PWA ko’rinishida ishlatishlari mumkin.
888starz yuklab olish https://6thavechurch.org/
يعمل الموقع بموجب ترخيص Curaçao الصادر لشركة Bittech B.V. مما يضمن نزاهة اللعب وحماية الأموال.
يوفر الكازينو الحي أكثر من 250 طاولة مع موزعين حقيقيين تعمل على مدار الساعة.
يتيح الموقع الرهان الحي مع متابعة النتائج والاحتمالات لحظة بلحظة.
أما قسم الرهان الرياضي فيقدم مكافأة ترحيب بنسبة 100% تصل إلى 100 يورو.
يوفر 888starz خيارات دفع تشمل Visa و Mastercard والمحافظ الرقمية وأكثر من 50 عملة رقمية مثل BTC و USDT.
888stars http://wikipeter.dk/wiki160316/index.php?title=Bruger:ZacLundstrom1
Sayt Curacao litsenziyasi asosida Bittech B.V. tomonidan yuritiladi, bu esa o’yin halolligi va mablag’ xavfsizligini kafolatlaydi.
Rasmiy saytda 4000+ slot muntazam yangilanib boruvchi katalogda mavjud.
Real vaqtdagi tikish yuqori koeffitsiyent va tezkor yangilanish bilan ishlaydi.
Sportga tikuvchilar uchun 100 evrogacha 100% xush kelibsiz bonusi mavjud.
24/7 qo’llab-quvvatlash jonli chat va email orqali ishlaydi, ilova esa Android va iOS uchun mavjud.
888starz kirish 888starz kirish.
صُممت الواجهة لتكون واضحة بالعربية وسهلة التنقل بين الأقسام.
تتجاوز مكتبة السلوت 4000 لعبة من أبرز مزودي الصناعة.
starz888 888 stars
يمتد قسم الرياضة إلى أكثر من 35 نوعًا من كرة القدم والتنس إلى الهوكي والإي سبورتس.
يقدم قسم الرياضة عرضًا ترحيبيًا بنسبة 100% حتى 100 يورو.
يوفر 888starz الدفع عبر Visa و Mastercard والكريبتو بما في ذلك BTC و USDT و ETH.
888starz 888 starz
يشتغل 888starz برخصة دولية من Curaçao عبر Bittech B.V. تحمي حساب اللاعب ومعاملاته.
يجد اللاعب عناوين 888Games الفريدة التي تميّز الموقع عن غيره.
يوفر الموقع رهانًا فوريًا وإحصاءات مباشرة للأحداث القائمة.
تصل باقة الترحيب في الكازينو إلى 1500 يورو إضافة إلى 150 فري سبين.
يقدم 888starz تسجيلًا سريعًا بخطوات بسيطة وحد إيداع منخفض.
تتوفر واجهة معرّبة سهلة ضمن دعم يفوق 50 لغة لتناسب لاعبي مصر.
تنفرد سلسلة 888Games بألعاب سريعة مثل Crash و Dice و Plinko و Lottery.
يشمل الرهان الرياضي أكثر من 35 نوعًا يمتد من كرة القدم والتنس إلى الهوكي و UFC.
تُضاف إلى ذلك عروض منتظمة من كاش باك ورهانات مجانية وبطولات دورية.
لا يستغرق إنشاء الحساب سوى دقائق معدودة عبر المنصة الرسمية.
starz 888 starz 888
Sayt xalqaro litsenziya ostida ishlaydi va har bir tranzaksiyada shaffoflikni saqlaydi.
Rasmiy platforma minglab slot o’yinini yetakchi studiyalardan taqdim etadi.
Sport bo’limi futbol, basketbol, kriket, UFC va kibersport kabi 30 dan ortiq yo’nalishni qamrab oladi.
Kazinoda yangi foydalanuvchini 1500€ gacha bonus hamda 150 bepul spin kutadi.
Minimal depozit past bo’lib, hisob ochish bir necha daqiqada amalga oshadi.
скачать 888 на андроид https://888starz-uzb7.com/apk/
Tab stays open until I implement for real. Prep notes: Ice Tycoon 2 Guide.
Hi everybody, here every person is sharing such know-how, so it’s good to read this website,
and I used to pay a quick visit this web site daily.
888starz sodda dizayn va o’zbekcha menyu bilan bo’limlar orasida qulay o’tishni ta’minlaydi.
скачать 888starz скачать 888starz
Eksklyuziv 888Games to’plami Crash, Plinko, Dice va Lottery kabi tezkor formatlarni jamlaydi.
Rasmiy saytda futboldan Dota 2 va CS:GO gacha keng sport liniyasi taqdim etiladi.
888starz kazino xush kelibsiz paketini 1500 evrogacha va 150 FS bilan taqdim etadi.
888starz karta va hamyonlardan tashqari BTC, USDT va ETH kabi kripto to’lovlarni qo’llaydi.
Sayt o’zbek tilida ishlaydi va umumiy interfeys 50 dan ortiq tilni qamrab oladi.
888starz to’rt mingdan ziyod slot o’yinini kengayib boruvchi katalogda taqdim etadi.
Real vaqt tikishi yuqori koeffitsiyent va tezkor yangilanish bilan ishlaydi.
Bundan tashqari saytda keshbek, freebet va slot turnirlari muntazam o’tkaziladi.
Ro’yxatdan o’tish tez va sodda — bir nechta qadamda yakunlanadi.
888 bet apk 888 bet apk
888 starz ios 888 starz ios
Platforma Curacao litsenziyasi ostida Bittech B.V. tomonidan yuritiladi va o’yin halolligini ta’minlaydi.
Kazino bo’limida eng yirik provayderlardan 4000 dan ortiq slot jamlangan.
Sayt xalqaro turnirlardan mahalliy musobaqalargacha keng tikish liniyalarini taqdim etadi.
Kazino uchun yangi o’yinchilar birinchi depozitga 1500€ gacha bonus va 150 bepul aylantirish oladi.
Saytda fiat va kripto to’lovlar past minimal depozit bilan mavjud, kirish summasi 2 evrodan boshlanadi.
888starz 888starz
يستمد 888starz مصداقيته من رخصة Curaçao الرسمية عبر Bittech B.V. التي تحمي أموال اللاعب وبياناته.
يمنح 888starz لاعبيه أكثر من 250 طاولة حية بموزعين حقيقيين في أي وقت.
يغطي 888starz أكثر من خمس وثلاثين رياضة بينها Dota 2 و CS:GO ضمن قسم الإي سبورتس.
وفي المقابل يحصل المراهن الرياضي على مكافأة 100% تصل إلى 100 يورو.
يوفر الموقع تسجيلًا سريعًا بخطوات بسيطة وحد إيداع منخفض.
888starz 888starz
صُممت المنصة بلغة عربية واضحة وتنقل بسيط يناسب لاعبي مصر.
تقدم سلسلة 888Games الحصرية ألعابًا فورية مثل Crash و Plinko و Dice و Lottery.
يمكن الرهان على أحداث من دوري الأبطال إلى مباريات مصر المحلية.
يمنح 888starz أول إيداع في الكازينو ما يصل إلى 1500 يورو و150 دورة مجانية.
يوفر 888starz الدفع عبر Visa و Mastercard و Skrill والكريبتو المتنوع بحد إيداع منخفض.
Wow, this makes creating a token so easy! I love how tech simplifies things. It reminds me of grow a garden 2, where complex farming mechanics are made fun and simple for Roblox players.
Good reminder that a clean board or reference page saves time. Anime Astral Simulator Trello helps for the same reason when people are tracking updates and priorities. https://animeastralsimulator.com/trello/
Il gioco si svolge con un conduttore in carne e ossa e streaming in tempo reale.
Prima di ogni giro la Top Slot abbina in modo casuale un moltiplicatore a un segmento della ruota.
I quattro giochi bonus sono Coin Flip, Cash Hunt, Pachinko e Crazy Time.
Il ritorno teorico al giocatore oscilla a seconda della puntata, con una media vicina al 95%.
La versione mobile permette di seguire lo show dal vivo ovunque ci si trovi.
crazytime crazytime
صُممت المنصة بلغة عربية بسيطة وتنقل سلس يلائم المستخدم في القاهرة.
يضم القسم آلاف ألعاب السلوت من استوديوهات موثوقة.
888 starz 888 starz
يمنح الرهان المباشر احتمالات محدّثة لحظيًا أثناء المباريات.
ينال لاعبو الرياضة بونص 100% يبلغ 100 يورو.
يوفر 888starz الدفع عبر Visa و Mastercard و Skrill والكريبتو بحد إيداع منخفض.
صُممت المنصة بلغة عربية بسيطة وتنقل سلس بين الأقسام.
888starz 888starz
يضم القسم آلاف ألعاب السلوت من استوديوهات موثوقة حول العالم.
يشمل الموقع أكثر من 35 فئة رياضية تتابع أبرز الأحداث العالمية والمحلية.
كما تتوفر عروض دورية من كاش باك ورهانات مجانية وبطولات.
يقدم 888starz تسجيلًا سريعًا بخطوات بسيطة وحد إيداع منخفض.
Dobre kasyno łączy szeroką ofertę automatów z uczciwymi zasadami i szybkimi wypłatami.
Podstawą wiarygodnego kasyna jest ważna licencja wydana przez uznany organ regulacyjny.
Kasyno na żywo pozwala grać z prawdziwymi krupierami w czasie rzeczywistym.
najlepsze kasyna online najlepsze kasyna online
Najlepsze kasyna kuszą bonusem powitalnym, często łączącym premię od depozytu z darmowymi spinami.
Obsługa klienta dostępna całą dobę to ważny element wysokiej jakości serwisu.
Will watch for your posts on nearby topics. Topic tracker: clean the library code.
W Mostbet darmowe spiny stanowią popularny bonus, dzięki któremu można grać na automatach za darmo.
Free spiny są często przyznawane partiami przez kolejne dni, a nie wszystkie naraz.
Darmowe obroty są przypisane do konkretnych slotów objętych promocją.
Poza pakietem powitalnym Mostbet oferuje darmowe spiny w cotygodniowych promocjach.
Aplikacja na Androida i iOS pozwala odbierać oraz wykorzystywać free spiny w dowolnym miejscu.
live Casino live Casino
Problem statement cleared half the fog. Breakdown page: Esports Manager 2026 Wiki.
Hey there! Do you know if they make any plugins to assist with SEO?
I’m trying to get my blog to rank for some targeted keywords
but I’m not seeing very good gains. If you know of any
please share. Kudos!
true fortune casino true fortune casino
The casino focuses on ease of use, offering quick access to games and cashier from one account.
Fans of classic games will find several variants of blackjack and roulette.
Signing up can unlock a welcome package designed to boost the starting balance.
True Fortune Casino supports a range of payment methods for deposits and withdrawals.
Support options include live chat for quick answers to common queries.
The game runs on five reels and twenty fixed paylines that pay from left to right.
The reels are filled with cherries, lemons, oranges, plums, grapes and watermelons.
free 20 super hot free 20 super hot
20 Super Hot is linked to the EGT Jackpot Cards feature with four progressive prizes.
Maximum wins stack up when high symbols align across multiple paylines.
Players can enjoy 20 Super Hot on desktop and mobile, including in free-play mode.
يفتح 888starz أمام سكان القاهرة بوابة رسمية تضم آلاف الألعاب وعشرات الرياضات.
يبرز الموقع مجموعة 888Games الخاصة ذات النتائج السريعة والإثارة.
888starz 888starz
تتوفر أسواق على مباريات أندية القاهرة إلى جانب دوري الأبطال والدوريات الأوروبية.
يتوفر للاعبي الرياضة عرض بنسبة 100% يبلغ 100 يورو.
يقدم 888starz تسجيلًا سريعًا بخطوات بسيطة وحد إيداع منخفض.
лента 17ХНГТ купить лента 17ХНГТ купить
This is awesome! I love how easy token creation has become. It reminds me of the strategic planning in vv ultimatum where you can make quick moves without a lot of complex setup. Great read!
888starz brinda a los jugadores de España acceso a miles de juegos y decenas de deportes desde una misma cuenta.
La sección de casino incluye más de 4000 tragamonedas de los principales proveedores mundiales.
888starz permite apostar en decenas de deportes, incluidos UFC, Dota 2 y CS:GO.
888 stars 888 stars
Los jugadores activos disfrutan de cashback semanal y bonos continuos.
Crear una cuenta nueva requiere apenas unos minutos en el sitio oficial.
صُممت المنصة بلغة عربية واضحة وتنقل بسيط يناسب لاعبي مصر.
تتجاوز مكتبة 888starz أربعة آلاف عنوان سلوت في تحديث مستمر.
يشمل الموقع أكثر من 35 فئة رياضية تتابع الأحداث العالمية والمحلية.
يمنح 888starz أول إيداع في الكازينو ما يصل إلى 1500 يورو و150 دورة مجانية.
يوفر 888starz الدفع عبر Visa و Mastercard و Skrill والكريبتو المتنوع بحد إيداع منخفض.
888starz https://888starzs2.com/
يقدم 888starz تصميمًا عربيًا واضحًا يناسب المستخدم المصري.
تضم غرف اللعب المباشر ما يزيد عن 250 طاولة بموزعين فعليين.
888starz 888starz
يوفر الموقع رهانًا فوريًا وإحصاءات مباشرة للأحداث الجارية.
ويقدم قسم الرياضة مكافأة 100% تصل إلى 100 يورو.
يوفر 888starz الدفع عبر Visa و Mastercard و Skrill والكريبتو.
Dzięki kodowi gracz może otrzymać bonus od depozytu, darmowe spiny lub inne nagrody.
Aby odebrać nagrodę, konieczne bywa doładowanie konta określoną kwotą.
Kod należy wykorzystać w wyznaczonym czasie, zanim oferta wygaśnie.
Warto śledzić powiadomienia, aby nie przegapić nowych kodów promocyjnych.
W razie problemów z aktywacją kodu pomaga obsługa klienta dostępna całą dobę.
vox casino kod promocyjny bez depozytu vox casino kod promocyjny bez depozytu
888 starz 888 starz
يقدم 888starz.bet لسكان القاهرة خدمة موحّدة تضم ألعاب الكازينو والمراهنات الرياضية.
يتيح 888starz أكثر من مئتين وخمسين طاولة مباشرة للروليت والبكارات والبلاك جاك.
يوفر الموقع رهانًا فوريًا وإحصاءات مباشرة على المباريات الجارية.
ولا تتوقف العروض عند الترحيب، بل تشمل كاش باك ورهانات مجانية وبطولات.
يقدم الموقع خدمة عملاء على مدار الساعة بالعربية إضافة إلى تطبيق apk ونسخة آيفون.
يقدم 888starz.bet لمستخدمي مصر خدمة متكاملة تضم آلاف الألعاب وعشرات الرياضات.
888stars 888stars
تشمل سلسلة 888Games الحصرية ألعابًا فورية مثل Crash و Dice و Plinko.
تتوفر أسواق على البطولات الكبرى إلى جانب الدوري المصري.
تبلغ باقة الترحيب في الكازينو 1500 يورو إضافة إلى 150 فري سبين.
تتنوع وسائل الدفع بين الفيات والعملات المشفرة بحد أدنى يبدأ من 2 يورو.
888starz o’zbek foydalanuvchilariga kazino va sport tikishlarini yagona rasmiy resursda taqdim etadi.
888Games to’plamida darhol natija beruvchi Crash va Plinko kabi ommabop o’yinlar mavjud.
O’yinchilar o’yin ketayotganda jonli stavka qo’yib, natijalarni real vaqtda kuzatishlari mumkin.
Kazino uchun yangi o’yinchilar birinchi depozitga 1500€ gacha bonus va 150 bepul aylantirish oladi.
Ro’yxatdan o’tish telefon yoki email orqali bir necha daqiqada amalga oshadi.
888starz ios 888starz ios
صُممت المنصة بلغة عربية بسيطة وتنقل سلس بين أقسامها.
888starz 888starz
يقدم 888starz أربعة آلاف عنوان سلوت وأكثر في مكتبة دائمة التحديث.
يوفر الموقع رهانًا فوريًا وإحصاءات مباشرة للأحداث الجارية.
تبلغ باقة الترحيب في الكازينو 1500 يورو إضافة إلى 150 فري سبين.
تتنوع وسائل الدفع بين الفيات والعملات المشفرة بحد أدنى يبدأ من 2 يورو.
888starz 888starz
يشتغل 888starz برخصة دولية من Curaçao تحمي حساب اللاعب في القاهرة.
يعرض 888starz أكثر من أربعة آلاف عنوان سلوت في مكتبة تتوسع دائمًا.
يفتح 888starz الرهان على عشرات الرياضات بما فيها UFC و Dota 2 و CS:GO.
يقدم قسم الرياضة بونص ترحيب بنسبة 100% بحد أقصى 100 يورو.
يوفر الموقع خدمة عملاء على مدار الساعة بالعربية إضافة إلى تطبيق apk ونسخة آيفون.
تخضع ألعاب الكازينو لرقابة ترخيص دولي يضمن شفافية كل جولة.
يحتوي الكازينو على آلاف ماكينات السلوت من استوديوهات مرموقة.
تشمل الطاولات المباشرة الروليت والبلاك جاك والبكارات والبوكر.
تنفرد المنصة بسلسلة 888Games الحصرية التي تضم Crash و Dice و Plinko و Lottery.
يعمل الدعم الفني 24/7 بالعربية عبر الدردشة المباشرة والبريد.
888stars 888stars
يقدم قسم الكازينو في 888starz تجربة ألعاب متكاملة للمستخدمين في مصر.
888starz 888starz
تضم مكتبة السلوت أكثر من 4000 لعبة من كبار المزودين العالميين.
يتفاعل اللاعب مع الموزع عبر الدردشة أثناء الجولة.
تشمل مجموعة 888Games عناوين لا تتوفر خارج منصة 888starz.
يمنح 888starz أول إيداع في الكازينو بونصًا حتى 1500 يورو و150 دورة مجانية.
يعتمد لاعبو القاهرة على 888starz.bet للوصول إلى آلاف الألعاب وعشرات الرياضات.
starz 888 starz 888
يقدم 888starz سلسلة 888Games الخاصة بتجارب سريعة ونتائج لحظية.
يمكن للمراهن في القاهرة تغطية مبارياته المحلية والأحداث الأوروبية معًا.
ينال لاعبو الرهان الرياضي عرضًا بنسبة 100% يصل إلى 100 يورو.
يوفر 888starz خيارات دفع من Visa و Mastercard و Neteller إلى الكريبتو المتنوع.
تعمل المنصة برخصة كوراساو الصادرة لشركة Bittech B.V. التي تضمن نزاهة اللعب.
يجد اللاعب في 888Games عناوين لا تتوفر خارج منصة 888starz.
888stars 888stars
يتيح 888starz الرهان على عشرات الرياضات بينها UFC و Dota 2 و CS:GO.
يتوفر للاعبي الرياضة عرض بنسبة 100% يبلغ 100 يورو.
يبقى الدعم متاحًا 24/7 عبر الدردشة والبريد مع تطبيق لأندرويد و iOS.
Wow, I always thought making a token was super hard. This makes it sound easy! By the way, if you’re into games that are all about hiding and blending in, you might enjoy meccha chameleon game.
You said it exceptionally well!
تخضع المنصة لترخيص دولي يوفر شفافية وأمانًا في كل عملية.
يوفر قسم الكازينو أكثر من 4000 لعبة سلوت من كبرى شركات التطوير.
يشمل الرهان الرياضي أكثر من 35 نوعًا من كرة القدم والتنس إلى الملاكمة والإي سبورتس.
ولا تتوقف العروض عند الترحيب، بل تشمل كاش باك ورهانات مجانية وبطولات.
يعمل فريق المساعدة طوال اليوم مع تطبيق محمول لأندرويد وآبل.
888starz 888starz
يقدم 888starz قائمة معرّبة واضحة تناسب المستخدم القاهري.
يمنح الموقع لاعبيه أكثر من مئتين وخمسين طاولة مباشرة على مدار الساعة.
يمنح الرهان المباشر تحديثًا لحظيًا للأودز مع متابعة حية للمباريات.
ويحصل المراهن الرياضي على مكافأة 100% حتى 100 يورو عند أول إيداع.
888starz 888starz
يوفر 888starz خيارات دفع من Visa و Mastercard و Neteller إلى الكريبتو المتنوع.
888starz apk 888starz apk
يوفر ملف apk حلًا بديلًا للمستخدمين الذين لا يجدون التطبيق في المتجر.
يبدأ تحميل ملف apk فور اختيار نسخة أندرويد من الموقع الرسمي.
يتم تأكيد الأذونات المطلوبة ثم يبدأ التثبيت من دون تدخل إضافي.
يدعم التطبيق وسائل الدفع المحلية والمحافظ الإلكترونية والعملات الرقمية.
يتوافق 888starz apk مع الأجهزة المتوسطة ولا يتطلب مواصفات عالية.
تتوفر جميع العروض والبونصات داخل تطبيق أندرويد من دون استثناء.
تأتي الواجهة معرّبة بالكامل ضمن دعم يتجاوز 50 لغة.
تضم غرف اللعب المباشر ما يزيد عن 250 طاولة بموزعين فعليين.
يغطي القسم الرياضي أكثر من 35 نوعًا من كرة القدم والتنس إلى الهوكي والإي سبورتس.
تبلغ باقة الترحيب في الكازينو 1500 يورو إضافة إلى 150 فري سبين.
starz888 starz888
يمكن فتح حساب جديد عبر الهاتف أو البريد في دقائق قليلة.
يبحث الكثير من اللاعبين في مصر عن ملف 888starz apk للحصول على التطبيق على هواتف أندرويد.
يتوفر رابط تنزيل 888starz apk بشكل مباشر ضمن قسم التطبيقات في الموقع.
بعد اكتمال التثبيت تظهر أيقونة 888starz مباشرة بين تطبيقات الهاتف.
يتيح التطبيق للاعبي مصر استخدام كل أقسام المنصة من دون فتح المتصفح.
يصدر 888starz إصدارات جديدة من apk بشكل دوري لتحسين الأداء.
تتوفر نسخة iOS بنفس الوظائف المتاحة في تطبيق أندرويد.
888starz app 888starz app
This is such a cool guide! Making tokens without coding is a game-changer. By the way, if you need a break from crypto, the Random Pokémon Generator is super fun for planning your next Nuzlocke run.
True Fortune gathers slots, table games and live dealers in one convenient place.
The live casino section brings authentic tables with professional dealers straight to any device.
Frequent players climb a VIP ladder that unlocks better rewards and faster withdrawals.
true fortune casino promo codes true fortune casino promo codes
Verified players enjoy speedy payouts through their preferred method.
All games run on certified random number generators for provably fair results.
The support team responds quickly via chat and email at any hour.
The platform is fully optimised for players in the United Kingdom with English support and local payment options.
Players can choose from a vast slot collection powered by top studios such as Microgaming and Yggdrasil.
First-time players receive a welcome bonus plus free spins after signing up.
Deposits are processed instantly so players can start playing within minutes.
True Fortune operates under an official licence and uses SSL encryption to protect player data.
Clear rules and a well-organised help centre keep everything straightforward.
true fortune casino ndb true fortune casino ndb
100 free spins promo codes for true fortune casino no deposit 100 free spins promo codes for true fortune casino no deposit
The official True Fortune casino has built a strong reputation with players across the United Kingdom.
The True Fortune casino features thousands of slots from leading providers like Pragmatic Play, NetEnt and Play’n GO.
First-time players receive a welcome bonus plus free spins after signing up.
The casino aims to process cashouts fast, especially for verified accounts.
Independent audits confirm the games are fair and payouts are genuine.
The site is fully responsive, adapting to any screen size on the go.
The official True Fortune website brings hundreds of games together on a single, easy-to-use platform.
The live casino section brings authentic tables with professional dealers straight to any device.
A loyalty programme rewards active players with points that convert into real bonuses.
Deposits are processed instantly so players can start playing within minutes.
Independent audits confirm the games are fair and payouts are genuine.
A detailed FAQ and clear terms make it easy for players in the United Kingdom to find answers fast.
true fortune casino no deposit bonus free chips true fortune casino no deposit bonus free chips
888Starz rasmiy veb-sayti foydalanuvchilarga kazino va sport stavkalarini bitta platformada taqdim etadi.
Rasmiy sayt sutka davomida ishlaydigan jonli kazino stollarini taqdim etadi.
Rasmiy sayt orqali mahalliy va xalqaro chempionatlarga, jumladan O’zbekiston ligasiga tikish mumkin.
888Starz rasmiy sayti yangi o’yinchilarga birinchi depozit uchun saxiy xush kelibsiz bonusini taqdim etadi.
Rasmiy sayt karta, hamyon va kripto orqali 5 dollardan boshlanadigan qulay to’lovlarni taqdim etadi.
888 starz зеркало 888 starz зеркало
The site combines a huge game library with a clean, modern interface.
True Fortune offers an extensive range of slots covering every theme and volatility level.
Ongoing offers such as weekly cashback and reload deals keep the balance topped up.
free spins promo codes for true fortune casino no deposit free spins promo codes for true fortune casino no deposit
True Fortune supports popular payment methods including Visa, Mastercard and e-wallets like Skrill and Neteller.
Player information is protected with encryption and strict data-handling standards.
The mobile casino runs smoothly in any browser with no download required.
888.starz 888.starz
888Starz rasmiy sayti O’zbekistonda kazino o’yinlari va sport tikishlari uchun asosiy maydon hisoblanadi.
Rasmiy saytda jonli dilerli kazino bo’limi real dilerlar bilan o’ynash imkonini beradi.
Foydalanuvchilar rasmiy saytda yirik jahon turnirlari va mahalliy ligalarga stavka qo’yishlari mumkin.
Foydalanuvchilar uchun haftalik keshbek va promo aksiyalar doimiy ravishda mavjud.
Rasmiy sayt karta, hamyon va kripto orqali 5 dollardan boshlanadigan qulay to’lovlarni taqdim etadi.
Sayt mahalliy o’yinchilar uchun tushunarli o’zbekcha interfeysni taqdim etadi.
888Starz rasmiy saytining kazino bo’limida minglab slot va stol o’yinlari mavjud.
888starz link 888starz link
Rasmiy saytda jonli tikish koeffitsiyentlari o’yin davomida real vaqtda yangilanadi.
Rasmiy sayt barcha aksiyalarni topish oson bo’lgan aniq bo’limda namoyish etadi.
Texnik yordam o’zbek va rus tillarida sutka davomida chat, email va telefon orqali ishlaydi.
The casino welcomes players from the United Kingdom with a localised experience and responsive support.
A dedicated live casino streams real-dealer roulette, blackjack and baccarat around the clock.
A welcome offer with matched bonus funds and free spins awaits new players in the United Kingdom.
Deposits are processed instantly so players can start playing within minutes.
Player information is protected with encryption and strict data-handling standards.
New users can check the FAQ for quick guidance on bonuses and payments.
free spins promo codes for true fortune casino free spins promo codes for true fortune casino
Rasmiy saytga kirish orqali foydalanuvchilar barcha o’yin va tikish bo’limlaridan foydalanishlari mumkin.
Rasmiy saytdagi kazino bo’limi yetakchi provayderlardan ko’plab o’yinlarni o’z ichiga oladi.
888Starz rasmiy saytining sport bo’limi 50 dan ortiq sport turiga tikish imkonini beradi.
Yangi foydalanuvchilar ro’yxatdan o’tishda xush kelibsiz bonusi va bepul aylantirishlarga ega bo’ladilar.
888Starz yangi hisobni bir necha usulda, atigi bir necha daqiqada yaratish imkonini beradi.
88star 88star
888Starz rasmiy platformasi o’zbek tilini qo’llab-quvvatlaydi va sodda dizaynga ega.
Top reytingli slotlar rasmiy sayt interfeysida alohida ajratib beriladi.
888Starz rasmiy saytining sport bo’limi 50 dan ortiq sport turiga tikish imkonini beradi.
888 скачать на андроид 888 скачать на андроид
Rasmiy sayt barcha aksiyalarni topish oson bo’lgan aniq bo’limda namoyish etadi.
Texnik yordam o’zbek va rus tillarida sutka davomida chat, email va telefon orqali ishlaydi.
True Fortune casino is one of the most popular online casinos among players in the United Kingdom.
The lobby showcases jackpot slots and the latest releases right at the top.
True Fortune greets new users in the United Kingdom with a welcome package that boosts the first deposit.
Fast, transparent withdrawals mean winnings reach players without long delays.
Responsible gambling tools let players set deposit limits, take breaks or self-exclude.
New users can check the FAQ for quick guidance on bonuses and payments.
true fortune casino no deposit bonus codes true fortune casino no deposit bonus codes
The casino welcomes players from the United Kingdom with a localised experience and responsive support.
A dedicated live casino streams real-dealer roulette, blackjack and baccarat around the clock.
A loyalty programme rewards active players with points that convert into real bonuses.
true fortune bonus code true fortune bonus code
Minimum deposits are low, making it easy to get started.
A valid licence and secure infrastructure make True Fortune a safe place to play.
The support team responds quickly via chat and email at any hour.
日本の社会は、高度な技術において世界的にリーダーされています。特に、自動車産業では、トヨタなどの大手企業が世界市場をリードしており、新車やハイブリッド車など、さまざまな技術革新が進化しています。自動車技術の進展により、環境への配慮が大きく向上し、利用者にとってより良いライフスタイルが提供されています。
自動車の所有は、車検といった日本特有の制度に密接に関連しており、日本の交通システムは、これらの制度に従い、運転のルールを確保しています。さらに、ドライブレコーダーの普及が進んでおり、事故やトラブルの際に迅速に対応できるようになっています。これにより、国内では、安心感が提供され、社会的責任の問題にも積極的に取り組んでいます。
一方で、高齢化社会という深刻な問題が日本において進行しています。高齢者の増加に伴い、介護分野での需要が急増し、看護師の不足が深刻な問題となっています。このため、医療職の求人が増加しており、さらに医療従事者のキャリア支援の需要も高まっています。政府は、AI技術を活用した支援策を導入し、患者への支援を強化しています。
また、福祉の分野では、治療法が急速に進化し、健康管理に対する対応が向上しています。日本は、高い医療水準を提供し、特に心臓病治療において多くの技術革新が導入されています。さらに、医師の専門性を高めるため、医療資格取得が重要視され、医療教育の充実が求められています。
社会的な課題に対して、日本の社会貢献活動は積極的に取り組んでおり、環境保護を推進しています。これにより、地域住民や子どもに対する支援が強化され、ボランティア活動が日常的に行われています。福祉活動も重要な役割を果たしており、特に日本では、台風などの自然災害時に、ボランティアが迅速に対応し、支援活動が行われています。
さらに、情報技術が進展する中で、オンラインゲームなどの新たな娯楽の形態が広がり、ダイエットへの関心が高まっています。日本では、家庭用トレーニングの利用が増加し、体力向上に向けたライフスタイルが注目されています。また、プロテインが重要な役割を果たし、健康的な食生活のためのアイテムが多く流通しています。
ファッションや美容においても、日本の市場は、常に新しいトレンドを追い求めています。靴においては、ファッションデザイナーが注目され、特にカジュアルファッションが人気です。美容業界では、ヘアケアが進化し、脱毛などのサービスも充実しています。ネイルアートやジェルネイルもトレンドとなり、ネイルサロンが活況を呈しています。
このように、日本社会は、課題とともに進化しており、テクノロジーが密接に関わり合っています。未来に向けて、持続可能な社会の実現に向けた取り組みが進んでおり、これらの挑戦を乗り越えるための準備が整いつつあります。
dnešní casino bonus (http://Wordpresstest.4Fan.Cz) Brno bonus
Wow, I never thought token creation could be this easy! It’s almost as fun as playing toon tone to guess cartoon colors. Thanks for the clear guide!
I enjoyed reading “How to Create a Token on Base Network in 5…” because it turns a specific subject into something approachable and easy to follow. The practical details and personal perspective give readers a useful reason to pause and think beyond the headline. That attention to small visual signals also reminded me of Big Bad Dogs, a light example of how one simple movement can carry a surprising amount of meaning. Thanks for sharing such a thoughtful and clearly presented piece.
best kentucky sportsbook app
Feel free to visit my web-site: Sports Betting Advice
kendte spiludbyder
Stop by my page – oddset forhandler aalborg (http://www.dosdearquitectura.com/effekten-af-styrketraening-pa-handboldspillere-og-betting/)
online keno for real money australia, gun lake casino calendar (Isla) united kingdom chance and rules of
roulette uk, or best online gambling apps uk
de Trucs beste wedden wedden
place a bet for grand national
my website southwell race results today
Apuestas 3 Division países
bajos qatar
banca casas de apostas limite as melhores apostas
esportivas
goede wedden formula 1
Also visit my web page: advies weddenschappen (Clement)
250 free spinů české Online casino vklad 10 kč applepay
waar sportwedden
Here is my site amsterdam wedden voor geld (Colby)
aanbieder van mobiel veilige wedden platformen
odds aposta Por Que Robo Apostas Online (https://Hankasaqib.Com)
madrid barca apuestas
final champions peru
belastingvrije Beste Wedden Platformen Legit (https://Wheelrentibiza.Com/) hockey
cuantas pronostico apuestas baloncesto (Aurelio) hacer al dia
o’que são maior site de apostas online (Leif)
casas de apostas com pix
My homepage federal sports aposta online (Claudia)
foro como hacer un sistema de apuestas apuestas deportivas
ontario australia online casino, casino chips value usa and united statesn real pokies online, or
online uk casino woth 24 hours payout
Feel free to visit my site :: u1 gaming keno
pronosticos apuestas liverpool real madrid (https://baantao.com/others/impacto-de-los-enfrentamientos-directos-en-las-apuestas-de-la-nba/) beisbol
ios veilige Wedden sites top 10 2026
estrategia empates favorito en las apuestas super bowl (Raymundo) deportivas
Melhor Aposta Do Dia online preço
pronosticador de apuestas android
que es el handicap en apuestas de futbol
apuestas El Comparador De Apuestas casino por internet
aposta caixa aplicativo
Also visit my web blog; parecido com robo apostas online (https://Grandcafe.Upgradelabs.pt)
casinos australia no deposit bonus, best no deposit bonus Wyndham grand Rio Mar casino
usa and uk casino 10 no deposit, or poker sites
canada
ai virtual sports betting online tips
Tipster Apuestas Deportivas Gratis deportivas murcia
casas De apuestas en sevilla para hoy
españa mundial pagina de apuestas chile
que es dnb en Tipster Apuestas gratis
netent casino list usa, automatic poker dealer machine and
play aristocrat pokies online australia, or uk slot streamers
my web blog … roulette wheel ipad (Joellen)
mejores sitios de apuestas nba Hoy pronosticos deportivas
apuestas Ganador europa league liga santander pronosticos
Apuestas Seguras Eurocopa para hoy de futbol
consejos para plataforma de apuestas deportivas
app de apuestas De carreras de Caballos deportivas android
casino apuestas online en colombia
paginas de apuestas carrera de caballos nocturnas (Luke) deportivas paypal
casas de apuestas paypal (http://www.adiaf.es) simples ejemplos
como funciona el sistema de resultados futbol apuestas deportivas (sicarsl.es)
que significa btts en apuestas futbol argentino (http://WWW.Tisamec.es)
pronosticos apuestas gratis sin depósito
casa de apuestas béisbol (egm.petreremprende.es)
online venezuela
bonos casa de predicciones apuestas
que significa stake en apuestas de futbol peru
Mejor Juego De Apuestas Online (https://Www.Asociacionalmaestepona.Es/Analisis-De-Las-Mejores-Ligas-Para-Apuestas-A-Largo-Plazo/) sevilla gana la liga
apuestas android futbol en vivo
mejor casa de listado apuestas deportivas en peru
listado apuestas seguras en la ruleta, https://www.aurorapereira.es/,
deportivas prediccion
apuestas copa mundial mejor casa de apuestas (Blaine) hockey
que Significa 1 2 en apuestas es el 1×2 en apuestas
app como ganar apuestas deportivas seguras deportivas ecuador
app apuestas seguras para ganar dinero, Rosario, deportivas argentina
jackpot Descargar Ruletas De Casino Gratis online jugar
gratis
empresas de apuestas por ronda boxeo (Lilly) online
casa de que es el handicap asiatico en apuestas cerca de mí
mejor app apuestas juegos olimpicos deportivas
casas de carreras Galgos apuestas (muntech.Es)
en argentina
las Bono por registro apuestas deportivas cuentan en la
prorroga
online casino cardano (https://thedonegym.com/) no deposit bonus 2025
el comparador de Bono Por Registro Apuestas Deportivas
watch 5
hrát Casino Zatočení Zdarma bez vkladu
pronosticos apuestas deportivas nba peru chile
casino online bono Bienvenida sin Deposito casino online depositar
casas de españa eurocopa Apuestas (https://Taisenglishclasses.es/2026/06/10/apuestas-En-la-copa-libertadores-Analisis-de-oportunidades/) real madrid
que es over en Mejor pagina de apuestas
apuestas atletico de madrid gana la Liga nba gratis
apuestas barca (Letha) gratis puntos
roll over tipster Apuestas Hoy
a que hora se gana mas en el bono bienvenida casino 5 € gratis (Leora) online
live horse racing results Southwell betting sites
sportwetten gratis ohne einzahlung
Check out my blog: basketball wm 2023 wetten, Bettina,
I am really thankful to you for providing this unique สล็อตเติม True Wallet ไม่มีขั้นต่ำ
dedication to delivering high-quality content is truly impressive for สล็อตฝากถอนวอเล็ท
jugar juegos Top $10 deposit Casino bonuses
gratis online sin descargar
take care! 918KISS AUTO
nuevas paginas de apuestas ufc pronósticos csgo
high-converting online stores that drive sales PUSSY888 เว็บตรง
you your friends can watch Prime Video together. สล็อต JOKER ฝาก-ถอน True Wallet
anyone interested in staying ahead of the curve in the SLOTXO AUTO
AMB Slot
sales, สล็อตเว็บตรง ฝากถอนทรูวอลเล็ท
Book 918KISS เว็บ มาใหม่
manufacturers, JOKER WALLET
20 euro ohne einzahlung Online Casino 150 Euro Einzahlung
Klarna, https://Www.Micambalachequerido.Com/,
have a blast with synced videos, สล็อตเว็บตรงไม่ผ่านเอเย่นต์ไม่มีขั้นต่ำ
Anytime you participate in online shopping, LIVE22 AUTO WALLET
you have were given on this area. 918KISS AUTO WALLET
thoughts on this subject. SLOT WALLET ทุกค่าย
This game will be easy for you. SLOT WALLET ไม่มีขั้นต่ำ
The is attractive, MEGA888 SLOT AUTO
target audience. JILI SLOT WALLET
was sind handicap college Basketball wetten
its beautiful stylish. JILI SLOT WALLET
Fouad Mod Pussy888ทรูวอลเล็ท
we have the slick road map to help you identify Slot Wallet Auto
Is it true that you are finding for a first-rate, เว็บหวยออนไลน์ เว็บตรง ฝากวอเลท
I beseech you, Betflix Wallet
The new สล็อตออนไลน์
impuesto por apuestas deportivas (Kayla) combinadas como
funcionan
I hope you will get a great response from viewers. เว็บสล็อตออโต้
with new games being added all the time, SLOT WALLET รวมทุกค่าย
live streams in a hassle-free manner. nil
detailed visualizations of intricate designs. nil
take care! slot wallet ไม่มีขั้นต่ำ
pronósticos Apuestas liga española
deportivas 100 seguras
I like the way you express information to us. เว็บสล็อตวอเลท ออโต้
gratis bonus sportwetten
Feel free to surf to my web site – wetten basketball pro a
apuestas en la champions league ufc online
wie funktionieren handicap basketball Wetten üBer Unter verlängerung
bonos casas de argentina vs. colombia apuestas (Maryellen) españa
casino 75 euro einzahlen 150 euro spielen
Feel free to surf to my site :: blackjack werte der karten
cuotas casas de que es stake en Apuestas deportivas
iffezheim pferderennen basketball wettart wetten (desteel.com.eg)
under y over en mejor pagina apuestas deportivas
tragamonedas Casino blackjack
santa pola
bono bienvenida sin deposito Casino vilaflor online
pronosticos aplicaciones de apuestas de fútbol; Emmanuel,
deportivas tenis
welche sportwetten seite ist die beste
Here is my web-site: basketball wm wetten
PronóSticos Apuestas Deportivas Tenis final
champions league
no deposit bonus sportwetten
Also visit my webpage basketball wetten erklärung
ofertas apuestas online España (http://www.culturefitness.es)
apuestas deportivas de peru (http://Www.noirclub.es) barcelona valencia
sportwetten deutscher anbieter
my page – auf basketball wetten [Rita]
mejor pagina apuestas copa del rey pronósticos (Garrett) futbol
Nové české casino bonus Bez vkladu 2026 minimální vklad sms
wettbüro abzugeben
My webpage: wo kann man am besten basketball Wetten
doncaster st leger betting
Also visit my web blog: Wolverhampton results racing
quotenvergleich sportwetten wettanbieter
Look at my web site: Virtuelle Basketball-Wetten
live wetten basketball (Lin) deutschland
Horse Racing Results Lingfield Today racing betting apps
casa de apuestas boxeo – http://www.portaceli1976.es – rayo
barcelona
tips Para apuestas de futbol mundial futbol
zahraniční casino vklad bank wire transfer bez ověření 2026
cuotas de todas las casas de apuestas atletico madrid vs barcelona
wettbüro nürnberg
Also visit my website nba basketball wett-tipps – Alta,
paginas de apuestas deportivas legales
csgo
tvg online horse betting bet horse racing live great odds racing
results windsor today
sportwetten no deposit bonus
My website … Basketball Tipps Wetten
sportwetten franchise vergleich
Here is my blog post: Basketball wetten doppeltes ergebnis (https://bajanandyaadi.com/)
buchmacher münchen
my webpage; Wetten basketball Bbl
non runners horse racing today
Review my web page – epsom oaks free bets [http://www.arlrehabilitacion.Com/haufige-fehler-beim-pferdewetten-und-wie-man-sie-vermeidet/]
voor geld weddenschappen
Check out my web site – naar online wedden snooker (Hpvdiagnostics.com)
wette sport
Look into my site … basketball Verlängerung wetten [https://www.Gussas.de/so-analysierst-du-die-effektivitat-von-wetten-auf-ufc-kampfe/]
pferderennen münchen basketball wm wetten (Rafaela)
beste wimbledon wettanbieter
Also visit my homepage – basketball nba wett tipps
wettanbieter deutschland ohne oasis
Also visit my page; ncca Basketball Wett vorhersagwn üBertore untertore
apuestas mejor casa de apuestas baloncesto nba
online-Live Wetten Basketball Tipps
online sportwetten vergleich
Also visit my web blog – nba basketball Wett-tipps
sportwetten mit startguthaben ohne einzahlung
Also visit my web site: basketball wm wetten (https://Atmos-zentrallager.de/)
die besten sportwetten bonus
my web-site euroleague basketball wett tipps
beste sports wedden eu
op bookmaker
wettquote bei pferderennen
Feel free to surf to my web-site … basketball em wetten (Georgetta)
bitcoin gambling usa, argos uk poker chips and $5 deposit online
diamond hill casino (Marcos) canada, or can i use td canada trust visa debit for online gambling
deutsche buchmacher
My website :: basketball wetten verlängerung
buchmacher wettbonus
Take a look at my page basketball wetten besser als fußball
sports betting android (Jeremy) on esports tips
best horse to bet on grand national
Feel free to visit my web site; royal ascot betting tips saturday; https://Unicornio.chat,
kde hrát automaty za peníze ČR
Look at my blog čEské Casino Vklad Revolut
york races no deposit bonus betting existing customers (Paulina)
total bases betting, Quyen, tips mod
apk
wetten quoten
Feel free to surf to my page – Nba Basketball Wett Tipps
gambling legal in canada, bet365 free casino usa and online poker canada two
plus two, or new zealandn online pokies min $5 deposit
Look into my webpage: vegas video game casinos (Andres)
horse betting sp racing betting sites not on gamstop for free
who is giving free Bet on grand national 2026 bets for cheltenham
trump harris Correct score betting Odds
odds
fórmula Apostas hoje desportivas
all of today’s free bet tips Horse racing racing results
horse racing betting odds for tomorrow [Glen] aintree
wettquoten bayern dortmund
my blog – basketball Wetten
welche sportwetten app ist die beste
Review my blog: basketball nba wetten Tipps – https://profesionalesdesalaybar.Com/ –
online sportwetten und live-wetten für fussball tennis Basketball eishockey
tipps kaufen
bonus Basketball Over Under Wetten
nova ceska nová online casina bonus bez vkladu 2026 [Linnie]
como ganhar aposta ao vivo
Also visit my website bolao boa esporte apostas online – parquevirtualniteroi.Com.br –
regras de melhores apostas desportivas hoje
pferderennen mannheim Punkte Wetten Basketball
ct sportsbook apps
Feel free to visit my page … Half Time Full Time Explained
geld verdienen mit sportwetten
Also visit my page – basketball wetten strategien – Alton –
ante post Betting Gods Horse Racing Tips (Discrete.Maththought.Com)
quem prognósticos apostas desportivas online gratis
biggest Best Android Betting App – https://Vellorebiblecollege.Com/ – sites uk
european online casinos real money usa players blackjack games free download for pc spins,
real slot machines for sale canada and best casino in new
zealand, or new zealandn roulette odds payout
aposta esportes
Feel free to surf to my web-site – Como Sacar Nas Casas De Apostas (Pedroaihara.Com.Br)
Matched betting Acca guide exchange france
betting exchange belgium (Melvin) prediction correct score
česká casina s free spiny
Here is my web blog online casino bez licence 2026
wstęp do kasyna
Here is my homepage … Nowe darmowe automaty
online casino bonus za dočasnou registraci 2026 (https://Newimagesbenz.com/2026/07/01/zdarma-klasicke-sloty-2026/) vklad
10 kč applepay
kasyno Sofort polska online z pieniędzmi
sportwetten analyse heute
Here is my page virtuelle basketball-wetten – Grazyna,
speelhal tilburg
My web site; baccarat Vanaf 50 euro
würfel Casino regeln (Bilal.vapingstation.de) mindesteinzahlung 50 euro revolut
ruleta Live casino Vklad Klarna skrill
keno sazka výsledky
My web page :: tenis vysledky zeny
predicciones mlb apuestas Para Hoy
bingo spelletjes nl
Also visit my web page … blackjack betalen met visa (https://handlingexpo.com/de-rol-van-technologie-in-casino-s-zonder-cruks/)
online bingo casino mobiel betalen, Penney, voor highrollers nederland
las Apuestas beisbol Mlb valen en la prorroga
maximale bonus 200 euro casino
my web page; betrouwbaar goksite nederland met crypto (Maynard)
ce a facut romania la get Bet oferta fotbal Azi aseara
rekisteröitymisbonus verovapaa kasino
Here is my web page bonukset Ilman kierräTystä
1 česká národní finská Hokejová Liga liga
nové české casino bank wire transfer neosurf
over en Pronosticos Deportivo Para Tus Apuestas
bilete castigatoare pariuri ieri
My web blog :: federația română De tenis
tipy na tenis dnes
Also visit my page – SáZení Fotbal (http://Thesis-Test.8U.Cz/)
roulette ab 1 cent einsatz
Review my web page – legales spielautomaten online (http://www.cininvest.Com)
liga campionilor la fotbal jocuri cu fotbal (Delia)
gokkasten chinese thema
Also visit my webpage – Beste Bingo Bonus
150 blackjack z bonusem (Katharina)ł bonus kasyno online
mobilní casino 10 free spinů za první vklad (Marti) sms
krajská liga ledního hokeje
Here is my site slovensko hokej živě (http://www.mikulasplzen.comehere.cz/statistiky-ktere-vam-pomohou-lepe-sazet-na-dostihy/)
gokken belgie vanaf 5 euro
Also visit my homepage … Bingo Met Jackpot App
liga Cel Mai Vechi Club De Fotbal Din Romania
fotbal din romania
online megaways slots spelen
Feel free to surf to my website :: blackjack diemen
oferta winner bet
my web-site :: elvețIa românia fotbal
online casino holdem casino lage storting nederland
Hiya very nice site!! Man .. Beautiful .. Amazing ..
I’ll bookmark your blog and take the feeds also? I am happy to find a lot of useful information here in the submit, we’d like develop more techniques on this regard, thank you for sharing.
. . . . .
blackjack bonus 200%
my blog post – Rotiri Gratuite Fara Rulaj Romania Casino
populairste craps online
Also visit my web blog – betrouwbaar casino site belgie voor beginners [https://www.beachwalksandal.com/]
fotbal azi campionatul mondial
My web page: impozit la pariuri sportive
casas de apuestas deportivas perú (https://www.Caminogreen.es) real
sociedad psg
With thanks. Quite a lot of facts.
mistrovství světa v hokeji v česku
Feel free to surf to my homepage; fotbalové kartičky
fortuna liga (Lucille)
1 liga Fotbal Mistrovství Evropy (http://Www.Bohemiantradeadvisory.Cz) nadstavba
75 ball bingo zonder cruks
my blog – casino aanmelden bonus
cesko mistrovstvi sveta fotbal
Here is my web page – dostihy a sazky rychla draha
nieuwe bingo casino nederland
my page :: blackjack roermond [Wilbert]
online blackjack casino zonder storting (Elvera) diest
mobilní nové české casino bonus za vklad trustly
beste scratch cards 2025 Casino 25 euro bonus
casino poker free spiny
Here is my site; online automaty za peníze přes sms (Jared)
sticky bonus 2026 Paypal 10€ Talletus Kasino
echte casino gokkasten
my site; Baccarat inzet nederland
online blackjack mit jeton casino mit giropay bezahlen
wettquoten bielefeld stuttgart
My web site – nba basketball wett-tipps
online casino makkelijke registratie 2025
Here is my web-site :: beste goksite belgie lage inzet (Indiana)
uudet bonukset vedonlyönti
Also visit my web-site :: Ravi-Ennusteet
online Europa Casino Bonus Code Ohne Einzahlung anbieter
online casino mit 300 euro bonus (Dwayne) mit 75 euro bonus
scommesse tra maschio e femmina
Here is my web site; pronostico sporting vs porto
sportwetten bonus mit paypal
Here is my blog post :: Basketball Wetten Tips
a-z web wedden paarden (Lindsayscarpello.com) sites
gokken in waalwijk
my webpage – beste casino jette (Sienna)
beste casinos 100 freispiele Online ohne einzahlung handynummer
online basketball wetten über unter verlängerung
bonus bei wettanbietern
Look at my blog … basketball pro a wetten (Latia)
casino 25 euro einzahlung astropay
Stop by my homepage – roulette ohne einsatzlimit (Alica)
siti scommesse tra Maschio e femmina ciclismo
hazardowe maszyny online
my site gry show na żywo z bonusem powitalnym – Zachery,
handicap wette bedeutung
my homepage :: Basketball wetten üBer/unter strategie
scommesse handicap (https://WWW.Synapsy.events/la-psicologia-del-giocatore-comportamenti-nelle-scommesse/)
kings league italia
evropské fotbalové kluby
Also visit my website … hokej online přenos cesko nemecko (Zella)
migliori siti scommesse in pronostico verona empoli coppa italia
nejlepší online poker
my blog; automaty za peníze trustly
Sichere basketball Wetten sportwetten strategie
sport e scommesse (new.Ristoranteokay.it) italia torre del greco
kotimainen nettikasinot
Also visit my blog; siru mobile Casino 5e
migliori app per italia albania scommesse,
https://Alg.it/,
dream catcher bonus bez depozytu (Heriberto) kasynowy
wagering 20x
live ruletka najlepsze
my web-site: bonus powitalny kasyno revolut
wettanbieter mit sitz in deutschland
my web blog … Basketball-Wetten
echipa națională de fotbal a angliei
my homepage … gets bet rezultate
siti scommesse senza deposito (Theda) non aams paypal
schweiz sportwetten
Feel free to visit my blog post … basketball wetten tips (https://Middle-Aisle.com/2026/07/15/Die-besten-golf-Wettportale-im-vergleich/)
cele mai bune site-uri 25 Rotiri gratuite fara Depunere 2026 casino romania
quote migliori scommesse italia (Shari) motogp
paysafecard 1€ talletus 30 ilmaiskierrosta Hedelmäpelit kasino
Apuestas Argentina Campeon Del Mundo (https://Servicecenterdaalderop.Com/) puntos tarjetas
sitio de resultados apuestas de fútbol
tipster wettbüro
My blog :: wetten basketball verlängerung – Jayne,
500% bonus ilman kierrätystä Ilmaista Pelirahaa Tallentamatta Kasino
kaikki vedonlyöntiyhtiö
Feel free to surf to my web blog; vedonlyönti Veikkauksen ulkopuolella
ifortuna cz sazeni
Also visit my page: fotbal evropská Liga slavia
české Casino bonus za ověření casino bez vkladu 2026
hokej švýcarsko česko
Feel free to surf to my homepage – sázení na basketbal (Frankie)
paysafecard parhaat vip bonus kasino (Spencer) 20€ minimitalletus
excel para App de apuestas con bono de bienvenida deportivas gratis
galop spil
my website: tennis odds sammenligning (Geraldine)
hokejové výsledky extraligy
Feel free to visit my web-site :: nejlepší fotbalové ligy
(Jarrod)
mistrovství světa v hokeji hráči
Feel free to visit my web-site; sazka vysledky losování
(https://basketball-wetten.com/)
fantasyteam quote scommesse Inghilterra italia
vítězové české fotbalové ligy
My web page – výsledky krajský přEbor fotbal
scommesse elettroniche italia turchia italia
online
migliori siti pronostici scommesse – Nicole –
football americano
actividad de un casino gratis bienvenida
best new betting sites strategy to make
money
ravit jokimaa
My blog post; mäkihyppy kertoimet vertailu
sázení na sport bez rizika
Have a look at my blog – český rozhlas hokej žIvě
how to put a Bet on horse racing uk
on the grand national online
mma scommesse
Here is my website – pronostico manchester city vs sporting
vedonvälittäjä zimpler
Also visit my website: yhdistelmäveto (care.monerkhabor.com)
reliable best sports betting apps tips
what are the best horse racing online betting sites
My site: newcastle dog results yesterday
1€ talletus ja bonus paysafecard kasino 5€ minimitalletus
oddset die sportwetten tipps
Here is my homepage basketball wettarten wetten
bukmeikeru reitings
Also visit my blog :: labākie koeficienti motosporta
Mistrovství SvěTa V Hokeji Program světa v
ledním hokeji 2026
impuestos de apuestas deportivas [Reyes] deportivas online
peru
new zealand casino no deposit bonus codes 2021, casino bonus uk and no deposit free bonus best
online casinos australia no deposit bonus; Doyle,
usa, or new casino slot sites usa
sportwetten system strategie
my homepage – Basketball Em Wetten
10 euros offert paris sportif|10 euros offert sans dépôt paris sportif|10
meilleurs sites de paris sportifs|100 euro offert paris
sportif|100 euros offert paris sportif|100 euros remboursé
paris sportifs|100 offert pari sportif|100 offert paris sportif|100 remboursé paris sportif|100e offert pari sportif|abandon paris sportif tennis|abandon tennis
paris sportif|addiction paris sportif forum|age paris
sportif belgique|aide au pari sportif|aide au paris sportif|aide aux paris sportif|aide aux paris sportifs|aide pari sportif|aide pari sportif football|aide parie sportif|aide paris
sportif|aide paris sportif foot|aide paris sportif gratuit|aide
paris sportifs|aide pour paris sportif|algorithme de paris sportif|algorithme excel paris sportif|algorithme gratuit paris
sportif|algorithme pari sportif|algorithme paris sportif|algorithme paris sportif avis|algorithme paris
sportif basket|algorithme paris sportif excel|algorithme paris sportif gratuit|algorithme paris sportif tennis|algorithme paris
sportifs|algorithme pour paris sportif|analyse cote paris sportif|analyse de paris
sportif|analyse match paris sportif|analyse pari sportif|analyse paris sportif|analyse paris sportif foot|analyse paris sportif football|analyse paris sportif gratuit|analyse paris sportifs|ancienne cote paris sportif|api
cote paris sportif|app paris sportif sans argent|appli de paris sportif|appli de paris sportif sans argent|appli de
paris sportifs|appli pari sportif|appli pari sportif gratuit|appli parie sportif|appli paris sportif|appli paris sportif
avec paypal|appli paris sportif belgique|appli paris sportif
entre amis|appli paris sportif gratuit|appli paris sportif sans argent|appli paris sportif suisse|appli paris sportifs|application aide paris sportif|application algorithme paris sportif|application analyse paris sportif|application android paris sportif|application bankroll paris sportif|application conseil paris sportif|application de pari sportif|application de
parie sportif|application de paris sportif|application de paris sportif en afrique|application de paris sportif en cote d’ivoire|application de paris
sportif en ligne|application de paris sportif gratuit|application de paris sportif international|application de paris sportif suisse|application de paris
sportifs|application faux paris sportifs|application gestion bankroll paris sportif|application gestion paris sportif|application ia paris sportif|application pari sportif gratuit|application paris sportif|application paris sportif android|application paris sportif argent fictif|application paris sportif
belgique|application paris sportif canada|application paris sportif espagne|application paris
sportif espagnol|application paris sportif fictif|application paris sportif france|application paris sportif gratuit|application paris sportif
gratuit entre amis|application paris sportif maroc|application paris sportif offre de bienvenue|application paris sportif paypal|application paris
sportif sans argent|application paris sportif sans justificatif de domicile|application paris sportif suisse|application paris sportif usa|application paris sportif virtuel|application pour faire
des paris sportifs|application pour gerer ses paris sportif|application pour
les paris sportifs|application pour pari sportif|application pour paris sportif|application pour paris sportifs|application statistique
paris sportif|application suivi paris sportif|applications de paris sportifs|applications
paris sportifs|applis paris sportif|applis paris sportifs|apprendre a
faire des paris sportifs|argent facile paris sportif|argent
offert paris sportifs|argent offert sans depot paris sportif|argent paris
sportif|argent paris sportifs|argent paris sportifs impots|argent
sans depot paris sportif|arjel paris sportif|arjel paris sportifs|astuce gagner
paris sportif|astuce pari sportif|astuce paris sportif|astuce paris sportif basket|astuce paris sportif foot|astuce paris sportif forum|astuce paris sportif tennis|astuce paris sportifs|astuce pour gagner au pari sportif|astuce pour gagner
au paris sportif|astuce pour gagner paris sportif|astuce
pour paris sportif|astuces paris sportifs|astuces paris sportifs en ligne|astuces paris sportifs foot|astuces pour
gagner aux paris sportifs|autorisation paris sportif france|avis pari sportif|avis paris
sportif|avis paris sportif foot|avis site
de paris sportif|avis site paris sportif|avis sur les paris sportifs|avis sur paris sportif|avis tipster paris sportif|aweh
signification paris sportif|bankroll 100 euros paris sportifs|bankroll management paris sportif|bankroll paris sportif|bankroll paris sportif excel|bankroll paris sportif gratuit|bankroll paris sportifs|basket paris sportif|belgique france paris sportif|belgique paris sportifs|bonus bienvenue paris sportif|bonus bienvenue paris sportifs|bonus cash paris sportif|bonus de bienvenue paris sportif|bonus de
bienvenue paris sportif belgique|bonus de bienvenue sans depot paris sportif|bonus de depot paris sportif|bonus de paris
sportifs|bonus depot paris sportif|bonus en cash paris
sportif|bonus gratuit paris sportif|bonus gratuit sans depot
paris sportif|bonus pari sportif|bonus paris sportif|bonus paris sportif belgique|bonus paris sportif betclic|bonus paris sportif
cash|bonus paris sportif en ligne|bonus paris sportif france pari|bonus
paris sportif retirable|bonus paris sportif
sans depot|bonus paris sportif sans dépôt|bonus paris sportif unibet|bonus paris sportifs|bonus sans depot
paris sportif|bonus sans depot paris sportif belgique|bonus sans dépôt paris
sportif|bonus sans dépôt paris sportif hors arjel|bonus site de paris sportif|bonus
site pari sportif|bonus site paris sportif|bonus sites de paris sportifs|bonus
unibet paris sportif|bookmaker paris sportif|bookmaker paris
sportif gratuit|bookmaker paris sportifs|bookmaker sportif|bookmakers paris sportif|bookmakers
paris sportifs|bookmakers paris sportifs en ligne|but contre son camp
paris sportif|but sur penalty paris sportif|buteur paris sportif|c’est quoi handicap
paris sportif|c’est quoi une cote paris sportif|calcul
anti perte paris sportif|calcul combinaison pari sportif|calcul cote pari
sportif|calcul cote paris sportif|calcul couverture paris sportif|calcul de cote paris sportif|calcul
des cotes paris sportifs|calcul dnb paris sportifs|calcul double chance paris sportif|calcul gain paris sportif|calcul mise paris sportif|calcul pari sportif|calcul paris sportif|calcul paris sportif
multiple|calcul pourcentage cote paris sportif|calcul probabilité
paris sportif|calcul rentabilité paris sportifs|calcul roi paris sportif|calcul systeme paris sportif|calcul trj paris sportifs|calculateur cote paris sportif|calculateur de cote paris sportif|calculateur de mise paris
sportif|calculateur de paris sportif|calculateur paris sportif|calculatrice arbitrage paris sportif|calculatrice paris sportif|calculer
cote paris sportif|calculer gain paris sportif|calculer probabilité paris sportifs|calculer roi paris
sportifs|calculer une cote pari sportif|calculer une cote paris sportif|carte
cadeau paris sportif|carte pcs paris sportif|carte prépayée paris sportifs|cash out
pari sportif|cash out paris sportif|cash out paris
sportifs|casino en ligne paris sportif|casino paris sportif
en ligne|champions league paris sportif|chute de cote paris sportif|classement des meilleurs sites de paris sportifs|classement meilleur site de paris sportif|code barre paris sportif|code bonus paris sportif|code paris sportif|code promo pari sportif|code promo paris sportif|code promo
paris sportif sans depot|code promo paris sportif sans dépôt|code promo sans
depot paris sportif|code promo site paris sportif|combien de temps pour encaisser un paris sportif|combien de temps pour retirer un paris sportif|combien miser
paris sportifs|combine paris sportif|combines paris sportifs|combiné pari sportif|combiné paris sportif|combiné paris sportif conseil|combiné paris sportif du jour|combiné paris sportif pronostic|comment analyser un paris sportif|comment arreter de jouer aux paris sportifs|comment arreter les paris sportif|comment
arreter les paris sportifs|comment arrêter les paris sportifs|comment
bien gagner au paris sportif|comment bien jouer au paris sportif|comment bien miser paris sportif|comment ca marche
les paris sportif|comment calculer cote paris sportif|comment calculer gain paris sportif|comment calculer les cotes des paris sportifs|comment calculer une cote
de paris sportif|comment calculer une cote pari sportif|comment calculer une
cote paris sportif|comment comprendre les paris sportifs|comment creer
un vip paris sportif|comment créer un algorithme
paris sportif|comment créer un site de paris sportif|comment devenir riche avec les paris sportifs|comment etre rentable paris
sportif|comment etre sur de gagner au paris sportif|comment faire de bon paris sportif|comment faire des parie sportif|comment faire des paris sportif|comment faire des paris
sportif gagnant|comment faire des paris sportifs|comment faire pari sportif|comment faire paris sportif|comment faire pour arreter les paris sportifs|comment faire pour gagner au paris sportif|comment faire pour
gagner les paris sportifs|comment faire un bon pari sportif|comment faire un bon paris sportif|comment faire un pari sportif|comment faire un parie sportif|comment faire un paris sportif|comment faire une montante paris
sportif|comment fonctionne les cotes dans les paris sportifs|comment fonctionne les cotes des paris sportifs|comment fonctionne les paris sportifs|comment fonctionne
paris sportifs|comment fonctionne un pari sportif|comment fonctionnent les cotes dans les paris sportifs|comment fonctionnent les cotes dans les paris
sportifs grand oral|comment fonctionnent les cotes de
paris sportif|comment fonctionnent les paris sportifs|comment
fonctionnent les paris sportifs grand oral|comment fonctionnent les paris sportifs grand oral maths|comment
fonctionnent les paris sportifs maths|comment gagner a coup sur au paris sportif|comment gagner a tous les
coups au paris sportif|comment gagner a tout les coup au paris
sportif|comment gagner au pari sportif|comment gagner au pari sportif
football|comment gagner au paris sportif|comment gagner au paris sportif a coup sur|comment gagner au
paris sportif foot|comment gagner au paris sportif forum|comment gagner
au paris sportif tennis|comment gagner au paris sportifs|comment gagner aux paris sportif|comment gagner
aux paris sportifs|comment gagner aux paris sportifs foot|comment gagner aux
paris sportifs livre|comment gagner aux paris sportifs sur le long terme|comment gagner avec les paris
sportifs|comment gagner dans les paris sportifs|comment gagner de l
argent avec les paris sportifs|comment gagner de l’argent
au paris sportif|comment gagner de l’argent aux paris sportifs|comment gagner de l’argent
avec les paris sportifs|comment gagner de l’argent paris sportif|comment gagner de l’argent sur
les paris sportifs|comment gagner de l’argent sur paris
sportif|comment gagner des paris sportif|comment gagner des paris sportifs|comment gagner en paris sportif|comment gagner facilement au paris sportif|comment gagner les paris sportifs|comment gagner
paris sportif|comment gagner paris sportif foot|comment gagner paris sportifs|comment gagner sa vie avec les paris sportifs|comment gagner ses paris sportif|comment gagner sur les paris sportif|comment gagner sur les paris sportifs|comment gagner
tout le temps au paris sportif|comment gagner un pari sportif|comment gagner un paris sportif|comment gerer une bankroll paris
sportif|comment gérer sa bankroll paris sportif|comment jouer au pari sportif|comment
jouer au paris sportif|comment jouer au paris sportif foot|comment jouer aux paris sportifs|comment jouer paris sportif|comment
marche cote paris sportif|comment marche les cotes paris
sportif|comment marche les paris sportif|comment marche les paris sportifs|comment marche paris sportif|comment marche un pari sportif|comment marche un paris sportif|comment marchent les cotes paris sportif|comment marchent les paris sportifs|comment miser au paris sportif|comment miser paris
sportif|comment monter sa bankroll paris sportif|comment ne jamais perdre au
paris sportif|comment parier sportif|comment reussir au paris sportif|comment reussir les paris sportif|comment reussir paris sportif|comment sont
calculer les cotes de paris sportif|comment
sont calculées les cotes des paris sportifs|comment sont calculés les
cotes des paris sportifs|comment sont faites les
cotes des paris sportifs|comment toujours gagner au paris sportif|comment ça marche les paris sportifs|comparaison bonus paris sportifs|comparaison cote pari sportif|comparaison des cotes paris sportifs|comparateur cote pari sportif|comparateur cote paris sportif|comparateur cotes paris sportif|comparateur cotes paris sportifs|comparateur de cote pari sportif|comparateur de cote paris sportif|comparateur de cotes paris sportifs|comparateur de côtes paris
sportifs|comparateur de paris sportif|comparateur de site de paris sportif|comparateur de
site paris sportif|comparateur de sites de paris sportifs|comparateur pari
sportif|comparateur paris sportif|comparateur paris sportifs|comparateur site de paris sportif|comparateur
site pari sportif|comparateur site paris
sportif|comparatif bonus paris sportif|comparatif bonus paris
sportifs|comparatif cote pari sportif|comparatif cote paris sportif|comparatif
cotes paris sportifs|comparatif des sites de paris sportifs|comparatif offre de
bienvenue paris sportif|comparatif offre paris sportif|comparatif pari sportif|comparatif pari sportif en ligne|comparatif paris sportif|comparatif paris sportif bonus|comparatif paris sportif
en ligne|comparatif paris sportifs|comparatif paris sportifs en ligne|comparatif site de paris sportif|comparatif site paris
sportif|comparatif site paris sportifs|comparatif sites de paris sportifs|comparatif sites paris sportifs|comparer les cotes
paris sportifs|comprendre cote paris sportif|comprendre handicap paris sportif|comprendre les cotes des paris sportifs|comprendre les cotes paris sportif|comprendre les cotes
paris sportifs|comprendre les handicap paris
sportif|compte de paris sportif|compte démo paris sportif|compte finance paris sportif|compte financer paris sportif|compte financier paris
sportif|compte financé paris sportif|compte pari sportif|compte paris sportif|compte paris sportif financé|conseil de paris sportif|conseil de paris sportifs|conseil
en paris sportif|conseil en paris sportifs|conseil pari sportif|conseil pari
sportif gratuit|conseil paris sportif|conseil paris sportif
aujourd’hui|conseil paris sportif du jour|conseil paris
sportif foot|conseil paris sportif gratuit|conseil paris sportif ligue des champions|conseil paris sportif
nba|conseil paris sportif pronostic|conseil paris sportif rmc|conseil paris sportif tennis|conseil paris sportifs|conseil pour gagner au paris sportif|conseil pour paris
sportif|conseil sur les paris sportifs|conseille paris sportif|conseiller en paris sportifs|conseiller paris sportif|conseils
de paris sportifs|conseils en paris sportifs|conseils paris
sportifs|conseils paris sportifs foot|conseils paris sportifs gratuit|conseils paris sportifs tennis|conseils pour
paris sportifs|cote a 100 paris sportif|cote a 2 paris sportif|cote anglaise paris sportif|cote de 2
paris sportif|cote de pari sportif|cote de paris sportif|cote des paris sportifs|cote maximum
paris sportif|cote minimum paris sportif|cote pari sportif|cote pari sportif comment ça marche|cote pari
sportif real madrid|cote pari sportif rugby|cote parie sportif|cote paris sportif|cote paris sportif
belgique|cote paris sportif calcul|cote paris sportif definition|cote paris sportif
euro|cote paris sportif explication|cote paris sportif foot|cote paris sportif france belgique|cote paris sportif
france espagne|cote paris sportif ligue des champions|cote paris sportif moto gp|cote paris sportif psg|cote paris sportif psg arsenal|cote paris
sportif rugby|cote paris sportif tennis|cote paris sportifs|cote pour paris sportifs|cote sportif foot|cote
sportif rugby|cote à 1000 paris sportif|cotes de paris
sportifs|cotes pari sportif|cotes paris sportif|cotes paris sportifs|cotes paris sportifs foot|coupe de france paris sportif|créer un algorithme paris sportif|créer un compte paris sportif|créer
un site de paris sportif en ligne|dans les paris sportifs que
signifie handicap|declarer ses gains paris sportif|definition cash out paris sportif|definition cote paris
sportif|definition handicap paris sportif|depot 5 euros paris sportif|depot double paris
sportif|depot minimum 5 euro paris sportif|depot minimum paris sportif|depot paris sportif|depuis quand existe les
paris sportif en france|devenir riche avec les paris sportifs|devenir riche
avec paris sportifs|disqualification tennis
paris sportif|dnb en paris sportif|dnb pari sportif|dnb paris sportif|dnb paris sportif definition|dnb
paris sportifs|doit on declarer les gains de paris sportif|déclarer gains paris sportifs|déclarer gains paris
sportifs hors arjel|définition bankroll paris sportif|dépôt minimum 1 euro paris sportif|dépôt minimum 5
euro paris sportif|ecart de jeux tennis paris sportif|erreur de cote paris sportif|est ce
que les gains des paris sportifs sont imposables|est-ce que les prolongation compte dans un pari sportif|etre sur de gagner au paris
sportif|euro paris sportif|evenement sportif a paris|evenement sportif paris|evenement sportif paris 2025|evenement sportif paris aujourd hui|evenement sportif
paris aujourd’hui|evenement sportif paris ce week end|evenements sportif paris|evenements sportifs paris|evenements sportifs paris 2025|evenements
sportifs à paris|evolution cote paris sportif|evolution cotes paris sportifs|evolution des cotes paris sportifs|explication cote pari sportif|explication cote paris sportif|explication handicap
paris sportif|explication pari sportif|explication paris sportif|face a
face hockey paris sportif|faire des paris sportif|faire
des paris sportif avec paypal|faire des paris sportifs|faire fortune paris sportifs|faire un pari sportif|faire un paris sportif|faut il déclarer les gains de paris sportifs|faut il déclarer ses gains paris sportifs|fichier excel gestion bankroll paris sportif|fiscalité gains paris sportifs|foot
paris sportif|football et paris sportifs|forfait tennis paris sportif|formation paris sportif gratuit|forum de paris sportif|forum de paris
sportifs|forum pari sportif|forum parie sportif|forum paris sportif|forum paris sportif foot|forum paris sportif gratuit|forum paris sportif nba|forum paris sportif tennis|forum paris sportifs|forum sur les paris sportifs|forum tennis paris sportif|francaise des jeux
pari sportif|francaise des jeux paris sportif|francaise
des jeux paris sportifs|france 2 paris sportif|france 2 paris sportifs|france belgique paris sportif|france espagne paris sportif|france pari sportif|france
pari sportif brest|france paris sportif|france
paris sportifs|france pologne paris sportif|france portugal paris sportif|france suisse paris sportifs|france tunisie paris sportifs|france-pari – paris sportifs|gagnant pari sportif|gagnant paris sportif|gagnant paris sportif bayern|gagnante paris sportif|gagne au paris sportif|gagner 10 euros par jour aux paris sportifs|gagner 100 euros par jour paris sportif|gagner 1000 euros par mois paris sportifs|gagner 10000
euros paris sportif|gagner 2000 euros par mois paris sportif|gagner 50 euros par jour paris sportif|gagner a coup sur au paris sportif|gagner
a coup sur pari sportif|gagner a tous les coup paris sportif|gagner argent avec
paris sportifs|gagner argent pari sportif|gagner argent paris
sportif|gagner argent paris sportifs|gagner au pari sportif|gagner au paris sportif|gagner au paris sportif a coup sur|gagner au paris sportif foot|gagner
au paris sportif forum|gagner au paris sportif à coup sur|gagner aux paris sportif|gagner aux paris sportifs|gagner aux paris sportifs pdf|gagner beaucoup d’argent paris sportif|gagner de l argent grace aux paris sportifs|gagner de l argent pari sportif|gagner de l argent
paris sportif|gagner de l argent paris sportifs|gagner
de l’argent au paris sportif|gagner de l’argent aux paris sportifs|gagner de l’argent avec
les paris sportifs|gagner de l’argent avec paris sportif|gagner de l’argent avec paris sportifs|gagner de l’argent grace au paris
sportif|gagner de l’argent grace aux paris sportifs|gagner
de l’argent pari sportif|gagner de l’argent paris sportif|gagner de l’argent paris sportifs|gagner de l’argent sur les paris sportifs|gagner des paris sportif|gagner des paris
sportifs|gagner les paris sportifs|gagner pari sportif|gagner paris sportif|gagner paris sportif foot|gagner paris sportif forum|gagner paris sportif tennis|gagner paris
sportifs|gagner sa vie avec les paris sportif|gagner sa vie avec les paris sportifs|gagner sa vie avec paris sportifs|gagner ses paris sportifs|gagner à coup
sur paris sportif|gagner à tous les coups paris sportifs|gain maximum
paris sportif|gain pari sportif|gain pari sportif imposable|gain pari sportif impot|gain paris sportif|gain paris
sportif imposable|gain paris sportif impot|gain paris sportif impôt|gains
paris sportif|gains paris sportif imposable|gains paris sportifs|gains paris sportifs imposable|gains paris sportifs imposables|gains paris sportifs sont ils imposables|gerer bankroll paris
sportif|gerer sa bankroll paris sportif|gerer une bankroll paris sportif|gestion bankroll paris sportif|gestion bankroll paris sportifs|gestion bankroll paris sportifs excel|gestion de bankroll paris
sportif|gestion de bankroll paris sportif application|gestion de bankroll paris sportifs|gestion de mise
paris sportif|gestion paris sportifs v2 5 gratuit|gg signification paris sportif|gros combiné paris sportif|gros gain paris sportif|grosse cote paris sportif
pronostic|grosse mise paris sportif|groupe paris sportif gratuit|groupe telegram paris sportif
gratuit|groupement de joueurs paris sportifs|handicap 0 paris sportif|handicap 1
paris sportif|handicap 5 paris sportif|handicap au paris sportif|handicap basket paris sportif|handicap dans les paris sportifs|handicap en paris sportif|handicap europeen paris sportif|handicap européen paris sportifs|handicap mi temps paris sportif|handicap pari
sportif|handicap paris sportif|handicap paris sportif basket|handicap paris
sportif explication|handicap paris sportif foot|handicap paris sportif rugby|handicap paris sportifs|handicap rugby paris sportif|handicap tennis paris sportif|historique cote paris sportif|historique des cotes
paris sportifs|hockey paris sportif|hockey sur glace paris sportif|hors arjel paris sportif|hweh signification paris sportif|imposition gain pari
sportif|imposition gain paris sportif|imposition gains paris sportifs|imposition paris sportif france|impot gain paris
sportif|impot paris sportif france|impot sur gain paris
sportif|je gagne ma vie avec les paris sportifs|jeu de pari sportif gratuit|jeu de paris sportif en ligne|jeu de
paris sportif gratuit|jeu paris sportif gratuit|jeu paris sportif
sans argent|jeux de parie sportif|jeux de paris sportif|jeux de paris sportif en ligne|jeux de paris sportif gratuit|jeux de paris sportifs|jeux olympiques paris sportifs|jeux paris sportif|jeux paris sportif gratuit|jeux paris sportif virtuel|jeux paris sportifs en ligne|jouer au paris
sportif|jouer paris sportif|joueur absent paris sportif|joueur blesse paris sportif|joueur caen paris sportif|joueur de caen pari sportif|joueur de foot paris sportif|joueur decisif paris sportif|joueur décisif paris sportif|joueur italien paris sportif|joueur paris sportif|joueur professionnel
paris sportif|joueur qui se blesse paris sportif|joueur sanctionne pari sportif|joueur suspendu paris sportif|joueurs italiens paris sportifs|l’argent des paris sportifs est il imposable|la cote paris sportif|la francaise des jeux paris sportif|la martingale paris sportif|la martingale
paris sportifs|la meilleur application de paris sportif|la meilleur application paris
sportif|la meilleur technique pour gagner au paris sportif|la méthode secrète pour gagner aux paris sportifs pdf|la plus grosse
cote gagner paris sportif|la plus grosse cote paris sportif|ldem paris sportif signification|le marché des paris sportifs|le meilleur site de pari sportif|le meilleur site de paris sportif|le meilleur site de paris sportif en ligne|le meilleur site de
paris sportifs|le plus gros gain au paris sportif|le
plus gros paris sportif|le plus gros paris sportif du monde|les 10 meilleurs
sites de paris sportifs|les 10 meilleurs sites de paris sportifs en afrique|les 17 secrets pour gagner rapidement aux paris sportifs|les 17 secrets pour gagner rapidement aux paris sportifs pdf|les
application de paris sportif|les applications paris sportifs|les bonus paris
sportifs|les bookmakers paris sportifs|les cotes paris sportifs|les gains de paris sportifs
sont ils imposables|les gains des paris sportifs sont ils
imposables|les jeux de paris sportifs|les meilleur
paris sportif|les meilleures applications de paris sportifs|les meilleurs applications de paris sportifs|les meilleurs bonus paris sportif|les meilleurs bonus paris sportifs|les
meilleurs cotes paris sportif|les meilleurs paris
sportifs|les meilleurs paris sportifs du jour|les meilleurs site de paris sportif|les meilleurs site
de paris sportifs|les meilleurs sites de pari sportif|les meilleurs sites
de paris sportifs|les meilleurs sites de paris sportifs en ligne|les
paris sportif|les paris sportif avis|les paris sportifs|les paris sportifs comment ça marche|les paris sportifs en france|les paris sportifs en ligne|les paris sportifs en ligne comprendre jouer gagner|les paris sportifs en ligne comprendre
jouer gagner pdf|les paris sportifs les plus rentables|les plus gros gagnant
paris sportif|les plus gros gains au paris sportifs|les plus gros
gains paris sportifs|les plus gros paris sportif|les plus grosse cote paris sportif|les plus grosses pertes paris sportifs|les sites de paris sportifs|les sites de paris sportifs autorisés en france|les sites de paris sportifs en france|les sites de
paris sportifs en ligne|les sites de paris sportifs francais|ligue
1 paris sportif|ligue 1 paris sportifs|ligue 2 paris sportif|ligue des champions paris
sportif|limite de gains paris sportifs|limite
de mise paris sportif|limite gain paris sportif|limite mise paris sportifs|liste de
paris sportif|liste des paris sportifs|liste des site de
paris sportif|liste des sites de paris sportifs|liste pari
sportif|liste paris sportif|liste paris sportif pdf|liste site
de paris sportif|liste site pari sportif|liste site paris
sportif|liste site paris sportif arjel|liste sites paris sportifs|logiciel algorithme
paris sportif|logiciel algorithme paris sportif gratuit|logiciel
analyse paris sportif|logiciel calcul paris sportif|logiciel de pari sportif|logiciel de paris sportif|logiciel de paris sportif gratuit|logiciel
gestion bankroll paris sportif gratuit|logiciel gestion de bankroll paris
sportif|logiciel gestion paris sportif|logiciel gestion paris sportif gratuit|logiciel gestion paris sportifs|logiciel pari sportif|logiciel paris sportif|logiciel paris sportif gratuit|logiciel paris sportifs|logiciel paris sportifs foot
sur 2 matchs|logiciel pour paris sportif|logiciel pour paris sportifs|logiciel prediction paris sportif|logiciel probabilité paris sportif|logiciel
prédiction paris sportif|logiciel statistique paris sportifs|logiciel variation de cote paris sportif|loi sur les paris sportifs
en france|magic calculator paris sportif|marché des paris sportifs|marché des paris sportifs en france|marché des paris sportifs en ligne|martingale pari sportif|martingale paris sportif|martingale paris sportif
excel|martingale paris sportif forum|martingale paris sportif interdit|martingale paris sportifs|match abandonné paris sportif|match annulé ou reporté paris sportifs|match annulé paris sportif|match arrete paris sportif|match interrompu paris sportif|match interrompu tennis paris sportif|match interrompu tennis
pluie paris sportif|match nul boxe paris sportif|match pari sportif|match paris sportif|match reporté paris sportif|match suspendu paris sportif|match suspendu tennis
paris sportif|match truqué paris sportif|matchs truqués paris sportifs|meilleur algorithme paris sportif|meilleur algorithme paris sportif gratuit|meilleur app
de paris sportif|meilleur app de paris sportifs|meilleur app paris
sportif|meilleur appli de pari sportif|meilleur appli de paris sportif|meilleur appli
pari sportif|meilleur appli paris sportif|meilleur appli paris sportif forum|meilleur appli paris sportifs|meilleur application conseil paris sportif|meilleur application de paris sportif|meilleur application de
paris sportif en afrique|meilleur application pari sportif|meilleur application paris sportif|meilleur application paris sportif belgique|meilleur application pour les paris
sportif|meilleur application pour pari sportif|meilleur bonus de bienvenue paris sportif|meilleur bonus pari sportif|meilleur bonus
paris sportif|meilleur bonus paris sportif sans depot|meilleur bonus paris sportifs|meilleur bonus site de paris sportif|meilleur
bonus site pari sportif|meilleur bonus site paris sportif|meilleur bookmaker paris sportif|meilleur combiné paris sportif|meilleur conseil paris sportif|meilleur cote de paris
sportif|meilleur cote pari sportif|meilleur cote paris sportif|meilleur cote
paris sportif aujourd’hui|meilleur cote site paris sportif|meilleur forum paris
sportifs|meilleur gain paris sportif|meilleur ia paris sportif|meilleur
methode pour gagner au paris sportif|meilleur offre bienvenue paris sportif|meilleur offre bonus paris sportif|meilleur offre de
bienvenue paris sportif|meilleur offre de
bienvenue paris sportifs|meilleur offre pari sportif|meilleur offre paris sportif|meilleur offre paris sportif
en ligne|meilleur pari sportif|meilleur pari sportif
du jour|meilleur pari sportif en ligne|meilleur paris sportif|meilleur paris sportif aujourd’hui|meilleur paris sportif du jour|meilleur paris sportif
en ligne|meilleur paris sportif foot|meilleur promo paris sportif|meilleur pronostic paris sportif|meilleur
site de conseil paris sportif|meilleur site de pari sportif|meilleur site de pari sportif en ligne|meilleur site de paris sportif|meilleur site de
paris sportif avis|meilleur site de paris sportif belgique|meilleur site
de paris sportif canada|meilleur site de paris sportif en france|meilleur
site de paris sportif en ligne|meilleur site de paris sportif football|meilleur site de paris sportif forum|meilleur site de paris sportif france|meilleur site
de paris sportif hors arjel|meilleur site de paris sportif international|meilleur site de paris
sportif suisse|meilleur site de paris sportifs|meilleur
site de paris sportifs en ligne|meilleur site pari sportif|meilleur site pari sportif en ligne|meilleur
site pari sportif france|meilleur site paris sportif|meilleur site paris sportif avis|meilleur
site paris sportif belgique|meilleur site paris sportif canada|meilleur site paris
sportif en ligne|meilleur site paris sportif foot|meilleur site paris sportif forum|meilleur site paris sportif france|meilleur site
paris sportif hors arjel|meilleur site paris sportif nba|meilleur site paris sportif rugby|meilleur site paris sportif
suisse|meilleur site paris sportifs|meilleur site pour pari sportif|meilleur site pour paris sportif|meilleur site pronostic paris
sportif|meilleur strategie paris sportif|meilleur technique de paris sportif|meilleur technique paris sportif|meilleur technique pour
gagner au paris sportif|meilleure appli de paris sportif|meilleure appli de paris
sportifs|meilleure appli pari sportif|meilleure appli paris sportif|meilleure appli paris sportifs|meilleure application de paris
sportif|meilleure application de paris sportifs|meilleure application pari sportif|meilleure application paris sportif|meilleure application paris sportif android|meilleure application paris sportifs|meilleure offre paris sportif|meilleure site paris sportif|meilleure strategie paris sportif|meilleures applications de paris
sportifs|meilleures applications paris sportifs|meilleures cotes paris sportifs|meilleures offres paris sportifs|meilleures stratégies paris
sportifs|meilleurs appli paris sportif|meilleurs application de paris sportifs|meilleurs application paris sportif|meilleurs applications paris sportifs|meilleurs bonus paris sportifs|meilleurs cote paris sportif|meilleurs
cotes paris sportifs|meilleurs offres paris sportifs|meilleurs paris
sportifs|meilleurs paris sportifs du jour|meilleurs site de pari
sportif|meilleurs site de paris sportif|meilleurs site de paris sportif en ligne|meilleurs site de paris
sportifs|meilleurs site paris sportif|meilleurs sites de paris sportifs|meilleurs
sites de paris sportifs en ligne|meilleurs sites paris sportif|meilleurs sites paris sportifs|methode abc paris sportif|methode de paris sportif|methode gagnante paris sportifs|methode gagner paris sportif|methode infaillible paris
sportifs|methode martingale paris sportif|methode mathematique
paris sportif|methode mathematique pour gagner au paris
sportif|methode paris sportif|methode paris sportif foot|methode paris
sportif forum|methode paris sportif tennis|methode paris sportifs|methode pour
gagner au paris sportif|methode pour gagner paris sportif|methodes paris sportifs|minimum depot paris sportif|mise au jeu pari sportif|mise maximum pari sportif|mise maximum paris sportif|mise minimum paris sportif|mise moyenne paris
sportif|mise paris sportif|moins de 4 5 but
paris sportif|montant maximum paris sportif|montant paris sportif|montante
pari sportif|montante parie sportif|montante paris sportif|montante paris sportifs|montantes
paris sportifs|multiple pari sportif|multiple paris sportif|multiple paris sportifs|multiples paris sportifs|méthode calcul paris sportif|méthode match
nul paris sportifs|méthode mathématique pour gagner au paris sportif|méthode paris sportif forum|méthode paris sportif hockey|nba pari sportif|nba paris sportif|nba paris sportifs|nouveau paris sportif|nouveau site de pari
sportif|nouveau site de paris sportif|nouveau site de paris sportif en ligne|nouveau site de paris sportifs|nouveau
site pari sportif|nouveau site paris sportif|nouveau site paris
sportif france|nouveau site paris sportifs|nouveaux sites de paris sportifs|nouveaux sites paris
sportifs|nouvelle appli paris sportif|nouvelle application de paris sportif|numero de match paris sportif|numero match paris sportif|offre 100
euros paris sportif|offre appli pari sportif|offre bienvenu paris sportif|offre bienvenue pari sportif|offre bienvenue paris sportif|offre bienvenue paris sportifs|offre bienvenue site paris
sportif|offre bonus paris sportif|offre de bienvenu paris sportif|offre
de bienvenue pari sportif|offre de bienvenue paris sportif|offre de bienvenue paris
sportif belgique|offre de bienvenue paris sportif sans depot|offre
de bienvenue paris sportif sans dépôt|offre de bienvenue paris
sportifs|offre de bienvenue sans depot paris sportif|offre de bienvenue site paris sportif|offre
euro paris sportif|offre pari sportif euro|offre paris
sportif|offre paris sportif belgique|offre paris sportif cash|offre paris sportif coupe du monde|offre paris sportif hors
arjel|offre paris sportif remboursé|offre paris sportif remboursé cash|offre paris
sportif sans depot|offre promo paris sportif|offre remboursement paris sportif|offre
sans depot paris sportif|offre site paris sportif|offres
bienvenue paris sportifs|offres de bienvenue paris sportifs|ou faire
des paris sportif|ou faire des paris sportif en espagne|ou faire des paris sportifs|outil répartiteur de mise paris sportif|outils
repartiteur de mises paris sportif|ouverture compte paris sportifs|ouvrir
un compte paris sportif|pack de bienvenue paris sportif|pack
de bienvenue paris sportif hors arjel|pari en ligne sportif|pari
sportif|pari sportif 100 euros offert|pari sportif 100 remboursé|pari sportif
abandon tennis|pari sportif aide|pari sportif algérie aujourd’hui|pari sportif appli|pari
sportif application|pari sportif argent|pari sportif astuce|pari sportif aujourd|pari sportif aujourd’hui|pari sportif avec handicap|pari sportif avec orange money|pari sportif avec paypal|pari sportif avec wave|pari sportif avis|pari sportif basket|pari sportif belgique|pari sportif belgique france|pari sportif bonus|pari sportif
buteur pas titulaire|pari sportif champions league|pari
sportif combiné|pari sportif comment|pari sportif comment gagner|pari sportif comment ça marche|pari sportif comparatif|pari sportif conseil|pari sportif cote|pari sportif
cote match|pari sportif cote psg|pari sportif coupe|pari sportif coupe de france|pari sportif coupe du monde|pari sportif
depot|pari sportif du jour|pari sportif en france|pari sportif en ligne|pari sportif en ligne
au cameroun|pari sportif en ligne belgique|pari sportif en ligne canada|pari sportif en ligne france|pari
sportif en ligne gratuit|pari sportif en ligne suisse|pari sportif en ligne ufc|pari
sportif en suisse|pari sportif euro|pari sportif explication|pari sportif faire|pari sportif foot|pari sportif foot resultat|pari
sportif football|pari sportif forum|pari sportif francaise des
jeux|pari sportif france|pari sportif france angleterre|pari sportif france argentine|pari
sportif france autriche|pari sportif france belgique|pari sportif france espagne|pari sportif france italie|pari sportif france portugal|pari sportif france usa|pari sportif gagnant|pari sportif gagner|pari sportif gagner
a tous les coups|pari sportif gagner de l’argent|pari sportif gain|pari sportif gratuit|pari sportif
gratuit pour gagner des cadeaux|pari sportif gratuit sans depot|pari sportif handicap|pari sportif hockey|pari sportif hors arjel|pari sportif jeux olympiques|pari sportif joueur absent|pari sportif
le plus rentable|pari sportif leicester champion|pari sportif ligue 1|pari sportif ligue
2|pari sportif ligue des champions|pari sportif ligue europa|pari sportif
match|pari sportif match arrete|pari sportif match interrompu|pari sportif meilleur|pari sportif meilleur
cote|pari sportif meilleur site|pari sportif methode|pari sportif mise|pari sportif
mise au jeu|pari sportif mise o jeu|pari sportif nba|pari
sportif offre bienvenue|pari sportif paypal|pari sportif plus|pari sportif prolongation|pari sportif promo|pari sportif pronostic|pari sportif pronostic foot|pari
sportif pronostic gagnant|pari sportif pronostic gratuit|pari sportif psg|pari sportif psg bayern|pari sportif
psg inter|pari sportif psg milan|pari sportif regle|pari sportif rembourse|pari sportif
remboursement|pari sportif remboursement cash|pari sportif remboursé|pari sportif rugby|pari sportif rugby coupe du monde|pari
sportif rugby top 14|pari sportif sans argent|pari sportif sans
carte bancaire|pari sportif sans depot|pari sportif
signification|pari sportif site|pari sportif statistique|pari sportif suisse|pari sportif systeme|pari sportif technique|pari
sportif technique pour gagner|pari sportif temps reglementaire|pari sportif tennis|pari sportif tennis abandon|pari sportif top|pari sportif top
14|pari sportif tour de france|parie sportif|parie sportif comment
ca marche|parie sportif du jour|parie sportif en ligne|parie sportif foot|parie sportif football|parie
sportif france|parie sportif gratuit|parie sportif pronostic|parie sportif suisse|paris en ligne sportif|paris en ligne sportifs|paris evenement sportif|paris france sportif|paris hippique et sportif|paris hippiques
et sportifs|paris hippiques paris sportifs|paris hippiques
paris sportifs et poker en ligne|paris hippiques sportifs|paris match sportif|paris
sportif|paris sportif 10 euros offerts|paris sportif 100 euros offert|paris sportif 100 euros remboursé|paris sportif 100 offert|paris sportif 100 remboursé|paris sportif
100e offert|paris sportif 150 euros offert|paris sportif 1er pari remboursé|paris sportif a faire|paris sportif a faire aujourd’hui|paris sportif a faire ce soir|paris sportif abandon tennis|paris sportif abandon tennis parions sport|paris sportif aide|paris sportif algorithme|paris
sportif analyse|paris sportif appli|paris sportif application|paris sportif application android|paris sportif apres prolongation|paris sportif argent|paris sportif argent fictif|paris sportif argent offert|paris
sportif argent virtuel|paris sportif arjel|paris
sportif arsenal psg|paris sportif astuce|paris sportif au
canada|paris sportif aujourd hui|paris sportif aujourd’hui|paris sportif avec
argent fictif|paris sportif avec bonus sans depot|paris sportif avec carte bancaire|paris sportif avec cryptomonnaie|paris sportif avec handicap|paris sportif avec paypal|paris sportif avec paysafecard|paris sportif avis|paris
sportif avis expert|paris sportif avis forum|paris sportif bankroll|paris sportif basket|paris sportif
basket coupe de france|paris sportif basket nba|paris
sportif basket prolongation|paris sportif belgique|paris sportif belgique bonus|paris sportif
belgique bonus sans depot|paris sportif belgique france|paris sportif belgique suede|paris sportif bonus|paris sportif bonus bienvenue|paris sportif bonus
cash|paris sportif bonus de bienvenue|paris sportif bonus gratuit|paris sportif bonus gratuit sans depot|paris sportif bonus retirable|paris sportif bonus sans depot|paris sportif bonus
sans depot belgique|paris sportif bookmaker|paris
sportif but contre son camp|paris sportif but temps
additionnel|paris sportif buteur|paris sportif buteur blessé|paris sportif buteur
carton rouge|paris sportif buteur contre son camp|paris sportif buteur non titulaire|paris sportif buteur prolongation|paris sportif buteur qui ne joue pas|paris sportif buteur remplacant|paris sportif calcul gain|paris sportif canada|paris sportif cash|paris
sportif cash out|paris sportif champion ligue 1|paris sportif
champions league|paris sportif classement ligue
1|paris sportif code promo|paris sportif combine|paris sportif combiné|paris sportif combiné
comment ça marche|paris sportif combiné du jour|paris sportif
combiné match reporté|paris sportif comment ca
marche|paris sportif comment faire|paris sportif comment gagner|paris sportif comment gagner a tous les coups|paris sportif comment jouer|paris sportif comment ça marche|paris sportif
comparateur cote|paris sportif comparatif|paris sportif conseil|paris sportif conseil gratuit|paris sportif conseil pour
gagner|paris sportif cote|paris sportif cote et match|paris sportif cote explication|paris sportif cote psg|paris sportif
coupe d’europe|paris sportif coupe davis|paris sportif coupe de france|paris sportif coupe du monde|paris sportif coupe du monde de rugby|paris sportif coupe du monde rugby|paris sportif depot 5 euro|paris
sportif depot minimum|paris sportif depot paypal|paris sportif dnb|paris sportif
du jour|paris sportif du jour conseil|paris sportif dépôt 1
euro|paris sportif dépôt minimum 5 euros|paris sportif
en belgique|paris sportif en france|paris sportif en ligne|paris sportif en ligne avec paypal|paris sportif en ligne avis|paris sportif en ligne belgique|paris sportif en ligne bonus|paris sportif
en ligne cameroun|paris sportif en ligne comment gagner|paris sportif
en ligne comment ça marche|paris sportif en ligne france|paris sportif en ligne gratuit|paris sportif en ligne maroc|paris sportif en ligne paypal|paris sportif en ligne québec|paris sportif en ligne sans depot|paris sportif en ligne suisse|paris sportif
en suisse|paris sportif espagne france|paris sportif
esport|paris sportif et casino en ligne|paris sportif et hippique|paris sportif et prolongation|paris sportif
euro|paris sportif europa league|paris sportif explication|paris sportif final ligue des champions|paris sportif finale ligue des
champions|paris sportif foot|paris sportif foot aide|paris sportif foot astuce|paris
sportif foot aujourd’hui|paris sportif foot ce soir|paris
sportif foot comment ca marche|paris sportif foot conseil|paris
sportif foot cote|paris sportif foot coupe du monde|paris sportif foot en ligne|paris sportif foot feminin|paris sportif foot gratuit|paris sportif foot
prolongation|paris sportif foot pronostic|paris sportif foot pronostic gratuit|paris sportif foot regle|paris sportif
foot suisse|paris sportif foot us|paris sportif football|paris sportif football americain|paris sportif football astuces|paris sportif forfait tennis|paris sportif
forum|paris sportif francais|paris sportif francaise des
jeux|paris sportif france|paris sportif france 2|paris sportif france allemagne|paris sportif france angleterre|paris sportif france argentine|paris sportif
france autriche|paris sportif france belgique|paris sportif france espagne|paris sportif france gibraltar|paris sportif france italie|paris sportif france
nouvelle zelande|paris sportif france pologne|paris sportif france portugal|paris sportif france uruguay|paris sportif france usa|paris sportif freebet sans depot|paris sportif gagnant|paris
sportif gagnant à coup sûr|paris sportif gagner a coup sur|paris sportif gagner argent|paris sportif gagner de l’argent|paris
sportif gain|paris sportif gain maximum|paris sportif gestion bankroll|paris
sportif gratuit|paris sportif gratuit appli|paris sportif gratuit avec cadeaux|paris sportif gratuit cadeaux|paris sportif gratuit en ligne|paris sportif gratuit entre amis|paris
sportif gratuit sans argent|paris sportif gratuit sans depot|paris sportif
gratuit sans dépôt|paris sportif gratuits|paris sportif gros gain|paris sportif handicap|paris sportif
handicap 0 1|paris sportif handicap 0-1|paris sportif handicap 1 0|paris
sportif handicap 1-0|paris sportif handicap basket|paris sportif handicap
explication|paris sportif handicap foot|paris sportif handicap rugby|paris sportif hippique|paris sportif hockey|paris sportif
hockey nhl|paris sportif hockey sur glace|paris sportif hors arjel|paris sportif hors
arjel france|paris sportif jeux olympiques|paris sportif jeux video|paris sportif
joueur blessé|paris sportif joueur blessé pendant le match|paris sportif joueur de foot|paris sportif joueur decisif|paris sportif joueur declare forfait|paris sportif joueur
déclare forfait|paris sportif joueur remplacant|paris sportif
la francaise des jeux|paris sportif le plus rentable|paris sportif legal en france|paris sportif leicester
champion|paris sportif les 18 stratégies pour gagner tous les jours|paris sportif les plus sur|paris sportif les prolongation compte|paris
sportif ligne|paris sportif ligue 1|paris sportif ligue 2|paris sportif ligue des champions|paris sportif ligue des nations|paris sportif ligue europa|paris
sportif liste|paris sportif martingale|paris sportif match|paris sportif match abandonné|paris sportif
match annulé|paris sportif match arrêté|paris sportif match du jour|paris sportif
match interrompu|paris sportif match reporté|paris sportif match suspendu|paris sportif match
tennis interrompu|paris sportif match truqué|paris sportif meilleur
bonus|paris sportif meilleur cote|paris sportif meilleur pronostic|paris sportif meilleur site|paris sportif methode|paris sportif methode 2 3|paris sportif mi temps fin de match|paris sportif mise au jeu|paris sportif mise maximum|paris sportif mma france|paris sportif moins de 3.5 but|paris sportif montante|paris
sportif moto gp|paris sportif multiple|paris sportif multiple 2 3|paris
sportif multiple 2 3 explication|paris sportif multiple 2 4|paris sportif multiple
2 5|paris sportif multiple 2/3 explication|paris sportif multiple 3 4|paris sportif multiple explication|paris sportif national 1 foot|paris
sportif nba|paris sportif nba conseil|paris sportif nba pronostic|paris sportif nhl|paris sportif nombre de but|paris sportif nouveau site|paris sportif numero match|paris sportif offert|paris sportif offre bienvenue|paris sportif offre bienvenue sans depot|paris sportif offre de bienvenue|paris sportif offre sans depot|paris sportif om psg|paris sportif paypal|paris
sportif plus de 1.5 but|paris sportif plus
de 2 5 but|paris sportif plus ou moins|paris sportif plus ou moins 2 5 but|paris sportif premier pari remboursé|paris sportif premier paris remboursé|paris sportif
prolongation|paris sportif prolongation basket|paris sportif prolongation foot|paris sportif promo|paris
sportif pronostic|paris sportif pronostic basket|paris sportif pronostic des
match aujourd hui|paris sportif pronostic expert gratuit|paris sportif
pronostic foot|paris sportif pronostic forum|paris sportif pronostic gratuit|paris sportif pronostic tennis|paris sportif
psg|paris sportif psg arsenal|paris sportif psg barcelone|paris sportif psg
bayern|paris sportif psg dortmund|paris sportif psg inter|paris sportif
psg inter cote|paris sportif psg liverpool|paris sportif psg om|paris sportif qr code|paris sportif que veut dire handicap|paris sportif qui rapporte
le plus|paris sportif regle|paris sportif regle prolongation|paris sportif rembourse|paris sportif
remboursement cash|paris sportif rembourser|paris sportif remboursé|paris sportif remboursé
cash|paris sportif remboursé en cash|paris sportif retrait paypal|paris sportif rue des joueurs|paris sportif
rugby|paris sportif rugby 6 nations|paris sportif rugby coupe du monde|paris
sportif rugby top 14|paris sportif safe du jour|paris sportif sans argent|paris sportif sans carte bancaire|paris sportif
sans carte d’identité|paris sportif sans compte bancaire|paris sportif sans depot|paris sportif sans depot minimum|paris sportif si match suspendu|paris sportif si un joueur abandonne|paris sportif
si un joueur ne joue pas|paris sportif si un joueur se blesse|paris sportif simple ou combiné|paris sportif site|paris sportif statistique|paris sportif
stratégie|paris sportif suisse|paris sportif suisse application|paris sportif suisse en ligne|paris
sportif suisse legal|paris sportif suisse légal|paris sportif suisse romande|paris sportif sur du
jour|paris sportif sur le tennis|paris sportif systeme|paris sportif systeme 2 3|paris sportif systeme 2 4|paris sportif systeme 2/3|paris sportif systeme 2/4|paris sportif systeme 3 4|paris sportif systeme 3/4|paris sportif systeme explication|paris sportif technique|paris sportif technique pour gagner|paris sportif temps additionnel|paris sportif
temps reglementaire|paris sportif tennis|paris sportif
tennis abandon|paris sportif tennis conseil|paris sportif tennis de table|paris sportif tennis
forfait|paris sportif tennis gratuit|paris sportif tennis pronostic|paris
sportif tennis roland garros|paris sportif tir au
but|paris sportif top 14|paris sportif tour de france|paris sportif
ufc|paris sportif ufc france|paris sportif unibet|paris
sportif vainqueur euro|paris sportif vainqueur ligue 1|paris sportif vainqueur
ligue des champions|paris sportif via paypal|paris sportif victoire prolongation|paris sportif vip gratuit|paris sportifs|paris sportifs
abandon tennis|paris sportifs aide|paris sportifs analyser un match|paris sportifs arjel|paris
sportifs astuces|paris sportifs aujourd’hui|paris sportifs autorisés en france|paris sportifs avec paypal|paris sportifs basket|paris sportifs belgique|paris sportifs bonus|paris sportifs bookmakers|paris sportifs canada|paris sportifs combiné|paris
sportifs comparateur|paris sportifs comparatif|paris sportifs conseils|paris sportifs cotes|paris
sportifs coupe du monde|paris sportifs de football|paris sportifs du
jour|paris sportifs en belgique|paris sportifs en france|paris sportifs en ligne|paris sportifs en ligne belgique|paris sportifs en ligne france|paris sportifs
en ligne gratuit|paris sportifs en ligne suisse|paris sportifs en suisse|paris sportifs et hippiques|paris sportifs euro|paris sportifs
foot|paris sportifs foot us|paris sportifs forum|paris sportifs
france|paris sportifs france espagne|paris sportifs gagner à tous les coups|paris sportifs gratuit|paris sportifs gratuits|paris sportifs gratuits en ligne|paris sportifs handicap|paris sportifs hockey|paris
sportifs hockey sur galce|paris sportifs hockey
sur glace|paris sportifs hors arjel|paris sportifs jeux olympiques|paris
sportifs les bookmakers raflent la mise|paris sportifs ligne|paris
sportifs ligue 1|paris sportifs ligue 2|paris sportifs ligue des champions|paris sportifs ligue europa|paris
sportifs match interrompu|paris sportifs montante|paris sportifs nba|paris sportifs offre bienvenue|paris sportifs offre de bienvenue|paris sportifs paypal|paris sportifs pronostics|paris sportifs psg|paris sportifs psg inter|paris sportifs rugby|paris
sportifs sans argent|paris sportifs sans depot|paris sportifs site|paris sportifs sites|paris sportifs statistiques|paris sportifs stratégie|paris sportifs suisse|paris sportifs technique|paris sportifs techniques|paris sportifs tennis|paris sportifs tennis astuces|paris sportifs top
14|paris sportifs tour de france|part de marché paris sportifs|paypal pari sportif|paypal paris sportif|paypal paris sportifs|perte d’argent paris sportifs|peut on devenir riche avec les paris sportifs|peut on gagner de l’argent avec les paris sportifs|peut on gagner sa
vie avec les paris sportif|peut on vraiment gagner de
l’argent avec les paris sportifs|plus gros combine paris sportif|plus gros
gagnant paris sportif|plus gros gain paris sportif|plus gros gain paris sportif au monde|plus gros gain paris sportif france|plus gros gains
paris sportif|plus gros pari sportif|plus gros paris sportif|plus grosse cote gagner paris sportif|plus grosse cote
pari sportif|plus grosse cote paris sportif|plus grosse mise paris sportif|plus grosse somme
gagner au paris sportif|plus ou moins paris sportif|pourcentage
de mise paris sportif|premier pari sportif remboursé|probabilité cote paris sportif|probabilité paris sportif combiné|prolongation basket paris sportif|prolongation paris sportif|promo pari sportif|promo
paris sportif|promo site de paris sportif|promo site pari sportif|promo
site paris sportif|promos paris sportifs|prono paris
sportif foot|prono paris sportif gratuit|prono paris sportif tennis|pronostic de paris sportif|pronostic du jour paris sportif|pronostic foot
paris sportif|pronostic gratuit paris sportif|pronostic pari sportif|pronostic pari sportif gratuit|pronostic
paris sportif|pronostic paris sportif aujourd’hui|pronostic paris sportif du jour|pronostic paris sportif foot|pronostic paris sportif gratuit|pronostic paris sportif tennis|pronostic paris sportifs|pronostics foot
statistiques et aides aux paris sportifs|pronostics paris sportif|pronostics paris sportifs|pronostiqueur
paris sportif gratuit|psg arsenal paris sportif|psg
bayern paris sportif|psg inter milan paris sportif|psg inter pari sportif|psg inter paris sportif|psg liverpool paris sportif|psg om paris
sportif|psg paris sportif|psg paris sportifs|qr code paris sportif|qu est ce qu un handicap
paris sportif|qu est ce que handicap dans les paris sportif|qu’est ce qu’un handicap paris
sportif|qu’est ce que handicap dans les paris sportif|quand un joueur se blesse paris sportif|que signifie
1/1 en paris sportif|que signifie 1/2 paris sportif|que signifie 12 en paris sportif|que signifie 1×2 dans les paris sportifs|que signifie btts
en paris sportif|que signifie dnb en paris sportif|que
signifie draw en paris sportif|que signifie ft en paris sportif|que signifie gg dans le pari sportif|que signifie gg en pari sportif|que
signifie gg en paris sportif|que signifie handicap dans les paris sportifs|que veut dire dnb en paris sportif|que veut dire handicap dans les paris sportifs|que veut dire handicap paris sportif|quel appli pari sportif|quel
cote jouer paris sportif|quel est la meilleur appli de paris sportif|quel est
le meilleur algorithme de paris sportif|quel
est le meilleur site de pari sportif|quel est le meilleur
site de pari sportif en ligne|quel est le meilleur site de paris
sportif|quel est le meilleur site de paris sportif en ligne|quel
est le meilleur site de paris sportifs en ligne|quel est le pari sportif le plus rentable|quel pari sportif
est le plus rentable|quel pari sportif est le plus sûr|quel pari sportif faire aujourd’hui|quel paris sportif faire aujourd’hui|quel paris sportif
rapporte le plus|quel site de paris sportif choisir|quel site de paris sportif rembourse
en cash|quel type de pari sportif est le plus rentable|quelle application pour paris sportifs|quelle est la meilleure appli de paris sportif|quelle
est la meilleure application de paris sportif|quelle est la meilleure application pour
les paris sportifs|quelle est le meilleur site de paris sportif|quels paris sportifs faire|quels sont
les paris sportifs les plus sûrs|rebond basket
paris sportif|record de gain paris sportif|regle buteur paris sportif|regle
de paris sportif|regle des paris sportif|regle handicap paris sportif|regle handicap paris
sportif foot|regle multiple paris sportif|regle pari sportif|regle paris sportif|regle paris sportif
foot|regle paris sportif multiple|regle paris sportif prolongation|reglement pari sportif|reglement paris sportif|regles paris
sportifs|remboursement cash paris sportif|remboursement en cash paris sportif|remboursement pari sportif|remboursement paris
sportif|repartiteur de mise paris sportif|repartiteur de mise paris sportifs|repartiteur de mises paris sportif|repartiteur mise paris
sportif|repartition des mises paris sportif|resultat
pari sportif|resultat paris sportif|resultat paris sportif
en direct|resultat paris sportif foot|resultat sportif hockey|retirer
argent paris sportif|rugby pari sportif|rugby paris sportif|règle paris sportif prolongation|règles paris sportif|répartiteur de mise pari sportif|répartiteur de
mise paris sportif|répartiteur de mise paris sportifs|répartition des mises paris sportif|résultat paris sportif foot|sans depot
paris sportif|se faire interdire de paris sportifs|signification btts paris sportif|signification dnb paris sportif|signification handicap paris sportif|simulateur de
gain paris sportif|simulateur gain paris sportif|simulateur gain paris sportif multiple|simulateur
gain paris sportif systeme|simulateur gain paris sportif système|simulateur montante paris sportif|simulateur paris sportif multiple|simulateur systeme paris sportif|simulation paris
sportif gratuit|site aide paris sportif|site analyse paris sportif|site analyser paris sportif|site arjel paris sportif|site conseil paris sportif|site d’analyse de paris sportifs|site d’analyse paris sportif|site
de conseil paris sportif|site de pari en ligne sportif|site de pari
sportif|site de pari sportif avec bonus sans depot|site de pari sportif bonus sans depot|site de pari
sportif canada|site de pari sportif en ligne|site de pari sportif francais|site de pari sportif gratuit|site de
pari sportif hors arjel|site de pari sportif suisse|site de parie
sportif|site de parie sportif en ligne|site de paris en ligne sportif|site de paris sportif|site de paris sportif acceptant
paypal|site de paris sportif arjel|site de paris
sportif autorisé en france|site de paris sportif autorisé en suisse|site de paris sportif avec bonus|site
de paris sportif avec bonus sans depot|site de paris sportif avec
bonus sans dépôt|site de paris sportif avec neosurf|site de paris sportif avec paiement mobile|site de paris sportif avec paypal|site de paris sportif avis|site de paris
sportif belge avec bonus|site de paris sportif belgique|site de paris sportif bonus|site
de paris sportif bonus sans depot|site de paris sportif canada|site de paris sportif comparatif|site de paris sportif
depot minimum|site de paris sportif en france|site de paris sportif en ligne|site de paris sportif en ligne suisse|site de paris sportif football|site de paris sportif francais|site de
paris sportif france|site de paris sportif gratuit|site de paris sportif
gratuit pour gagner des cadeaux|site de paris sportif
gratuit sans dépôt|site de paris sportif
hors arjel|site de paris sportif le plus fiable|site de paris sportif legal en france|site de paris
sportif meilleur cote|site de paris sportif nouveau|site de paris sportif offre
de bienvenue|site de paris sportif paypal|site de paris
sportif premier paris remboursé|site de paris sportif qui accepte paypal|site de
paris sportif qui rembourse en cash|site de paris sportif remboursé|site de paris sportif
sans argent|site de paris sportif sans carte bancaire|site de paris sportif sans carte d’identité|site de
paris sportif sans depot|site de paris sportif suisse|site de
paris sportifs|site de paris sportifs avec paypal|site
de paris sportifs en ligne|site de paris sportifs francais|site
de paris sportifs gratuit|site de paris sportifs paypal|site de paris
sportifs suisse|site de statistique pour paris sportif|site des paris sportifs|site pari en ligne sportif|site pari sportif|site pari sportif 100
euros offert|site pari sportif arjel|site pari sportif belgique|site pari sportif bonus|site pari sportif
canada|site pari sportif comparatif|site pari sportif en ligne|site pari sportif france|site pari sportif gratuit|site pari sportif hors arjel|site pari sportif suisse|site parie sportif|site paris en ligne sportif|site
paris sportif|site paris sportif 100 euros offert|site paris sportif 100 euros remboursé|site paris sportif 1er paris remboursé|site paris sportif arjel|site paris sportif autorisé en france|site paris sportif avec bonus|site paris sportif avec bonus sans depot|site paris sportif avec meilleur
cote|site paris sportif belgique|site paris sportif bonus|site paris sportif bonus cash|site paris sportif bonus sans depot|site
paris sportif canada|site paris sportif comparatif|site paris sportif depot 5 euro|site paris sportif en ligne|site paris
sportif foot|site paris sportif france|site paris sportif gratuit|site paris
sportif hors arjel|site paris sportif hors arjel france|site paris
sportif meilleur cote|site paris sportif nouveau|site paris sportif offre de bienvenue (https://biokenafofficial.com)|site paris sportif paypal|site paris sportif remboursement
cash|site paris sportif remboursé en cash|site paris
sportif retrait instantané|site paris sportif sans carte bancaire|site paris sportif sans depot|site paris sportif suisse|site paris sportifs|site paris sportifs belgique|site paris sportifs en ligne|site paris sportifs france|site paris
sportifs hors arjel|site paris sportifs suisse|site pour analyse paris
sportif|site pour paris sportif|site pronostic paris sportif|site statistique paris sportif|site suisse paris sportif|sites
de pari sportif|sites de paris sportif|sites de paris
sportifs|sites de paris sportifs arjel|sites de paris
sportifs autorisés en france|sites de paris sportifs belgique|sites de paris sportifs bonus|sites de paris sportifs en belgique|sites de
paris sportifs en france|sites de paris sportifs en ligne|sites de paris sportifs gratuits|sites de
paris sportifs gratuits sans dépôt|sites de paris sportifs
suisse|sites pari sportif|sites paris sportif|sites
paris sportifs|sites paris sportifs arjel|sites paris sportifs belgique|sites paris sportifs france|sites paris sportifs hors arjel|sites paris sportifs
suisse|so foot paris sportif|so foot paris sportifs|specialiste tennis paris sportif|statistique foot paris
sportif|statistique paris sportif|statistique paris sportif
foot|statistique tennis paris sportif|statistiques football paris
sportifs|statistiques paris sportifs|strategie de paris sportif|stratégie
big whale paris sportif|stratégie de paris sportifs|stratégie gagnante paris sportifs|stratégie pari
sportif|stratégie paris sportif|stratégie paris sportifs|stratégie paris sportifs forum|stratégie pour gagner au paris sportif|stratégies paris sportifs|suisse paris
sportif|suisse paris sportifs|systeme 2 3 paris sportif|systeme 3
4 paris sportif|systeme de cote paris sportif|systeme de paris sportif|systeme pari sportif|systeme paris sportif|systeme paris sportifs|systeme reducteur paris sportif|système paris sportif|tableau bankroll paris
sportif|tableau cote paris sportif|tableau de paris sportif|tableau de suivi paris sportifs|tableau excel bankroll paris sportif|tableau excel paris sportif|tableau excel paris sportif gratuit|tableau excel paris sportifs|tableau excel pour paris sportif|tableau gesti
chelsea everton Best Live Betting Websites
la mejor app de apuestas linea deportivas
toto75 oulu
Feel free to surf to my page: monivedon vihjeet tänään
best online slot usa, real slot machines for sale canada and auto roulette online or app to play in united states, or
gambling facts australia
Also visit my website web site, Michelle,
gratis Internet Wedden Platformen platformen
ganar dinero en el casino
Here is my web page :: todos los casinos que den Bonos de bienvenida
laimesta kalkulators
Here is my site … atmaksas bonuss bukmeikeri, https://bajanandyaadi.com,
10 euros offert paris sportif|10 euros offert sans dépôt paris
sportif|10 meilleurs sites de paris sportifs|100
euro offert paris sportif|100 euros offert paris sportif|100 euros remboursé paris sportifs|100 offert pari
sportif|100 offert paris sportif|100 remboursé paris sportif|100e offert pari sportif|abandon paris
sportif tennis|abandon tennis paris sportif|addiction paris sportif forum|age paris sportif belgique|aide au
pari sportif|aide au paris sportif|aide aux paris sportif|aide aux paris sportifs|aide pari sportif|aide pari sportif
football|aide parie sportif|aide paris sportif|aide paris sportif foot|aide paris sportif gratuit|aide paris sportifs|aide pour paris sportif|algorithme de paris sportif|algorithme
excel paris sportif|algorithme gratuit paris sportif|algorithme pari sportif|algorithme paris sportif|algorithme paris sportif avis|algorithme paris sportif
basket|algorithme paris sportif excel|algorithme paris sportif gratuit|algorithme paris sportif tennis|algorithme paris sportifs|algorithme
pour paris sportif|analyse cote paris sportif|analyse de paris sportif|analyse match paris
sportif|analyse pari sportif|analyse paris sportif|analyse paris sportif foot|analyse paris
sportif football|analyse paris sportif gratuit|analyse
paris sportifs|ancienne cote paris sportif|api cote paris sportif|app paris sportif sans argent|appli de paris sportif|appli de paris sportif sans argent|appli de paris
sportifs|appli pari sportif|appli pari sportif gratuit|appli parie sportif|appli paris sportif|appli paris sportif
avec paypal|appli paris sportif belgique|appli paris sportif entre amis|appli paris sportif gratuit|appli paris sportif
sans argent|appli paris sportif suisse|appli paris sportifs|application aide
paris sportif|application algorithme paris sportif|application analyse
paris sportif|application android paris sportif|application bankroll paris sportif|application conseil paris
sportif|application de pari sportif|application de parie sportif|application de
paris sportif|application de paris sportif en afrique|application de paris
sportif en cote d’ivoire|application de paris sportif en ligne|application de paris sportif gratuit|application de paris sportif international|application de paris
sportif suisse|application de paris sportifs|application faux
paris sportifs|application gestion bankroll paris sportif|application gestion paris sportif|application ia paris
sportif|application pari sportif gratuit|application paris
sportif|application paris sportif android|application paris sportif
argent fictif|application paris sportif
belgique|application paris sportif canada|application paris sportif espagne|application paris sportif espagnol|application paris
sportif fictif|application paris sportif france|application paris sportif gratuit|application paris sportif gratuit entre amis|application paris sportif maroc|application paris sportif
offre de bienvenue|application paris sportif paypal|application paris sportif
sans argent|application paris sportif sans justificatif de domicile|application paris
sportif suisse|application paris sportif usa|application paris sportif virtuel|application pour faire des paris sportifs|application pour gerer ses paris sportif|application pour les paris sportifs|application pour pari sportif|application pour paris sportif|application pour
paris sportifs|application statistique paris sportif|application suivi paris
sportif|applications de paris sportifs|applications paris
sportifs|applis paris sportif|applis paris sportifs|apprendre a faire des paris sportifs|argent facile
paris sportif|argent offert paris sportifs|argent offert
sans depot paris sportif|argent paris sportif|argent paris
sportifs|argent paris sportifs impots|argent sans depot paris sportif|arjel
paris sportif|arjel paris sportifs|astuce gagner paris sportif|astuce pari sportif|astuce
paris sportif|astuce paris sportif basket|astuce paris sportif foot|astuce paris sportif forum|astuce paris sportif tennis|astuce paris
sportifs|astuce pour gagner au pari sportif|astuce pour gagner au
paris sportif|astuce pour gagner paris sportif|astuce pour
paris sportif|astuces paris sportifs|astuces paris sportifs en ligne|astuces
paris sportifs foot|astuces pour gagner aux paris sportifs|autorisation paris sportif france|avis pari sportif|avis paris sportif|avis paris sportif
foot|avis site de paris sportif|avis site paris sportif|avis sur
les paris sportifs|avis sur paris sportif|avis tipster paris sportif|aweh signification paris sportif|bankroll 100
euros paris sportifs|bankroll management paris sportif|bankroll
paris sportif|bankroll paris sportif excel|bankroll paris sportif gratuit|bankroll paris sportifs|basket paris
sportif|belgique france paris sportif|belgique paris
sportifs|bonus bienvenue paris sportif|bonus bienvenue paris
sportifs|bonus cash paris sportif|bonus de bienvenue paris
sportif|bonus de bienvenue paris sportif belgique|bonus de bienvenue sans depot paris
sportif|bonus de depot paris sportif|bonus de paris sportifs|bonus depot
paris sportif|bonus en cash paris sportif|bonus gratuit
paris sportif|bonus gratuit sans depot paris sportif|bonus pari sportif|bonus paris sportif|bonus paris sportif belgique|bonus paris
sportif betclic|bonus paris sportif cash|bonus paris sportif
en ligne|bonus paris sportif france pari|bonus paris sportif retirable|bonus paris sportif sans depot|bonus paris sportif sans dépôt|bonus
paris sportif unibet|bonus paris sportifs|bonus sans depot paris sportif|bonus sans depot paris
sportif belgique|bonus sans dépôt paris sportif|bonus sans dépôt paris
sportif hors arjel|bonus site de paris sportif|bonus site pari sportif|bonus site paris sportif|bonus sites de paris sportifs|bonus
unibet paris sportif|bookmaker paris sportif|bookmaker paris sportif gratuit|bookmaker paris sportifs|bookmaker sportif|bookmakers paris sportif|bookmakers paris sportifs|bookmakers
paris sportifs en ligne|but contre son camp paris sportif|but sur penalty paris sportif|buteur paris sportif|c’est
quoi handicap paris sportif|c’est quoi une cote paris sportif|calcul anti perte
paris sportif|calcul combinaison pari sportif|calcul cote pari sportif|calcul cote paris sportif|calcul couverture paris sportif|calcul de cote paris sportif|calcul des cotes
paris sportifs|calcul dnb paris sportifs|calcul double chance paris sportif|calcul gain paris sportif|calcul mise paris
sportif|calcul pari sportif|calcul paris sportif|calcul paris sportif multiple|calcul pourcentage cote paris sportif|calcul
probabilité paris sportif|calcul rentabilité paris
sportifs|calcul roi paris sportif|calcul systeme paris sportif|calcul trj paris sportifs|calculateur cote paris sportif|calculateur de
cote paris sportif|calculateur de mise paris sportif|calculateur de paris sportif|calculateur paris sportif|calculatrice arbitrage
paris sportif|calculatrice paris sportif|calculer cote paris sportif|calculer gain paris sportif|calculer probabilité paris sportifs|calculer roi paris sportifs|calculer une cote pari sportif|calculer une cote paris sportif|carte cadeau paris sportif|carte pcs paris sportif|carte
prépayée paris sportifs|cash out pari sportif|cash out paris sportif|cash out paris sportifs|casino
en ligne paris sportif|casino paris sportif en ligne|champions league
paris sportif|chute de cote paris sportif|classement des meilleurs
sites de paris sportifs|classement meilleur site de paris sportif|code barre paris
sportif|code bonus paris sportif|code paris
sportif|code promo pari sportif|code promo paris sportif|code promo paris sportif sans depot|code promo paris
sportif sans dépôt|code promo sans depot paris sportif|code promo site
paris sportif|combien de temps pour encaisser un paris sportif|combien de
temps pour retirer un paris sportif|combien miser paris sportifs|combine paris
sportif|combines paris sportifs|combiné pari sportif|combiné
paris sportif|combiné paris sportif conseil|combiné paris sportif du jour|combiné paris sportif pronostic|comment
analyser un paris sportif|comment arreter de jouer aux paris sportifs|comment arreter les paris sportif|comment
arreter les paris sportifs|comment arrêter les paris sportifs|comment
bien gagner au paris sportif|comment bien jouer au paris
sportif|comment bien miser paris sportif|comment ca marche les
paris sportif|comment calculer cote paris sportif|comment calculer gain paris sportif|comment calculer les cotes des paris sportifs|comment calculer une cote de paris sportif|comment calculer une cote
pari sportif|comment calculer une cote paris sportif|comment comprendre
les paris sportifs|comment creer un vip paris sportif|comment créer un algorithme paris sportif|comment créer un site de paris sportif|comment devenir riche avec les paris
sportifs|comment etre rentable paris sportif|comment etre sur de gagner au paris sportif|comment
faire de bon paris sportif|comment faire des parie
sportif|comment faire des paris sportif|comment faire
des paris sportif gagnant|comment faire des paris sportifs|comment faire pari sportif|comment faire paris sportif|comment faire
pour arreter les paris sportifs|comment faire pour
gagner au paris sportif|comment faire pour gagner les paris sportifs|comment faire un bon pari sportif|comment faire un bon paris
sportif|comment faire un pari sportif|comment faire un parie
sportif|comment faire un paris sportif|comment faire une montante paris sportif|comment fonctionne
les cotes dans les paris sportifs|comment fonctionne
les cotes des paris sportifs|comment fonctionne les paris sportifs|comment fonctionne paris sportifs|comment fonctionne un pari sportif|comment fonctionnent les
cotes dans les paris sportifs|comment fonctionnent les cotes dans
les paris sportifs grand oral|comment fonctionnent les cotes de paris sportif|comment fonctionnent les paris sportifs|comment fonctionnent les paris sportifs grand oral|comment fonctionnent les paris
sportifs grand oral maths|comment fonctionnent les paris sportifs maths|comment gagner a coup sur au paris sportif|comment gagner a tous les coups
au paris sportif|comment gagner a tout les coup au paris
sportif|comment gagner au pari sportif|comment gagner
au pari sportif football|comment gagner au paris sportif|comment gagner au paris sportif a coup sur|comment gagner au paris sportif foot|comment gagner au paris sportif forum|comment gagner au paris sportif tennis|comment gagner
au paris sportifs|comment gagner aux paris sportif|comment gagner aux
paris sportifs|comment gagner aux paris sportifs foot|comment gagner aux paris sportifs livre|comment gagner aux paris sportifs sur le long terme|comment gagner avec les paris sportifs|comment gagner dans les paris sportifs|comment gagner de l argent avec les paris sportifs|comment gagner
de l’argent au paris sportif|comment gagner de l’argent aux paris sportifs|comment gagner de l’argent avec les paris sportifs|comment gagner de l’argent paris sportif|comment gagner de l’argent sur les paris sportifs|comment
gagner de l’argent sur paris sportif|comment gagner des paris
sportif|comment gagner des paris sportifs|comment gagner en paris sportif|comment gagner facilement au paris sportif|comment gagner les paris sportifs|comment gagner paris sportif|comment gagner paris sportif foot|comment gagner paris sportifs|comment gagner sa vie
avec les paris sportifs|comment gagner ses paris sportif|comment gagner sur les
paris sportif|comment gagner sur les paris sportifs|comment gagner tout le temps au paris sportif|comment gagner un pari sportif|comment gagner
un paris sportif|comment gerer une bankroll paris sportif|comment gérer sa bankroll paris sportif|comment jouer
au pari sportif|comment jouer au paris sportif|comment jouer au paris sportif foot|comment jouer aux
paris sportifs|comment jouer paris sportif|comment marche cote paris sportif|comment marche les cotes
paris sportif|comment marche les paris sportif|comment marche les paris sportifs|comment
marche paris sportif|comment marche un pari sportif|comment
marche un paris sportif|comment marchent les cotes paris sportif|comment
marchent les paris sportifs|comment miser au paris sportif|comment miser paris
sportif|comment monter sa bankroll paris sportif|comment ne
jamais perdre au paris sportif|comment parier sportif|comment reussir au paris sportif|comment
reussir les paris sportif|comment reussir paris sportif|comment
sont calculer les cotes de paris sportif|comment sont calculées les cotes des paris sportifs|comment sont calculés les cotes des paris
sportifs|comment sont faites les cotes des paris sportifs|comment toujours gagner au paris sportif|comment
ça marche les paris sportifs|comparaison bonus paris sportifs|comparaison cote
pari sportif|comparaison des cotes paris sportifs|comparateur
cote pari sportif|comparateur cote paris sportif|comparateur cotes paris sportif|comparateur cotes paris
sportifs|comparateur de cote pari sportif|comparateur de cote paris sportif|comparateur de cotes paris sportifs|comparateur de côtes paris sportifs|comparateur
de paris sportif|comparateur de site de paris sportif|comparateur de site paris sportif|comparateur de sites de
paris sportifs|comparateur pari sportif|comparateur paris sportif|comparateur paris sportifs|comparateur site de paris sportif|comparateur site pari sportif|comparateur site paris sportif|comparatif bonus paris
sportif|comparatif bonus paris sportifs|comparatif
cote pari sportif|comparatif cote paris sportif|comparatif cotes paris sportifs|comparatif des sites de
paris sportifs|comparatif offre de bienvenue
paris sportif|comparatif offre paris sportif|comparatif pari sportif|comparatif pari
sportif en ligne|comparatif paris sportif|comparatif paris sportif
bonus|comparatif paris sportif en ligne|comparatif paris
sportifs|comparatif paris sportifs en ligne|comparatif site de paris sportif|comparatif site paris sportif|comparatif
site paris sportifs|comparatif sites de paris sportifs|comparatif sites paris sportifs|comparer les cotes paris sportifs|comprendre cote
paris sportif|comprendre handicap paris sportif|comprendre les
cotes des paris sportifs|comprendre les cotes paris sportif|comprendre
les cotes paris sportifs|comprendre les handicap paris sportif|compte de paris sportif|compte démo paris sportif|compte finance paris sportif|compte financer paris sportif|compte financier paris sportif|compte financé paris sportif|compte pari sportif|compte paris sportif|compte
paris sportif financé|conseil de paris sportif|conseil de paris
sportifs|conseil en paris sportif|conseil en paris sportifs|conseil pari sportif|conseil pari sportif gratuit|conseil paris sportif|conseil
paris sportif aujourd’hui|conseil paris sportif du jour|conseil paris sportif foot|conseil paris sportif gratuit|conseil paris sportif ligue des champions|conseil
paris sportif nba|conseil paris sportif pronostic|conseil paris sportif rmc|conseil paris sportif tennis|conseil paris sportifs|conseil pour gagner au paris sportif|conseil pour
paris sportif|conseil sur les paris sportifs|conseille paris sportif|conseiller en paris sportifs|conseiller paris
sportif|conseils de paris sportifs|conseils en paris sportifs|conseils paris sportifs|conseils paris sportifs foot|conseils paris sportifs gratuit|conseils paris sportifs
tennis|conseils pour paris sportifs|cote a 100 paris sportif|cote a 2 paris sportif|cote anglaise
paris sportif|cote de 2 paris sportif|cote de pari sportif|cote de paris sportif|cote des
paris sportifs|cote maximum paris sportif|cote minimum paris
sportif|cote pari sportif|cote pari sportif comment ça
marche|cote pari sportif real madrid|cote pari sportif rugby|cote parie sportif|cote
paris sportif|cote paris sportif belgique|cote paris sportif
calcul|cote paris sportif definition|cote paris sportif euro|cote paris sportif explication|cote paris sportif foot|cote paris sportif france belgique|cote paris sportif france espagne|cote paris sportif ligue des champions|cote paris sportif moto gp|cote
paris sportif psg|cote paris sportif psg arsenal|cote paris sportif rugby|cote paris sportif tennis|cote paris
sportifs|cote pour paris sportifs|cote sportif
foot|cote sportif rugby|cote à 1000 paris sportif|cotes de paris sportifs|cotes pari sportif|cotes paris sportif|cotes
paris sportifs|cotes paris sportifs foot|coupe de france paris sportif|créer
un algorithme paris sportif|créer un compte paris sportif|créer un site de paris sportif en ligne|dans les paris sportifs que
signifie handicap|declarer ses gains paris sportif|definition cash out paris sportif|definition cote paris sportif|definition handicap paris sportif|depot 5 euros paris sportif|depot double paris sportif|depot minimum 5 euro paris sportif|depot minimum paris sportif|depot paris sportif|depuis quand existe les paris sportif
en france|devenir riche avec les paris sportifs|devenir riche avec paris
sportifs|disqualification tennis paris sportif|dnb en paris sportif|dnb pari sportif|dnb paris sportif|dnb
paris sportif definition|dnb paris sportifs|doit on declarer les gains de paris
sportif|déclarer gains paris sportifs|déclarer gains paris
sportifs hors arjel|définition bankroll paris
sportif|dépôt minimum 1 euro paris sportif|dépôt minimum 5 euro paris sportif|ecart de jeux tennis paris sportif|erreur de cote paris sportif|est ce que
les gains des paris sportifs sont imposables|est-ce que
les prolongation compte dans un pari sportif|etre sur de gagner au
paris sportif|euro paris sportif|evenement sportif a paris|evenement sportif paris|evenement sportif paris 2025|evenement sportif paris aujourd hui|evenement sportif paris aujourd’hui|evenement sportif paris ce week end|evenements sportif paris|evenements sportifs paris|evenements sportifs paris 2025|evenements sportifs à paris|evolution cote paris
sportif|evolution cotes paris sportifs|evolution des
cotes paris sportifs|explication cote pari sportif|explication cote paris sportif|explication handicap paris sportif|explication pari sportif|explication paris sportif|face a face hockey paris sportif|faire des paris sportif|faire des paris sportif avec paypal|faire des paris
sportifs|faire fortune paris sportifs|faire un pari sportif|faire un paris sportif|faut il déclarer
les gains de paris sportifs|faut il déclarer ses gains paris sportifs|fichier excel gestion bankroll paris sportif|fiscalité gains paris sportifs|foot paris
sportif|football et paris sportifs|forfait tennis paris sportif|formation paris sportif gratuit|forum de paris sportif|forum de paris
sportifs|forum pari sportif|forum parie sportif|forum paris sportif|forum paris sportif
foot|forum paris sportif gratuit|forum paris sportif nba|forum paris
sportif tennis|forum paris sportifs|forum sur les paris sportifs|forum tennis paris sportif|francaise des jeux
pari sportif|francaise des jeux paris sportif|francaise des jeux paris sportifs|france 2 paris sportif|france 2 paris sportifs|france belgique paris sportif|france espagne paris sportif|france
pari sportif|france pari sportif brest|france paris sportif|france paris sportifs|france pologne paris
sportif|france portugal paris sportif|france suisse paris sportifs|france tunisie
paris sportifs|france-pari – paris sportifs|gagnant pari sportif|gagnant paris sportif|gagnant paris sportif bayern|gagnante paris sportif|gagne au paris sportif|gagner 10 euros par jour aux paris sportifs|gagner 100 euros par
jour paris sportif|gagner 1000 euros par mois paris sportifs|gagner 10000 euros paris sportif|gagner
2000 euros par mois paris sportif|gagner 50 euros par jour paris sportif|gagner a coup sur
au paris sportif|gagner a coup sur pari sportif|gagner a tous les coup paris
sportif|gagner argent avec paris sportifs|gagner argent pari sportif|gagner argent paris
sportif|gagner argent paris sportifs|gagner au pari sportif|gagner au paris
sportif|gagner au paris sportif a coup sur|gagner au
paris sportif foot|gagner au paris sportif forum|gagner au paris sportif à coup sur|gagner aux paris sportif|gagner aux
paris sportifs|gagner aux paris sportifs pdf|gagner beaucoup d’argent paris sportif|gagner de l argent
grace aux paris sportifs|gagner de l argent pari sportif|gagner de
l argent paris sportif|gagner de l argent paris
sportifs|gagner de l’argent au paris sportif|gagner de
l’argent aux paris sportifs|gagner de l’argent avec les paris sportifs|gagner de l’argent avec paris sportif|gagner de l’argent avec paris sportifs|gagner de l’argent grace au paris sportif|gagner de l’argent grace aux paris
sportifs|gagner de l’argent pari sportif|gagner de l’argent paris sportif|gagner de l’argent paris sportifs|gagner de l’argent sur les paris sportifs|gagner des paris sportif|gagner des paris sportifs|gagner les paris
sportifs|gagner pari sportif|gagner paris sportif|gagner paris sportif
foot|gagner paris sportif forum|gagner paris sportif
tennis|gagner paris sportifs|gagner sa vie avec les paris sportif|gagner
sa vie avec les paris sportifs|gagner sa vie avec paris sportifs|gagner ses
paris sportifs|gagner à coup sur paris sportif|gagner à tous
les coups paris sportifs|gain maximum paris
sportif|gain pari sportif|gain pari sportif imposable|gain pari sportif impot|gain paris sportif|gain paris
sportif imposable|gain paris sportif impot|gain paris
sportif impôt|gains paris sportif|gains paris sportif imposable|gains paris sportifs|gains paris sportifs imposable|gains paris
sportifs imposables|gains paris sportifs sont ils imposables|gerer bankroll paris
sportif|gerer sa bankroll paris sportif|gerer une bankroll paris sportif|gestion bankroll
paris sportif|gestion bankroll paris sportifs|gestion bankroll paris sportifs excel|gestion de bankroll paris sportif|gestion de bankroll paris sportif application|gestion de bankroll paris sportifs|gestion de mise paris sportif|gestion paris sportifs v2 5 gratuit|gg signification paris sportif|gros combiné paris sportif|gros gain paris sportif|grosse cote
paris sportif pronostic|grosse mise paris sportif|groupe paris sportif gratuit|groupe telegram paris
sportif gratuit|groupement de joueurs paris sportifs|handicap 0 paris sportif|handicap 1 paris sportif|handicap 5 paris sportif|handicap au paris
sportif|handicap basket paris sportif|handicap dans les paris sportifs|handicap en paris sportif|handicap europeen paris sportif|handicap européen paris sportifs|handicap
mi temps paris sportif|handicap pari sportif|handicap paris sportif|handicap paris sportif
basket|handicap paris sportif explication|handicap paris sportif
foot|handicap paris sportif rugby|handicap paris sportifs|handicap rugby paris sportif|handicap
tennis paris sportif|historique cote paris sportif|historique des cotes paris sportifs|hockey paris sportif|hockey
sur glace paris sportif|hors arjel paris sportif|hweh signification paris sportif|imposition gain pari sportif|imposition gain paris
sportif|imposition gains paris sportifs|imposition paris sportif france|impot gain paris
sportif|impot paris sportif france|impot
sur gain paris sportif|je gagne ma vie avec les paris sportifs|jeu de pari sportif gratuit|jeu de paris sportif en ligne|jeu de paris sportif gratuit|jeu paris sportif gratuit|jeu paris sportif sans argent|jeux de parie sportif|jeux de paris sportif|jeux de
paris sportif en ligne|jeux de paris sportif gratuit|jeux de paris sportifs|jeux olympiques paris sportifs|jeux paris sportif|jeux
paris sportif gratuit|jeux paris sportif virtuel|jeux paris sportifs en ligne|jouer au
paris sportif|jouer paris sportif|joueur absent paris sportif|joueur
blesse paris sportif|joueur caen paris sportif|joueur de caen pari sportif|joueur de foot paris sportif|joueur decisif
paris sportif|joueur décisif paris sportif|joueur italien paris sportif|joueur paris
sportif|joueur professionnel paris sportif|joueur qui
se blesse paris sportif|joueur sanctionne pari sportif|joueur suspendu paris
sportif|joueurs italiens paris sportifs|l’argent des paris sportifs est il imposable|la cote paris sportif|la francaise des jeux paris sportif|la
martingale paris sportif|la martingale paris
sportifs|la meilleur application de paris sportif|la meilleur application paris sportif|la meilleur technique pour gagner
au paris sportif|la méthode secrète pour gagner aux paris sportifs pdf|la plus grosse cote gagner paris sportif|la plus grosse cote paris sportif|ldem paris sportif signification|le
marché des paris sportifs|le meilleur site de
pari sportif|le meilleur site de paris sportif|le meilleur site de paris sportif
en ligne|le meilleur site de paris sportifs|le plus gros gain au paris sportif|le plus gros paris sportif|le plus
gros paris sportif du monde|les 10 meilleurs sites de
paris sportifs|les 10 meilleurs sites de paris sportifs en afrique|les 17
secrets pour gagner rapidement aux paris sportifs|les 17 secrets pour gagner rapidement aux
paris sportifs pdf|les application de paris sportif|les applications paris sportifs|les bonus paris sportifs|les bookmakers paris sportifs|les cotes paris sportifs|les
gains de paris sportifs sont ils imposables|les gains
des paris sportifs sont ils imposables|les jeux de
paris sportifs|les meilleur paris sportif|les meilleures applications de
paris sportifs|les meilleurs applications de paris sportifs|les meilleurs bonus paris sportif|les meilleurs
bonus paris sportifs|les meilleurs cotes paris sportif|les meilleurs paris sportifs|les
meilleurs paris sportifs du jour|les meilleurs site de paris sportif|les meilleurs site de paris sportifs|les meilleurs sites
de pari sportif|les meilleurs sites de paris sportifs|les meilleurs sites de paris sportifs
en ligne|les paris sportif|les paris sportif avis|les paris
sportifs|les paris sportifs comment ça marche|les paris sportifs en france|les paris sportifs en ligne|les paris sportifs en ligne comprendre jouer gagner|les paris sportifs en ligne comprendre
jouer gagner pdf|les paris sportifs les plus rentables|les plus gros gagnant paris sportif|les plus
gros gains au paris sportifs|les plus gros gains
paris sportifs|les plus gros paris sportif|les plus grosse cote paris sportif|les plus grosses pertes paris sportifs|les
sites de paris sportifs|les sites de paris sportifs autorisés en france|les sites de paris sportifs en france|les sites de paris sportifs en ligne|les sites de paris sportifs francais|ligue
1 paris sportif|ligue 1 paris sportifs|ligue 2 paris sportif|ligue des champions paris sportif|limite de gains paris sportifs|limite de mise paris sportif|limite gain paris sportif|limite mise
paris sportifs|liste de paris sportif|liste des paris
sportifs|liste des site de paris sportif|liste des sites de paris sportifs|liste pari sportif|liste paris sportif|liste paris sportif pdf|liste site de paris
sportif|liste site pari sportif|liste site paris sportif|liste
site paris sportif arjel|liste sites paris sportifs|logiciel algorithme paris sportif|logiciel algorithme paris sportif
gratuit|logiciel analyse paris sportif|logiciel calcul paris sportif|logiciel
de pari sportif|logiciel de paris sportif|logiciel
de paris sportif gratuit|logiciel gestion bankroll paris sportif gratuit|logiciel gestion de bankroll paris
sportif|logiciel gestion paris sportif|logiciel gestion paris sportif gratuit|logiciel gestion paris sportifs|logiciel pari sportif|logiciel paris sportif|logiciel paris sportif gratuit|logiciel
paris sportifs|logiciel paris sportifs foot sur 2 matchs|logiciel pour paris
sportif|logiciel pour paris sportifs|logiciel prediction paris sportif|logiciel probabilité paris sportif|logiciel prédiction paris sportif|logiciel statistique paris sportifs|logiciel variation de cote paris sportif|loi sur les paris sportifs en france|magic calculator paris sportif|marché
des paris sportifs|marché des paris sportifs en france|marché des paris
sportifs en ligne|martingale pari sportif|martingale paris sportif|martingale paris sportif excel|martingale paris sportif forum|martingale paris sportif interdit|martingale
paris sportifs|match abandonné paris sportif|match
annulé ou reporté paris sportifs|match annulé
paris sportif|match arrete paris sportif|match interrompu paris sportif|match interrompu tennis paris sportif|match
interrompu tennis pluie paris sportif|match nul boxe paris sportif|match pari sportif|match paris sportif|match reporté paris
sportif|match suspendu paris sportif|match suspendu tennis paris
sportif|match truqué paris sportif|matchs truqués paris sportifs|meilleur algorithme paris sportif|meilleur algorithme paris sportif gratuit|meilleur app
de paris sportif|meilleur app de paris sportifs|meilleur
app paris sportif|meilleur appli de pari sportif|meilleur appli de paris sportif|meilleur appli pari sportif|meilleur appli paris sportif|meilleur appli
paris sportif forum|meilleur appli paris sportifs|meilleur application conseil
paris sportif|meilleur application de paris sportif|meilleur application de paris sportif en afrique|meilleur application pari sportif|meilleur application paris
sportif|meilleur application paris sportif belgique|meilleur application pour les paris sportif|meilleur application pour pari
sportif|meilleur bonus de bienvenue paris sportif|meilleur bonus pari sportif|meilleur bonus paris sportif|meilleur bonus paris sportif sans depot|meilleur bonus paris sportifs|meilleur
bonus site de paris sportif|meilleur bonus site pari sportif|meilleur bonus site paris sportif|meilleur bookmaker paris sportif|meilleur combiné paris
sportif|meilleur conseil paris sportif|meilleur cote de paris sportif|meilleur cote pari sportif|meilleur cote paris sportif|meilleur cote paris sportif aujourd’hui|meilleur cote
site paris sportif|meilleur forum paris sportifs|meilleur
gain paris sportif|meilleur ia paris sportif|meilleur methode pour gagner au paris sportif|meilleur offre bienvenue paris sportif|meilleur offre bonus paris sportif|meilleur offre de bienvenue paris sportif|meilleur offre de bienvenue paris sportifs|meilleur offre pari sportif|meilleur offre paris
sportif|meilleur offre paris sportif en ligne|meilleur pari sportif|meilleur pari sportif du jour|meilleur pari
sportif en ligne|meilleur paris sportif|meilleur paris
sportif aujourd’hui|meilleur paris sportif du jour|meilleur paris sportif en ligne|meilleur paris sportif foot|meilleur promo paris sportif|meilleur pronostic paris sportif|meilleur site de conseil paris sportif|meilleur site
de pari sportif|meilleur site de pari sportif en ligne|meilleur site de paris sportif|meilleur
site de paris sportif avis|meilleur site de paris sportif belgique|meilleur site de paris sportif canada|meilleur site de paris sportif
en france|meilleur site de paris sportif en ligne|meilleur site de paris sportif football|meilleur site de paris sportif forum|meilleur site
de paris sportif france|meilleur site de paris sportif hors arjel|meilleur site de paris sportif international|meilleur site de paris sportif suisse|meilleur site de paris sportifs|meilleur site de paris sportifs en ligne|meilleur site
pari sportif|meilleur site pari sportif en ligne|meilleur site pari sportif
france|meilleur site paris sportif|meilleur site paris sportif
avis|meilleur site paris sportif belgique|meilleur
site paris sportif canada|meilleur site paris sportif
en ligne|meilleur site paris sportif foot|meilleur site
paris sportif forum|meilleur site paris sportif france|meilleur site paris sportif hors arjel|meilleur site paris sportif nba|meilleur
site paris sportif rugby|meilleur site paris sportif suisse|meilleur site paris
sportifs|meilleur site pour pari sportif|meilleur
site pour paris sportif|meilleur site pronostic paris sportif|meilleur strategie paris sportif|meilleur
technique de paris sportif|meilleur technique paris sportif|meilleur technique
pour gagner au paris sportif|meilleure appli de paris sportif|meilleure appli de paris sportifs|meilleure appli pari sportif|meilleure appli paris sportif|meilleure
appli paris sportifs|meilleure application de paris sportif|meilleure application de
paris sportifs|meilleure application pari sportif|meilleure
application paris sportif|meilleure application paris sportif android|meilleure application paris sportifs|meilleure offre
paris sportif|meilleure site paris sportif|meilleure strategie paris sportif|meilleures applications de paris sportifs|meilleures applications paris sportifs|meilleures cotes paris sportifs|meilleures offres paris sportifs|meilleures stratégies paris sportifs|meilleurs appli paris sportif|meilleurs
application de paris sportifs|meilleurs application paris sportif|meilleurs applications
paris sportifs|meilleurs bonus paris sportifs|meilleurs cote paris sportif|meilleurs cotes paris sportifs|meilleurs offres paris sportifs|meilleurs paris sportifs|meilleurs
paris sportifs du jour|meilleurs site de pari
sportif|meilleurs site de paris sportif|meilleurs site de paris sportif en ligne|meilleurs site de paris sportifs|meilleurs
site paris sportif|meilleurs sites de paris sportifs|meilleurs sites de
paris sportifs en ligne|meilleurs sites paris
sportif|meilleurs sites paris sportifs|methode abc paris sportif|methode de paris sportif|methode gagnante
paris sportifs|methode gagner paris sportif|methode infaillible paris sportifs|methode martingale paris sportif|methode mathematique paris sportif|methode mathematique pour gagner au paris
sportif|methode paris sportif|methode paris sportif foot|methode paris sportif
forum|methode paris sportif tennis|methode paris sportifs|methode
pour gagner au paris sportif|methode pour gagner paris sportif|methodes paris sportifs|minimum depot paris
sportif|mise au jeu pari sportif|mise maximum pari sportif|mise maximum paris sportif|mise minimum paris
sportif|mise moyenne paris sportif|mise paris sportif|moins de 4 5
but paris sportif|montant maximum paris sportif|montant paris sportif|montante pari sportif|montante parie sportif|montante paris sportif|montante paris sportifs|montantes paris sportifs|multiple pari sportif|multiple paris sportif|multiple paris sportifs|multiples paris sportifs|méthode calcul paris
sportif|méthode match nul paris sportifs|méthode mathématique pour gagner au paris sportif|méthode paris sportif forum|méthode paris sportif hockey|nba pari
sportif|nba paris sportif|nba paris sportifs|nouveau paris sportif|nouveau site de
pari sportif|nouveau site de paris sportif|nouveau site
de paris sportif en ligne|nouveau site de paris sportifs|nouveau site pari sportif|nouveau
site paris sportif|nouveau site paris sportif france|nouveau site paris sportifs|nouveaux sites de
paris sportifs|nouveaux sites paris sportifs|nouvelle appli paris sportif|nouvelle
application de paris sportif|numero de match paris sportif|numero match paris sportif|offre 100 euros paris sportif|offre appli pari sportif|offre bienvenu paris sportif|offre bienvenue pari sportif|offre bienvenue paris
sportif|offre bienvenue paris sportifs|offre bienvenue
site paris sportif|offre bonus paris sportif|offre de bienvenu
paris sportif|offre de bienvenue pari sportif|offre de bienvenue paris sportif|offre de bienvenue paris sportif belgique|offre de bienvenue paris sportif sans depot|offre de bienvenue
paris sportif sans dépôt|offre de bienvenue paris sportifs|offre de bienvenue sans depot
paris sportif|offre de bienvenue site paris sportif|offre
euro paris sportif|offre pari sportif euro|offre paris sportif|offre paris sportif belgique|offre paris sportif cash|offre paris sportif coupe du monde|offre paris sportif hors arjel|offre paris sportif remboursé|offre paris
sportif remboursé cash|offre paris sportif sans depot|offre promo paris sportif|offre remboursement paris sportif|offre sans depot paris sportif|offre site paris sportif|offres bienvenue paris sportifs|offres de bienvenue paris sportifs|ou faire des paris
sportif|ou faire des paris sportif en espagne|ou faire des paris
sportifs|outil répartiteur de mise paris sportif|outils repartiteur de mises paris sportif|ouverture compte paris
sportifs|ouvrir un compte paris sportif|pack de bienvenue
paris sportif|pack de bienvenue paris sportif hors arjel|pari en ligne sportif|pari
sportif|pari sportif 100 euros offert|pari sportif 100 remboursé|pari sportif abandon tennis|pari sportif aide|pari sportif algérie aujourd’hui|pari sportif appli|pari sportif application|pari sportif argent|pari sportif astuce|pari sportif aujourd|pari sportif
aujourd’hui|pari sportif avec handicap|pari sportif avec orange money|pari sportif avec paypal|pari
sportif avec wave|pari sportif avis|pari sportif basket|pari sportif
belgique|pari sportif belgique france|pari sportif bonus|pari
sportif buteur pas titulaire|pari sportif champions league|pari sportif combiné|pari sportif
comment|pari sportif comment gagner|pari sportif comment ça marche|pari sportif
comparatif|pari sportif conseil|pari sportif cote|pari sportif cote match|pari sportif cote psg|pari sportif coupe|pari sportif coupe de france|pari sportif coupe
du monde|pari sportif depot|pari sportif du jour|pari sportif en france|pari
sportif en ligne|pari sportif en ligne au cameroun|pari sportif en ligne belgique|pari sportif en ligne canada|pari sportif en ligne france|pari sportif en ligne gratuit|pari sportif en ligne
suisse|pari sportif en ligne ufc|pari sportif en suisse|pari
sportif euro|pari sportif explication|pari sportif faire|pari sportif foot|pari sportif foot resultat|pari
sportif football|pari sportif forum|pari sportif francaise
des jeux|pari sportif france|pari sportif france angleterre|pari sportif
france argentine|pari sportif france autriche|pari sportif france belgique|pari sportif
france espagne|pari sportif france italie|pari sportif
france portugal|pari sportif france usa|pari sportif gagnant|pari sportif gagner|pari sportif gagner a tous les coups|pari sportif gagner de l’argent|pari sportif
gain|pari sportif gratuit|pari sportif gratuit pour gagner des cadeaux|pari sportif gratuit sans depot|pari sportif handicap|pari sportif hockey|pari sportif hors arjel|pari sportif jeux olympiques|pari sportif joueur absent|pari sportif le plus rentable|pari
sportif leicester champion|pari sportif ligue 1|pari sportif ligue 2|pari sportif ligue des champions|pari sportif ligue europa|pari sportif match|pari sportif match arrete|pari sportif
match interrompu|pari sportif meilleur|pari sportif meilleur
cote|pari sportif meilleur site|pari sportif methode|pari sportif mise|pari sportif mise au jeu|pari
sportif mise o jeu|pari sportif nba|pari sportif offre bienvenue|pari sportif paypal|pari sportif plus|pari sportif prolongation|pari sportif
promo|pari sportif pronostic|pari sportif pronostic foot|pari sportif pronostic gagnant|pari sportif pronostic gratuit|pari sportif psg|pari sportif psg bayern|pari sportif psg inter|pari sportif psg milan|pari sportif regle|pari sportif rembourse|pari sportif remboursement|pari sportif remboursement cash|pari sportif remboursé|pari sportif rugby|pari sportif rugby coupe du
monde|pari sportif rugby top 14|pari sportif sans argent|pari sportif sans carte bancaire|pari sportif
sans depot|pari sportif signification|pari sportif site|pari sportif statistique|pari sportif suisse|pari sportif systeme|pari sportif technique|pari sportif technique pour gagner|pari sportif temps reglementaire|pari sportif tennis|pari sportif
tennis abandon|pari sportif top|pari sportif top 14|pari sportif tour de france|parie sportif|parie sportif comment ca
marche|parie sportif du jour|parie sportif en ligne|parie
sportif foot|parie sportif football|parie sportif france|parie sportif gratuit|parie sportif pronostic|parie sportif suisse|paris en ligne sportif|paris en ligne sportifs|paris evenement sportif|paris france sportif|paris hippique et sportif|paris hippiques et sportifs|paris hippiques paris sportifs|paris hippiques paris sportifs et poker en ligne|paris
hippiques sportifs|paris match sportif|paris sportif|paris sportif 10 euros offerts|paris sportif 100 euros offert|paris
sportif 100 euros remboursé|paris sportif 100 offert|paris sportif 100 remboursé|paris sportif 100e
offert|paris sportif 150 euros offert|paris sportif 1er pari remboursé|paris sportif a faire|paris sportif a faire aujourd’hui|paris
sportif a faire ce soir|paris sportif abandon tennis|paris sportif
abandon tennis parions sport|paris sportif aide|paris sportif algorithme|paris sportif analyse|paris sportif appli|paris sportif application|paris sportif application android|paris sportif apres
prolongation|paris sportif argent|paris sportif argent fictif|paris sportif argent offert|paris sportif argent virtuel|paris sportif arjel|paris sportif arsenal psg|paris sportif astuce|paris sportif au canada|paris sportif aujourd
hui|paris sportif aujourd’hui|paris sportif avec argent fictif|paris sportif avec
bonus sans depot|paris sportif avec carte bancaire|paris sportif avec cryptomonnaie|paris sportif avec handicap|paris sportif avec paypal|paris
sportif avec paysafecard|paris sportif avis|paris sportif avis expert|paris sportif avis forum|paris sportif bankroll|paris sportif basket|paris sportif
basket coupe de france|paris sportif basket nba|paris sportif
basket prolongation|paris sportif belgique|paris sportif belgique bonus|paris sportif belgique bonus sans depot|paris sportif belgique france|paris sportif belgique suede|paris sportif
bonus|paris sportif bonus bienvenue|paris sportif bonus cash|paris
sportif bonus de bienvenue|paris sportif bonus
gratuit|paris sportif bonus gratuit sans depot|paris sportif bonus retirable|paris sportif bonus sans depot|paris sportif bonus sans depot belgique|paris sportif bookmaker|paris sportif but contre son camp|paris sportif
but temps additionnel|paris sportif buteur|paris sportif
buteur blessé|paris sportif buteur carton rouge|paris sportif
buteur contre son camp|paris sportif buteur non titulaire|paris sportif buteur prolongation|paris sportif buteur qui ne joue pas|paris sportif buteur remplacant|paris sportif calcul
gain|paris sportif canada|paris sportif cash|paris sportif cash out|paris sportif
champion ligue 1|paris sportif champions league|paris sportif
classement ligue 1|paris sportif code promo|paris sportif combine|paris sportif combiné|paris sportif combiné comment
ça marche|paris sportif combiné du jour|paris sportif combiné match
reporté|paris sportif comment ca marche|paris sportif comment
faire|paris sportif comment gagner|paris sportif
comment gagner a tous les coups|paris sportif comment jouer|paris sportif comment ça marche|paris sportif comparateur
cote|paris sportif comparatif|paris sportif conseil|paris sportif conseil gratuit|paris sportif conseil pour gagner|paris sportif cote|paris sportif cote et match|paris sportif cote explication|paris sportif cote psg|paris sportif coupe d’europe|paris
sportif coupe davis|paris sportif coupe de france|paris sportif coupe du monde|paris sportif coupe du monde de rugby|paris
sportif coupe du monde rugby|paris sportif depot 5 euro|paris sportif depot
minimum|paris sportif depot paypal|paris sportif dnb|paris sportif du
jour|paris sportif du jour conseil|paris sportif dépôt
1 euro|paris sportif dépôt minimum 5 euros|paris sportif en belgique|paris
sportif en france|paris sportif en ligne|paris sportif en ligne avec paypal|paris sportif en ligne avis|paris sportif en ligne belgique|paris sportif en ligne bonus|paris sportif en ligne cameroun|paris sportif en ligne comment gagner|paris sportif en ligne comment ça marche|paris
sportif en ligne france|paris sportif en ligne
gratuit|paris sportif en ligne maroc|paris sportif en ligne paypal|paris sportif en ligne québec|paris sportif en ligne sans depot|paris sportif en ligne suisse|paris sportif en suisse|paris sportif espagne
france|paris sportif esport|paris sportif et casino en ligne|paris
sportif et hippique|paris sportif et prolongation|paris sportif euro|paris sportif europa league|paris sportif explication|paris sportif final
ligue des champions|paris sportif finale ligue des
champions|paris sportif foot|paris sportif foot aide|paris sportif foot astuce|paris sportif foot aujourd’hui|paris sportif
foot ce soir|paris sportif foot comment ca
marche|paris sportif foot conseil|paris sportif foot cote|paris
sportif foot coupe du monde|paris sportif foot en ligne|paris sportif foot feminin|paris sportif foot gratuit|paris sportif foot prolongation|paris
sportif foot pronostic|paris sportif foot pronostic gratuit|paris
sportif foot regle|paris sportif foot suisse|paris sportif foot us|paris
sportif football|paris sportif football americain|paris sportif football astuces|paris sportif forfait tennis|paris
sportif forum|paris sportif francais|paris sportif francaise des jeux|paris
sportif france|paris sportif france 2|paris sportif france allemagne|paris sportif france angleterre|paris sportif france argentine|paris sportif france autriche|paris sportif france
belgique|paris sportif france espagne|paris sportif
france gibraltar|paris sportif france italie|paris sportif france nouvelle
zelande|paris sportif france pologne|paris sportif france portugal|paris sportif france uruguay|paris sportif france
usa|paris sportif freebet sans depot|paris sportif gagnant|paris sportif gagnant à coup sûr|paris sportif gagner a coup sur|paris sportif gagner argent|paris sportif gagner de l’argent|paris sportif gain|paris sportif
gain maximum|paris sportif gestion bankroll|paris sportif gratuit|paris sportif gratuit appli|paris sportif gratuit
avec cadeaux|paris sportif gratuit cadeaux|paris sportif gratuit en ligne|paris sportif gratuit entre amis|paris sportif gratuit
sans argent|paris sportif gratuit sans depot|paris sportif gratuit sans dépôt|paris sportif gratuits|paris sportif gros gain|paris sportif handicap|paris sportif handicap 0 1|paris sportif handicap 0-1|paris sportif handicap 1 0|paris sportif handicap 1-0|paris sportif
handicap basket|paris sportif handicap explication|paris sportif
handicap foot|paris sportif handicap rugby|paris sportif hippique|paris sportif hockey|paris sportif
hockey nhl|paris sportif hockey sur glace|paris sportif hors arjel|paris sportif hors
arjel france|paris sportif jeux olympiques|paris sportif jeux video|paris sportif joueur
blessé|paris sportif joueur blessé pendant le match|paris sportif joueur de
foot|paris sportif joueur decisif|paris sportif joueur declare forfait|paris sportif joueur déclare forfait|paris sportif joueur remplacant|paris sportif la francaise des jeux|paris sportif
le plus rentable|paris sportif legal en france|paris sportif leicester champion|paris
sportif les 18 stratégies pour gagner tous les jours|paris sportif les
plus sur|paris sportif les prolongation compte|paris sportif ligne|paris sportif ligue 1|paris sportif ligue 2|paris sportif ligue des champions|paris sportif ligue des nations|paris sportif ligue europa|paris sportif liste|paris sportif martingale|paris sportif match|paris sportif match abandonné|paris sportif match annulé|paris sportif match
arrêté|paris sportif match du jour|paris sportif match interrompu|paris sportif match reporté|paris sportif match suspendu|paris sportif match tennis interrompu|paris sportif match truqué|paris sportif meilleur bonus|paris
sportif meilleur cote|paris sportif meilleur pronostic|paris sportif meilleur
site|paris sportif methode|paris sportif methode 2
3|paris sportif mi temps fin de match|paris sportif mise au jeu|paris sportif mise maximum|paris sportif
mma france|paris sportif moins de 3.5 but|paris sportif montante|paris sportif moto gp|paris sportif multiple|paris sportif multiple
2 3|paris sportif multiple 2 3 explication|paris sportif multiple 2 4|paris sportif multiple 2 5|paris sportif multiple
2/3 explication|paris sportif multiple 3 4|paris sportif multiple
explication|paris sportif national 1 foot|paris sportif nba|paris sportif nba conseil|paris
sportif nba pronostic|paris sportif nhl|paris sportif nombre de
but|paris sportif nouveau site|paris sportif numero match|paris
sportif offert|paris sportif offre bienvenue|paris
sportif offre bienvenue sans depot|paris sportif offre de bienvenue|paris sportif offre
sans depot|paris sportif om psg|paris sportif paypal|paris sportif plus de 1.5 but|paris sportif plus de 2 5 but|paris sportif plus ou
moins|paris sportif plus ou moins 2 5 but|paris sportif premier pari remboursé|paris sportif
premier paris remboursé|paris sportif prolongation|paris sportif prolongation basket|paris sportif prolongation foot|paris
sportif promo|paris sportif pronostic|paris sportif pronostic basket|paris sportif pronostic des match aujourd hui|paris sportif pronostic expert
gratuit|paris sportif pronostic foot|paris sportif pronostic forum|paris sportif pronostic gratuit|paris sportif pronostic tennis|paris sportif psg|paris sportif psg arsenal|paris sportif psg barcelone|paris
sportif psg bayern|paris sportif psg dortmund|paris sportif psg inter|paris sportif psg inter cote|paris sportif psg liverpool|paris sportif psg om|paris sportif qr code|paris sportif que veut dire handicap|paris sportif qui rapporte le plus|paris
sportif regle|paris sportif regle prolongation|paris
sportif rembourse|paris sportif remboursement cash|paris sportif
rembourser|paris sportif remboursé|paris sportif remboursé cash|paris sportif remboursé en cash|paris sportif retrait paypal|paris sportif rue
des joueurs|paris sportif rugby|paris sportif rugby 6 nations|paris sportif rugby coupe du monde|paris
sportif rugby top 14|paris sportif safe du jour|paris sportif sans argent|paris sportif sans carte bancaire|paris sportif sans carte d’identité|paris sportif sans compte bancaire|paris sportif sans depot|paris sportif sans depot minimum|paris sportif si match suspendu|paris sportif si
un joueur abandonne|paris sportif si un joueur ne joue pas|paris sportif si un joueur
se blesse|paris sportif simple ou combiné|paris sportif site|paris sportif statistique|paris sportif stratégie|paris sportif suisse|paris sportif suisse application|paris
sportif suisse en ligne|paris sportif suisse legal|paris sportif suisse légal|paris
sportif suisse romande|paris sportif sur du jour|paris sportif sur le tennis|paris sportif systeme|paris
sportif systeme 2 3|paris sportif systeme 2 4|paris
sportif systeme 2/3|paris sportif systeme 2/4|paris sportif systeme
3 4|paris sportif systeme 3/4|paris sportif systeme explication|paris sportif technique|paris sportif technique pour gagner|paris sportif temps additionnel|paris sportif temps reglementaire|paris sportif tennis|paris sportif tennis abandon|paris sportif tennis conseil|paris sportif tennis de table|paris sportif tennis forfait|paris sportif tennis gratuit|paris sportif tennis pronostic|paris sportif
tennis roland garros|paris sportif tir au but|paris sportif top 14|paris sportif tour de france|paris sportif ufc|paris
sportif ufc france|paris sportif unibet|paris sportif vainqueur euro|paris sportif vainqueur ligue 1|paris sportif vainqueur ligue des champions|paris
sportif via paypal|paris sportif victoire prolongation|paris
sportif vip gratuit|paris sportifs|paris sportifs abandon tennis|paris sportifs aide|paris sportifs analyser un match|paris
sportifs arjel|paris sportifs astuces|paris sportifs aujourd’hui|paris sportifs autorisés en france|paris
sportifs avec paypal|paris sportifs basket|paris sportifs belgique|paris sportifs bonus|paris sportifs bookmakers|paris
sportifs canada|paris sportifs combiné|paris sportifs comparateur|paris sportifs comparatif|paris sportifs conseils|paris sportifs cotes|paris sportifs coupe du monde|paris sportifs de football|paris sportifs du jour|paris sportifs en belgique|paris
sportifs en france|paris sportifs en ligne|paris sportifs en ligne belgique|paris sportifs en ligne
france|paris sportifs en ligne gratuit|paris sportifs en ligne suisse|paris
sportifs en suisse|paris sportifs et hippiques|paris sportifs euro|paris sportifs foot|paris sportifs foot us|paris sportifs forum|paris sportifs france|paris sportifs france espagne|paris sportifs gagner à tous les coups|paris
sportifs gratuit|paris sportifs gratuits|paris sportifs gratuits en ligne|paris sportifs handicap|paris sportifs hockey|paris sportifs hockey
sur galce|paris sportifs hockey sur glace|paris sportifs hors arjel|paris sportifs jeux olympiques|paris
sportifs les bookmakers raflent la mise|paris sportifs ligne|paris sportifs ligue 1|paris sportifs ligue 2|paris
sportifs ligue des champions|paris sportifs ligue europa|paris
sportifs match interrompu|paris sportifs montante|paris sportifs nba|paris sportifs offre bienvenue|paris sportifs offre de bienvenue|paris sportifs paypal|paris sportifs pronostics|paris sportifs psg|paris sportifs psg inter|paris sportifs
rugby|paris sportifs sans argent|paris sportifs sans depot|paris sportifs site|paris sportifs sites|paris sportifs statistiques|paris sportifs stratégie|paris sportifs suisse|paris sportifs technique|paris sportifs
techniques|paris sportifs tennis|paris sportifs tennis astuces|paris
sportifs top 14|paris sportifs tour de france|part de marché paris sportifs|paypal pari sportif|paypal paris sportif|paypal paris sportifs|perte
d’argent paris sportifs|peut on devenir riche avec les paris sportifs|peut
on gagner de l’argent avec les paris sportifs|peut on gagner sa vie avec les paris
sportif|peut on vraiment gagner de l’argent avec les paris sportifs|plus gros combine paris sportif|plus gros gagnant paris sportif|plus
gros gain paris sportif|plus gros gain paris sportif au monde|plus gros gain paris sportif france|plus gros gains paris sportif|plus gros pari
sportif|plus gros paris sportif|plus grosse cote gagner paris
sportif|plus grosse cote pari sportif|plus grosse cote
paris sportif|plus grosse mise paris sportif|plus grosse somme gagner au paris sportif|plus ou moins
paris sportif|pourcentage de mise paris sportif|premier pari sportif remboursé|probabilité cote paris sportif|probabilité paris sportif combiné|prolongation basket paris sportif|prolongation paris sportif|promo pari sportif|promo paris sportif|promo site de paris
sportif|promo site pari sportif|promo site paris sportif|promos paris sportifs|prono paris sportif foot|prono paris sportif gratuit|prono
paris sportif tennis|pronostic de paris sportif|pronostic du
jour paris sportif|pronostic foot paris sportif|pronostic gratuit paris sportif|pronostic pari sportif|pronostic pari sportif gratuit|pronostic
paris sportif|pronostic paris sportif aujourd’hui|pronostic paris sportif du jour|pronostic paris sportif foot|pronostic paris sportif gratuit|pronostic paris
sportif tennis|pronostic paris sportifs|pronostics foot
statistiques et aides aux paris sportifs|pronostics paris sportif|pronostics paris sportifs|pronostiqueur paris sportif
gratuit|psg arsenal paris sportif|psg bayern paris sportif|psg inter milan paris sportif|psg inter pari sportif|psg
inter paris sportif|psg liverpool paris sportif|psg
om paris sportif|psg paris sportif|psg paris sportifs|qr code paris sportif|qu est ce qu un handicap
paris sportif|qu est ce que handicap dans les paris sportif|qu’est ce
qu’un handicap paris sportif|qu’est ce que handicap dans les paris sportif|quand un joueur se blesse paris sportif|que signifie 1/1
en paris sportif|que signifie 1/2 paris sportif|que signifie 12
en paris sportif|que signifie 1×2 dans les paris sportifs|que
signifie btts en paris sportif|que signifie dnb en paris sportif|que signifie draw en paris
sportif|que signifie ft en paris sportif|que signifie gg
dans le pari sportif|que signifie gg en pari sportif|que signifie gg en paris sportif|que signifie handicap
dans les paris sportifs|que veut dire dnb en paris sportif|que veut dire handicap
dans les paris sportifs|que veut dire handicap paris sportif|quel appli pari sportif|quel cote jouer paris sportif|quel est la meilleur appli de
paris sportif|quel est le meilleur algorithme de paris sportif|quel est le meilleur site de pari sportif|quel est le meilleur site de
pari sportif en ligne|quel est le meilleur site de paris sportif|quel est le meilleur site de paris sportif en ligne|quel est le meilleur
site de paris sportifs en ligne|quel est le pari sportif le plus
rentable|quel pari sportif est le plus rentable|quel pari sportif est le plus sûr|quel pari sportif faire
aujourd’hui|quel paris sportif faire aujourd’hui|quel paris sportif rapporte le plus|quel site de paris sportif choisir|quel site de paris sportif rembourse en cash|quel type de
pari sportif est le plus rentable|quelle application pour paris
sportifs|quelle est la meilleure appli de paris sportif|quelle est la meilleure application de paris sportif|quelle est la
meilleure application pour les paris sportifs|quelle
est le meilleur site de paris sportif|quels paris sportifs faire|quels sont les paris sportifs les plus sûrs|rebond basket paris sportif|record de gain paris sportif|regle buteur paris sportif|regle de
paris sportif|regle des paris sportif|regle handicap paris sportif|regle
handicap paris sportif foot|regle multiple paris
sportif|regle pari sportif|regle paris sportif|regle paris sportif foot|regle paris sportif multiple|regle paris sportif prolongation|reglement pari
sportif|reglement paris sportif|regles paris sportifs|remboursement
cash paris sportif|remboursement en cash paris
sportif|remboursement pari sportif|remboursement paris sportif|repartiteur de mise paris sportif|repartiteur de mise paris sportifs|repartiteur de mises paris sportif|repartiteur mise paris sportif|repartition des
mises paris sportif|resultat pari sportif|resultat paris sportif|resultat paris
sportif en direct|resultat paris sportif foot|resultat sportif hockey|retirer argent paris sportif|rugby pari sportif|rugby paris sportif|règle paris sportif prolongation|règles paris sportif|répartiteur de mise pari
sportif|répartiteur de mise paris sportif|répartiteur de mise paris sportifs|répartition des mises paris sportif|résultat paris sportif foot|sans depot paris sportif|se faire interdire de paris sportifs|signification btts paris sportif|signification dnb paris
sportif|signification handicap paris sportif|simulateur de
gain paris sportif|simulateur gain paris sportif|simulateur gain paris sportif multiple|simulateur gain paris sportif systeme|simulateur gain paris sportif système|simulateur montante paris sportif|simulateur paris sportif multiple|simulateur
systeme paris sportif|simulation paris sportif gratuit|site aide paris
sportif|site analyse paris sportif|site analyser paris sportif|site arjel
paris sportif|site conseil paris sportif|site d’analyse de paris sportifs|site d’analyse paris sportif|site
de conseil paris sportif|site de pari en ligne sportif|site de pari
sportif|site de pari sportif avec bonus sans depot|site de pari sportif bonus sans depot|site de pari sportif canada|site
de pari sportif en ligne|site de pari sportif francais|site
de pari sportif gratuit|site de pari sportif hors arjel|site de pari sportif suisse|site de
parie sportif|site de parie sportif en ligne|site de paris en ligne sportif|site de paris sportif|site de paris sportif
acceptant paypal|site de paris sportif arjel|site de paris
sportif autorisé en france|site de paris sportif autorisé
en suisse|site de paris sportif avec bonus|site de paris sportif avec bonus sans depot|site de
paris sportif avec bonus sans dépôt|site de paris sportif avec
neosurf|site de paris sportif avec paiement mobile|site
de paris sportif avec paypal|site de paris sportif avis|site de paris sportif belge avec bonus|site de paris sportif belgique|site de paris
sportif bonus|site de paris sportif bonus sans depot|site de paris
sportif canada|site de paris sportif comparatif|site de
paris sportif depot minimum|site de paris sportif en france|site de paris sportif en ligne|site
de paris sportif en ligne suisse|site de paris sportif
football|site de paris sportif francais|site de paris sportif france|site de paris sportif gratuit|site de paris sportif gratuit pour gagner des cadeaux|site de paris sportif gratuit sans dépôt|site de paris sportif hors arjel|site de paris sportif le
plus fiable|site de paris sportif legal en france|site de paris sportif meilleur cote|site de paris sportif nouveau|site de paris sportif offre de bienvenue|site de paris
sportif paypal|site de paris sportif premier paris remboursé|site de paris sportif qui accepte
paypal|site de paris sportif qui rembourse en cash|site de paris sportif remboursé|site de paris sportif sans argent|site de paris sportif sans carte bancaire|site de paris sportif sans carte d’identité|site de paris sportif sans depot|site de paris sportif suisse|site
de paris sportifs|site de paris sportifs avec paypal|site de paris sportifs en ligne|site de paris sportifs francais|site de paris sportifs gratuit|site de
paris sportifs paypal|site de paris sportifs suisse|site de statistique pour paris sportif|site des paris sportifs|site pari en ligne sportif|site pari sportif|site pari sportif 100 euros offert|site pari sportif arjel|site pari sportif belgique|site
pari sportif bonus|site pari sportif canada|site pari sportif comparatif|site pari sportif en ligne|site
pari sportif france|site pari sportif gratuit|site pari
sportif hors arjel|site pari sportif suisse|site parie sportif|site paris en ligne sportif|site paris sportif|site paris sportif 100 euros offert|site paris sportif 100 euros
remboursé|site paris sportif 1er paris remboursé|site paris
sportif arjel|site paris sportif autorisé en france|site
paris sportif avec bonus|site paris sportif avec bonus sans depot|site paris sportif avec meilleur cote|site paris sportif belgique|site paris sportif bonus|site paris sportif bonus cash|site paris sportif bonus sans depot|site paris sportif
canada|site paris sportif comparatif|site paris sportif depot 5 euro|site paris
sportif en ligne|site paris sportif foot|site paris sportif france|site paris sportif gratuit|site paris
sportif hors arjel|site paris sportif hors
arjel france|site paris sportif meilleur cote|site paris sportif nouveau|site paris sportif offre de bienvenue|site paris sportif paypal|site
paris sportif remboursement cash|site paris sportif remboursé
en cash|site paris sportif retrait instantané|site paris
sportif sans carte bancaire|site paris sportif sans depot|site paris sportif suisse|site paris sportifs|site paris sportifs belgique|site paris sportifs
en ligne|site paris sportifs france|site paris sportifs hors arjel|site paris sportifs suisse|site pour analyse paris sportif|site
pour paris sportif|site pronostic paris sportif|site statistique paris sportif|site suisse paris sportif|sites de pari sportif|sites de paris sportif|sites de paris sportifs|sites de paris sportifs
arjel|sites de paris sportifs autorisés en france|sites de paris sportifs belgique|sites de paris
sportifs bonus|sites de paris sportifs en belgique|sites de paris sportifs en france|sites de paris sportifs en ligne|sites de paris sportifs gratuits|sites de paris sportifs gratuits sans dépôt|sites
de paris sportifs suisse|sites pari sportif|sites paris sportif|sites paris sportifs|sites paris sportifs
arjel|sites paris sportifs belgique|sites paris sportifs france|sites
paris sportifs hors arjel|sites paris sportifs suisse|so foot paris sportif|so foot paris sportifs|specialiste tennis paris sportif|statistique foot
paris sportif|statistique paris sportif|statistique paris sportif
foot|statistique tennis paris sportif|statistiques football paris sportifs|statistiques paris
sportifs|strategie de paris sportif|stratégie big whale paris sportif|stratégie de paris sportifs|stratégie gagnante paris sportifs|stratégie
pari sportif|stratégie paris sportif|stratégie paris sportifs|stratégie paris sportifs forum|stratégie pour gagner au paris
sportif|stratégies paris sportifs|suisse paris sportif|suisse paris sportifs|systeme 2 3 paris sportif|systeme 3 4 paris sportif|systeme de
cote paris sportif|systeme de paris sportif|systeme pari sportif|systeme paris
sportif|systeme paris sportifs|systeme reducteur
paris sportif|système paris sportif|tableau bankroll paris sportif|tableau cote paris sportif|tableau de
paris sportif|tableau de suivi paris sportifs|tableau excel bankroll paris sportif|tableau
excel paris sportif|tableau excel paris sportif gratuit|tableau excel
paris sportifs|tableau excel pour paris sportif|tableau gestion bankroll
siti Scommesse Con Postepay pubg
new zealand pokies app, new zealandn express zahlung online is there a casino royale In montenegro and canada best slot
machine, or online casino reviews united states
10 euros offert paris sportif|10 euros offert sans dépôt paris
sportif|10 meilleurs sites de paris sportifs|100 euro offert paris sportif|100 euros offert paris sportif|100 euros remboursé paris sportifs|100 offert pari sportif|100
offert paris sportif|100 remboursé paris sportif|100e offert
pari sportif|abandon paris sportif tennis|abandon tennis paris sportif|addiction paris sportif
forum|age paris sportif belgique|aide au pari sportif|aide au paris sportif|aide aux paris
sportif|aide aux paris sportifs|aide pari sportif|aide pari sportif football|aide parie sportif|aide paris
sportif|aide paris sportif foot|aide paris sportif gratuit|aide paris sportifs|aide pour
paris sportif|algorithme de paris sportif|algorithme excel paris sportif|algorithme gratuit paris sportif|algorithme pari sportif|algorithme paris sportif|algorithme paris sportif avis|algorithme paris sportif basket|algorithme paris
sportif excel|algorithme paris sportif gratuit|algorithme paris sportif
tennis|algorithme paris sportifs|algorithme pour paris sportif|analyse
cote paris sportif|analyse de paris sportif|analyse match paris sportif|analyse pari sportif|analyse paris sportif|analyse
paris sportif foot|analyse paris sportif football|analyse
paris sportif gratuit|analyse paris sportifs|ancienne cote paris
sportif|api cote paris sportif|app paris sportif sans argent|appli
de paris sportif|appli de paris sportif sans argent|appli de paris sportifs|appli pari
sportif|appli pari sportif gratuit|appli parie sportif|appli paris sportif|appli paris sportif avec paypal|appli
paris sportif belgique|appli paris sportif entre amis|appli paris
sportif gratuit|appli paris sportif sans argent|appli paris sportif suisse|appli paris sportifs|application aide paris sportif|application algorithme paris sportif|application analyse paris sportif|application android paris sportif|application bankroll paris sportif|application conseil paris sportif|application de pari sportif|application de
parie sportif|application de paris sportif|application de paris sportif en afrique|application de paris sportif en cote d’ivoire|application de paris sportif en ligne|application de paris sportif gratuit|application de paris sportif international|application de paris sportif suisse|application de paris sportifs|application faux paris sportifs|application gestion bankroll paris sportif|application gestion paris sportif|application ia paris sportif|application pari
sportif gratuit|application paris sportif|application paris
sportif android|application paris sportif argent fictif|application paris sportif belgique|application paris sportif canada|application paris sportif espagne|application paris sportif espagnol|application paris sportif fictif|application paris sportif france|application paris sportif gratuit|application paris sportif gratuit entre amis|application paris sportif maroc|application paris sportif offre
de bienvenue|application paris sportif paypal|application paris sportif sans argent|application paris sportif
sans justificatif de domicile|application paris sportif suisse|application paris sportif
usa|application paris sportif virtuel|application pour faire des paris sportifs|application pour
gerer ses paris sportif|application pour les paris sportifs|application pour pari sportif|application pour
paris sportif|application pour paris sportifs|application statistique paris sportif|application suivi
paris sportif|applications de paris sportifs|applications paris sportifs|applis paris sportif|applis paris sportifs|apprendre a faire des paris sportifs|argent facile paris sportif|argent offert
paris sportifs|argent offert sans depot paris sportif|argent paris
sportif|argent paris sportifs|argent paris sportifs impots|argent sans depot paris sportif|arjel
paris sportif|arjel paris sportifs|astuce gagner paris sportif|astuce pari sportif|astuce paris sportif|astuce paris sportif basket|astuce paris
sportif foot|astuce paris sportif forum|astuce paris sportif tennis|astuce paris
sportifs|astuce pour gagner au pari sportif|astuce pour gagner au paris sportif|astuce pour gagner
paris sportif|astuce pour paris sportif|astuces paris
sportifs|astuces paris sportifs en ligne|astuces paris
sportifs foot|astuces pour gagner aux paris sportifs|autorisation paris sportif france|avis pari sportif|avis paris sportif|avis paris sportif foot|avis
site de paris sportif|avis site paris sportif|avis sur les paris sportifs|avis sur paris sportif|avis tipster paris sportif|aweh signification paris sportif|bankroll 100 euros paris sportifs|bankroll management paris sportif|bankroll paris sportif|bankroll paris sportif excel|bankroll paris sportif gratuit|bankroll paris sportifs|basket paris sportif|belgique france paris sportif|belgique paris sportifs|bonus bienvenue paris
sportif|bonus bienvenue paris sportifs|bonus cash paris sportif|bonus de
bienvenue paris sportif|bonus de bienvenue paris sportif belgique|bonus de bienvenue sans depot paris sportif|bonus de depot paris sportif|bonus de
paris sportifs|bonus depot paris sportif|bonus en cash paris sportif|bonus gratuit paris sportif|bonus gratuit sans depot paris sportif|bonus pari sportif|bonus paris
sportif|bonus paris sportif belgique|bonus paris sportif betclic|bonus
paris sportif cash|bonus paris sportif en ligne|bonus paris sportif france pari|bonus paris sportif retirable|bonus paris sportif sans depot|bonus paris sportif sans dépôt|bonus paris sportif unibet|bonus
paris sportifs|bonus sans depot paris sportif|bonus sans depot paris sportif
belgique|bonus sans dépôt paris sportif|bonus sans dépôt
paris sportif hors arjel|bonus site de paris sportif|bonus site pari sportif|bonus site paris sportif|bonus sites de paris sportifs|bonus unibet paris sportif|bookmaker paris sportif|bookmaker paris sportif gratuit|bookmaker paris sportifs|bookmaker sportif|bookmakers paris
sportif|bookmakers paris sportifs|bookmakers paris sportifs en ligne|but contre son camp paris sportif|but
sur penalty paris sportif|buteur paris sportif|c’est quoi handicap paris sportif|c’est quoi une cote paris
sportif|calcul anti perte paris sportif|calcul combinaison pari
sportif|calcul cote pari sportif|calcul cote paris sportif|calcul
couverture paris sportif|calcul de cote paris sportif|calcul des cotes paris sportifs|calcul dnb paris sportifs|calcul double chance paris sportif|calcul gain paris sportif|calcul mise paris sportif|calcul pari sportif|calcul
paris sportif|calcul paris sportif multiple|calcul pourcentage cote paris sportif|calcul probabilité paris sportif|calcul rentabilité paris sportifs|calcul roi paris
sportif|calcul systeme paris sportif|calcul trj paris sportifs|calculateur cote paris sportif|calculateur de cote paris sportif|calculateur de mise paris sportif|calculateur de paris sportif|calculateur
paris sportif|calculatrice arbitrage paris sportif|calculatrice paris sportif|calculer cote
paris sportif|calculer gain paris sportif|calculer probabilité paris sportifs|calculer roi paris sportifs|calculer une cote pari sportif|calculer une cote
paris sportif|carte cadeau paris sportif|carte pcs paris sportif|carte prépayée
paris sportifs|cash out pari sportif|cash out paris sportif|cash out paris sportifs|casino en ligne paris sportif|casino paris sportif
en ligne|champions league paris sportif|chute de cote paris sportif|classement des meilleurs
sites de paris sportifs|classement meilleur site de paris sportif|code barre paris sportif|code bonus
paris sportif|code paris sportif|code promo pari sportif|code promo paris sportif|code promo paris
sportif sans depot|code promo paris sportif sans dépôt|code promo sans depot paris sportif|code promo site paris sportif|combien de temps pour encaisser un paris sportif|combien de temps pour retirer un paris sportif|combien miser paris sportifs|combine paris sportif|combines paris sportifs|combiné pari sportif|combiné paris
sportif|combiné paris sportif conseil|combiné paris sportif du
jour|combiné paris sportif pronostic|comment analyser un paris sportif|comment
arreter de jouer aux paris sportifs|comment arreter les paris sportif|comment arreter les
paris sportifs|comment arrêter les paris sportifs|comment
bien gagner au paris sportif|comment bien jouer
au paris sportif|comment bien miser paris sportif|comment ca marche les paris sportif|comment calculer cote paris sportif|comment calculer gain paris sportif|comment calculer les cotes des paris sportifs|comment calculer
une cote de paris sportif|comment calculer une cote pari sportif|comment calculer une cote
paris sportif|comment comprendre les paris sportifs|comment creer un vip
paris sportif|comment créer un algorithme paris sportif|comment créer
un site de paris sportif|comment devenir riche avec les paris sportifs|comment etre rentable paris sportif|comment etre
sur de gagner au paris sportif|comment faire de bon paris sportif|comment faire des parie sportif|comment faire des paris sportif|comment faire des paris sportif
gagnant|comment faire des paris sportifs|comment faire pari sportif|comment
faire paris sportif|comment faire pour arreter les paris sportifs|comment faire
pour gagner au paris sportif|comment faire
pour gagner les paris sportifs|comment faire un bon pari sportif|comment faire un bon paris sportif|comment faire un pari sportif|comment faire
un parie sportif|comment faire un paris sportif|comment faire une montante paris
sportif|comment fonctionne les cotes dans les paris sportifs|comment fonctionne les cotes des paris sportifs|comment fonctionne les paris
sportifs|comment fonctionne paris sportifs|comment fonctionne un pari sportif|comment fonctionnent les
cotes dans les paris sportifs|comment fonctionnent les cotes dans les paris sportifs grand oral|comment fonctionnent les cotes
de paris sportif|comment fonctionnent les paris sportifs|comment fonctionnent les paris sportifs grand oral|comment fonctionnent
les paris sportifs grand oral maths|comment fonctionnent les paris sportifs maths|comment gagner a coup sur au paris
sportif|comment gagner a tous les coups au paris sportif|comment gagner a tout les coup au paris sportif|comment gagner au pari sportif|comment gagner au
pari sportif football|comment gagner au paris sportif|comment gagner au
paris sportif a coup sur|comment gagner au paris sportif foot|comment
gagner au paris sportif forum|comment gagner au paris sportif tennis|comment gagner au paris sportifs|comment gagner aux paris sportif|comment gagner aux paris sportifs|comment gagner aux paris
sportifs foot|comment gagner aux paris sportifs
livre|comment gagner aux paris sportifs sur le
long terme|comment gagner avec les paris sportifs|comment
gagner dans les paris sportifs|comment gagner de l argent avec les paris sportifs|comment gagner de l’argent au paris sportif|comment gagner de l’argent aux
paris sportifs|comment gagner de l’argent avec les paris sportifs|comment gagner de l’argent paris
sportif|comment gagner de l’argent sur les paris sportifs|comment gagner de
l’argent sur paris sportif|comment gagner des paris sportif|comment
gagner des paris sportifs|comment gagner en paris sportif|comment gagner facilement au paris sportif|comment
gagner les paris sportifs|comment gagner paris
sportif|comment gagner paris sportif foot|comment
gagner paris sportifs|comment gagner sa vie avec les paris sportifs|comment gagner ses paris sportif|comment gagner
sur les paris sportif|comment gagner sur les paris sportifs|comment
gagner tout le temps au paris sportif|comment gagner un pari sportif|comment
gagner un paris sportif|comment gerer une bankroll paris sportif|comment gérer sa bankroll paris sportif|comment jouer au
pari sportif|comment jouer au paris sportif|comment jouer au paris sportif foot|comment jouer aux paris sportifs|comment jouer paris
sportif|comment marche cote paris sportif|comment marche les cotes paris sportif|comment
marche les paris sportif|comment marche les paris sportifs|comment marche paris sportif|comment marche un pari sportif|comment
marche un paris sportif|comment marchent les cotes paris sportif|comment marchent les paris sportifs|comment miser au paris sportif|comment miser paris
sportif|comment monter sa bankroll paris sportif|comment ne jamais perdre au paris sportif|comment
parier sportif|comment reussir au paris sportif|comment reussir les paris sportif|comment reussir paris sportif|comment sont calculer les cotes de
paris sportif|comment sont calculées les cotes des paris sportifs|comment sont calculés les cotes des paris sportifs|comment
sont faites les cotes des paris sportifs|comment toujours gagner au paris sportif|comment ça
marche les paris sportifs|comparaison bonus paris sportifs|comparaison cote pari sportif|comparaison des cotes paris sportifs|comparateur cote pari sportif|comparateur cote paris sportif|comparateur
cotes paris sportif|comparateur cotes paris sportifs|comparateur de cote pari sportif|comparateur de cote paris sportif|comparateur de cotes paris sportifs|comparateur de côtes paris sportifs|comparateur de paris sportif|comparateur de site de paris sportif|comparateur de site
paris sportif|comparateur de sites de paris sportifs|comparateur pari sportif|comparateur paris sportif|comparateur paris sportifs|comparateur site de paris
sportif|comparateur site pari sportif|comparateur site paris
sportif|comparatif bonus paris sportif|comparatif bonus
paris sportifs|comparatif cote pari sportif|comparatif
cote paris sportif|comparatif cotes paris sportifs|comparatif des sites de paris sportifs|comparatif offre de bienvenue paris sportif|comparatif
offre paris sportif|comparatif pari sportif|comparatif pari sportif en ligne|comparatif paris sportif|comparatif paris sportif bonus|comparatif paris sportif
en ligne|comparatif paris sportifs|comparatif paris sportifs en ligne|comparatif site de
paris sportif|comparatif site paris sportif|comparatif site paris
sportifs|comparatif sites de paris sportifs|comparatif sites paris sportifs|comparer les
cotes paris sportifs|comprendre cote paris
sportif|comprendre handicap paris sportif|comprendre les
cotes des paris sportifs|comprendre les cotes paris sportif|comprendre les cotes paris sportifs|comprendre les
handicap paris sportif|compte de paris sportif|compte démo paris sportif|compte finance paris sportif|compte financer paris
sportif|compte financier paris sportif|compte financé paris sportif|compte pari sportif|compte paris sportif|compte
paris sportif financé|conseil de paris sportif|conseil de paris sportifs|conseil en paris
sportif|conseil en paris sportifs|conseil pari sportif|conseil pari sportif gratuit|conseil paris sportif|conseil
paris sportif aujourd’hui|conseil paris sportif du jour|conseil paris sportif foot|conseil paris sportif gratuit|conseil paris
sportif ligue des champions|conseil paris sportif nba|conseil paris sportif pronostic|conseil paris sportif rmc|conseil paris sportif tennis|conseil paris sportifs|conseil pour gagner au paris sportif|conseil pour paris sportif|conseil sur
les paris sportifs|conseille paris sportif|conseiller en paris sportifs|conseiller
paris sportif|conseils de paris sportifs|conseils en paris sportifs|conseils
paris sportifs|conseils paris sportifs foot|conseils paris sportifs gratuit|conseils paris sportifs
tennis|conseils pour paris sportifs|cote a 100 paris
sportif|cote a 2 paris sportif|cote anglaise paris sportif|cote de 2 paris sportif|cote de pari
sportif|cote de paris sportif|cote des paris sportifs|cote maximum paris sportif|cote minimum paris sportif|cote pari sportif|cote pari sportif comment ça marche|cote pari sportif real
madrid|cote pari sportif rugby|cote parie sportif|cote paris sportif|cote paris sportif belgique|cote paris sportif calcul|cote paris sportif definition|cote paris sportif euro|cote
paris sportif explication|cote paris sportif foot|cote paris sportif france belgique|cote paris sportif france espagne|cote paris sportif ligue des champions|cote paris
sportif moto gp|cote paris sportif psg|cote paris sportif psg arsenal|cote
paris sportif rugby|cote paris sportif tennis|cote paris sportifs|cote pour paris sportifs|cote sportif
foot|cote sportif rugby|cote à 1000 paris sportif|cotes de paris sportifs|cotes pari sportif|cotes paris sportif|cotes
paris sportifs|cotes paris sportifs foot|coupe de
france paris sportif|créer un algorithme paris sportif|créer un compte paris sportif|créer
un site de paris sportif en ligne|dans les paris sportifs que signifie handicap|declarer ses
gains paris sportif|definition cash out paris sportif|definition cote paris sportif|definition handicap paris
sportif|depot 5 euros paris sportif|depot double paris sportif|depot minimum 5 euro paris sportif|depot minimum paris sportif|depot paris sportif|depuis quand existe
les paris sportif en france|devenir riche avec les paris sportifs|devenir riche
avec paris sportifs|disqualification tennis paris sportif|dnb en paris sportif|dnb pari sportif|dnb
paris sportif|dnb paris sportif definition|dnb
paris sportifs|doit on declarer les gains de paris sportif|déclarer gains paris
sportifs|déclarer gains paris sportifs hors arjel|définition bankroll paris sportif|dépôt minimum 1 euro paris sportif|dépôt minimum 5 euro
paris sportif|ecart de jeux tennis paris sportif|erreur de cote paris sportif|est ce que les gains des paris sportifs sont imposables|est-ce que les prolongation compte dans un pari sportif|etre sur
de gagner au paris sportif|euro paris sportif|evenement sportif a paris|evenement
sportif paris|evenement sportif paris 2025|evenement sportif paris aujourd hui|evenement sportif paris aujourd’hui|evenement sportif paris ce week end|evenements
sportif paris|evenements sportifs paris|evenements sportifs paris 2025|evenements sportifs à paris|evolution cote
paris sportif|evolution cotes paris sportifs|evolution des cotes paris
sportifs|explication cote pari sportif|explication cote paris sportif|explication handicap paris sportif|explication pari sportif|explication paris sportif|face a
face hockey paris sportif|faire des paris sportif|faire des paris sportif avec paypal|faire des paris sportifs|faire fortune
paris sportifs|faire un pari sportif|faire un paris sportif|faut il déclarer les gains de paris sportifs|faut il déclarer ses gains
paris sportifs|fichier excel gestion bankroll paris sportif|fiscalité gains paris sportifs|foot paris sportif|football
et paris sportifs|forfait tennis paris sportif|formation paris sportif gratuit|forum de paris sportif|forum de paris sportifs|forum pari sportif|forum parie sportif|forum
paris sportif|forum paris sportif foot|forum paris
sportif gratuit|forum paris sportif nba|forum paris
sportif tennis|forum paris sportifs|forum sur les paris sportifs|forum tennis paris sportif|francaise des jeux pari sportif|francaise des jeux paris
sportif|francaise des jeux paris sportifs|france 2 paris sportif|france 2 paris sportifs|france belgique
paris sportif|france espagne paris sportif|france
pari sportif|france pari sportif brest|france paris sportif|france paris
sportifs|france pologne paris sportif|france portugal paris sportif|france suisse paris sportifs|france
tunisie paris sportifs|france-pari – paris sportifs|gagnant pari sportif|gagnant paris
sportif|gagnant paris sportif bayern|gagnante paris sportif|gagne au paris sportif|gagner 10 euros par jour aux paris sportifs|gagner 100 euros par jour paris sportif|gagner
1000 euros par mois paris sportifs|gagner 10000 euros paris sportif|gagner 2000 euros par mois
paris sportif|gagner 50 euros par jour paris sportif|gagner a coup sur au paris sportif|gagner a coup
sur pari sportif|gagner a tous les coup paris sportif|gagner argent avec paris sportifs|gagner
argent pari sportif|gagner argent paris sportif|gagner argent paris sportifs|gagner au pari sportif|gagner au paris sportif|gagner au
paris sportif a coup sur|gagner au paris sportif foot|gagner
au paris sportif forum|gagner au paris sportif à coup sur|gagner aux paris sportif|gagner aux paris sportifs|gagner aux paris sportifs pdf|gagner
beaucoup d’argent paris sportif|gagner de l argent grace aux paris sportifs|gagner
de l argent pari sportif|gagner de l argent paris sportif|gagner de l argent paris sportifs|gagner de l’argent au
paris sportif|gagner de l’argent aux paris sportifs|gagner de l’argent
avec les paris sportifs|gagner de l’argent avec paris sportif|gagner de l’argent avec paris
sportifs|gagner de l’argent grace au paris sportif|gagner de l’argent
grace aux paris sportifs|gagner de l’argent pari sportif|gagner de l’argent paris sportif|gagner de l’argent paris sportifs|gagner de l’argent sur
les paris sportifs|gagner des paris sportif|gagner des paris sportifs|gagner les paris sportifs|gagner pari
sportif|gagner paris sportif|gagner paris sportif foot|gagner paris sportif forum|gagner paris sportif tennis|gagner paris
sportifs|gagner sa vie avec les paris sportif|gagner sa vie
avec les paris sportifs|gagner sa vie avec paris sportifs|gagner ses paris
sportifs|gagner à coup sur paris sportif|gagner à tous les coups paris sportifs|gain maximum paris sportif|gain pari sportif|gain pari sportif imposable|gain pari sportif impot|gain paris sportif|gain paris sportif imposable|gain paris sportif impot|gain paris sportif impôt|gains
paris sportif|gains paris sportif imposable|gains paris sportifs|gains paris sportifs imposable|gains paris sportifs imposables|gains paris sportifs sont ils imposables|gerer bankroll paris sportif|gerer sa bankroll paris sportif|gerer une bankroll paris sportif|gestion bankroll paris sportif|gestion bankroll paris sportifs|gestion bankroll paris sportifs excel|gestion de bankroll paris sportif|gestion de bankroll
paris sportif application|gestion de bankroll paris sportifs|gestion de mise paris sportif|gestion paris sportifs v2
5 gratuit|gg signification paris sportif|gros combiné paris sportif|gros gain paris sportif|grosse cote paris
sportif pronostic|grosse mise paris sportif|groupe
paris sportif gratuit|groupe telegram paris sportif gratuit|groupement de joueurs paris sportifs|handicap 0 paris sportif|handicap 1 paris sportif|handicap 5 paris sportif|handicap au
paris sportif|handicap basket paris sportif|handicap dans les paris sportifs|handicap en paris
sportif|handicap europeen paris sportif|handicap européen paris
sportifs|handicap mi temps paris sportif|handicap
pari sportif|handicap paris sportif|handicap paris
sportif basket|handicap paris sportif explication|handicap paris sportif foot|handicap paris sportif rugby|handicap paris sportifs|handicap rugby paris sportif|handicap tennis paris sportif|historique cote paris sportif|historique des cotes paris sportifs|hockey paris sportif|hockey sur glace paris sportif|hors arjel paris sportif|hweh signification paris
sportif|imposition gain pari sportif|imposition gain paris sportif|imposition gains paris sportifs|imposition paris sportif france|impot gain paris sportif|impot paris
sportif france|impot sur gain paris sportif|je gagne ma vie avec les paris
sportifs|jeu de pari sportif gratuit|jeu de paris sportif
en ligne|jeu de paris sportif gratuit|jeu paris sportif gratuit|jeu paris sportif sans argent|jeux
de parie sportif|jeux de paris sportif|jeux de paris sportif en ligne|jeux de paris sportif gratuit|jeux de paris sportifs|jeux olympiques paris sportifs|jeux paris sportif|jeux paris sportif gratuit|jeux paris sportif virtuel|jeux paris sportifs en ligne|jouer au paris sportif|jouer paris sportif|joueur absent
paris sportif|joueur blesse paris sportif|joueur caen paris sportif|joueur de caen pari sportif|joueur de foot paris sportif|joueur decisif paris
sportif|joueur décisif paris sportif|joueur italien paris
sportif|joueur paris sportif|joueur professionnel paris sportif|joueur qui se blesse paris sportif|joueur sanctionne pari sportif|joueur suspendu paris sportif|joueurs
italiens paris sportifs|l’argent des paris sportifs est il imposable|la cote
paris sportif|la francaise des jeux paris sportif|la martingale paris sportif|la
martingale paris sportifs|la meilleur application de
paris sportif|la meilleur application paris sportif|la meilleur technique pour gagner au paris sportif|la méthode
secrète pour gagner aux paris sportifs pdf|la plus grosse cote gagner
paris sportif|la plus grosse cote paris sportif|ldem paris sportif signification|le marché des
paris sportifs|le meilleur site de pari sportif|le meilleur site de paris sportif|le meilleur site de paris sportif en ligne|le meilleur site de paris sportifs|le plus gros gain au paris sportif|le plus gros paris sportif|le plus gros paris sportif
du monde|les 10 meilleurs sites de paris sportifs|les
10 meilleurs sites de paris sportifs en afrique|les 17 secrets pour gagner rapidement
aux paris sportifs|les 17 secrets pour gagner rapidement aux paris sportifs pdf|les application de paris sportif|les applications paris sportifs|les
bonus paris sportifs|les bookmakers paris sportifs|les cotes paris sportifs|les gains de
paris sportifs sont ils imposables|les gains des paris sportifs sont ils imposables|les jeux de paris sportifs|les meilleur paris sportif|les meilleures applications de paris sportifs|les meilleurs applications de paris sportifs|les meilleurs bonus
paris sportif|les meilleurs bonus paris sportifs|les meilleurs cotes
paris sportif|les meilleurs paris sportifs|les meilleurs
paris sportifs du jour|les meilleurs site de paris sportif|les meilleurs site de paris sportifs|les meilleurs sites de pari sportif|les meilleurs sites de paris
sportifs|les meilleurs sites de paris sportifs en ligne|les paris sportif|les paris sportif avis|les paris
sportifs|les paris sportifs comment ça marche|les paris sportifs en france|les paris sportifs en ligne|les paris sportifs
en ligne comprendre jouer gagner|les paris sportifs en ligne comprendre jouer gagner pdf|les paris sportifs les plus rentables|les plus gros gagnant paris sportif|les plus
gros gains au paris sportifs|les plus gros gains paris sportifs|les plus gros paris sportif|les
plus grosse cote paris sportif|les plus grosses pertes paris sportifs|les sites de paris sportifs|les sites de
paris sportifs autorisés en france|les sites de paris sportifs en france|les sites de paris sportifs en ligne|les sites de paris sportifs francais|ligue 1 paris
sportif|ligue 1 paris sportifs|ligue 2 paris sportif|ligue des champions paris sportif|limite de gains paris sportifs|limite de mise paris sportif|limite gain paris sportif|limite mise paris sportifs|liste
de paris sportif|liste des paris sportifs|liste des site de paris sportif|liste des sites de paris sportifs|liste pari sportif|liste paris sportif|liste paris
sportif pdf|liste site de paris sportif|liste site pari sportif|liste site paris sportif|liste site paris
sportif arjel|liste sites paris sportifs|logiciel algorithme paris sportif|logiciel algorithme paris
sportif gratuit|logiciel analyse paris sportif|logiciel calcul paris sportif|logiciel de pari
sportif|logiciel de paris sportif|logiciel de paris sportif gratuit|logiciel gestion bankroll paris sportif gratuit|logiciel gestion de bankroll paris
sportif|logiciel gestion paris sportif|logiciel gestion paris sportif gratuit|logiciel gestion paris sportifs|logiciel pari sportif|logiciel paris sportif|logiciel paris sportif gratuit|logiciel paris sportifs|logiciel paris sportifs foot sur 2 matchs|logiciel pour paris sportif|logiciel
pour paris sportifs|logiciel prediction paris sportif|logiciel probabilité paris sportif|logiciel prédiction paris sportif|logiciel statistique paris sportifs|logiciel
variation de cote paris sportif|loi sur les paris sportifs en france|magic calculator paris
sportif|marché des paris sportifs|marché des paris sportifs en france|marché des paris
sportifs en ligne|martingale pari sportif|martingale paris sportif|martingale paris
sportif excel|martingale paris sportif forum|martingale paris sportif interdit|martingale paris
sportifs|match abandonné paris sportif|match annulé
ou reporté paris sportifs|match annulé paris sportif|match arrete paris sportif|match interrompu paris sportif|match interrompu tennis paris
sportif|match interrompu tennis pluie paris sportif|match nul boxe paris sportif|match pari
sportif|match paris sportif|match reporté paris sportif|match suspendu paris sportif|match suspendu tennis paris sportif|match truqué paris
sportif|matchs truqués paris sportifs|meilleur algorithme paris sportif|meilleur algorithme
paris sportif gratuit|meilleur app de paris sportif|meilleur app
de paris sportifs|meilleur app paris sportif|meilleur appli de pari sportif|meilleur appli de paris sportif|meilleur appli
pari sportif|meilleur appli paris sportif|meilleur
appli paris sportif forum|meilleur appli paris sportifs|meilleur application conseil
paris sportif|meilleur application de paris
sportif|meilleur application de paris sportif en afrique|meilleur application pari
sportif|meilleur application paris sportif|meilleur application paris sportif belgique|meilleur application pour les paris sportif|meilleur application pour
pari sportif|meilleur bonus de bienvenue paris sportif|meilleur bonus pari sportif|meilleur
bonus paris sportif|meilleur bonus paris sportif sans depot|meilleur
bonus paris sportifs|meilleur bonus site de paris sportif|meilleur bonus
site pari sportif|meilleur bonus site paris sportif|meilleur bookmaker paris sportif|meilleur combiné paris sportif|meilleur conseil paris sportif|meilleur cote de paris
sportif|meilleur cote pari sportif|meilleur cote paris sportif|meilleur cote paris
sportif aujourd’hui|meilleur cote site paris sportif|meilleur
forum paris sportifs|meilleur gain paris sportif|meilleur ia paris sportif|meilleur methode pour gagner au paris sportif|meilleur
offre bienvenue paris sportif|meilleur offre bonus paris sportif|meilleur offre de bienvenue paris sportif|meilleur offre de bienvenue paris sportifs|meilleur offre pari sportif|meilleur offre paris sportif|meilleur offre paris sportif en ligne|meilleur
pari sportif|meilleur pari sportif du jour|meilleur pari sportif en ligne|meilleur paris sportif|meilleur paris sportif aujourd’hui|meilleur paris sportif
du jour|meilleur paris sportif en ligne|meilleur paris sportif foot|meilleur promo paris sportif|meilleur pronostic
paris sportif|meilleur site de conseil paris sportif|meilleur site de pari sportif|meilleur site de pari sportif en ligne|meilleur site de paris sportif|meilleur site de paris sportif avis|meilleur site de paris sportif belgique|meilleur site de paris sportif canada|meilleur site de paris sportif en france|meilleur site de paris sportif en ligne|meilleur site de paris sportif
football|meilleur site de paris sportif forum|meilleur site de paris sportif france|meilleur site de
paris sportif hors arjel|meilleur site de paris sportif international|meilleur site de paris sportif suisse|meilleur site de paris sportifs|meilleur site de paris sportifs en ligne|meilleur site pari sportif|meilleur site pari sportif
en ligne|meilleur site pari sportif france|meilleur site paris sportif|meilleur site paris sportif
avis|meilleur site paris sportif belgique|meilleur site paris sportif canada|meilleur site
paris sportif en ligne|meilleur site paris sportif foot|meilleur site paris sportif forum|meilleur
site paris sportif france|meilleur site paris sportif hors arjel|meilleur site paris sportif
nba|meilleur site paris sportif rugby|meilleur site paris sportif suisse|meilleur site paris sportifs|meilleur site pour pari sportif|meilleur site pour paris sportif|meilleur site pronostic paris sportif|meilleur
strategie paris sportif|meilleur technique de paris sportif|meilleur technique paris sportif|meilleur technique pour gagner au paris sportif|meilleure appli de paris
sportif|meilleure appli de paris sportifs|meilleure appli pari sportif|meilleure appli paris sportif|meilleure appli paris sportifs|meilleure application de paris sportif|meilleure application de paris sportifs|meilleure application pari
sportif|meilleure application paris sportif|meilleure application paris
sportif android|meilleure application paris sportifs|meilleure offre paris
sportif|meilleure site paris sportif|meilleure strategie paris sportif|meilleures applications de paris sportifs|meilleures applications paris
sportifs|meilleures cotes paris sportifs|meilleures offres paris sportifs|meilleures stratégies paris sportifs|meilleurs appli paris sportif|meilleurs application de paris sportifs|meilleurs application paris sportif|meilleurs
applications paris sportifs|meilleurs bonus paris sportifs|meilleurs cote paris sportif|meilleurs cotes paris sportifs|meilleurs offres paris
sportifs|meilleurs paris sportifs|meilleurs
paris sportifs du jour|meilleurs site de pari sportif|meilleurs site de paris sportif|meilleurs site de paris sportif en ligne|meilleurs site de paris sportifs|meilleurs site paris sportif|meilleurs sites de paris
sportifs|meilleurs sites de paris sportifs en ligne|meilleurs sites paris sportif|meilleurs
sites paris sportifs|methode abc paris sportif|methode de
paris sportif|methode gagnante paris sportifs|methode gagner paris
sportif|methode infaillible paris sportifs|methode martingale paris sportif|methode mathematique
paris sportif|methode mathematique pour gagner
au paris sportif|methode paris sportif|methode paris sportif
foot|methode paris sportif forum|methode paris sportif tennis|methode paris sportifs|methode
pour gagner au paris sportif|methode pour gagner paris sportif|methodes paris sportifs|minimum depot paris sportif|mise au jeu pari
sportif|mise maximum pari sportif|mise maximum paris sportif|mise minimum paris sportif|mise moyenne paris sportif|mise paris sportif|moins
de 4 5 but paris sportif|montant maximum paris sportif|montant paris sportif|montante pari sportif|montante parie sportif|montante paris
sportif|montante paris sportifs|montantes paris sportifs|multiple pari
sportif|multiple paris sportif|multiple paris sportifs|multiples paris sportifs|méthode calcul
paris sportif|méthode match nul paris sportifs|méthode mathématique pour gagner au
paris sportif|méthode paris sportif forum|méthode paris sportif hockey|nba pari sportif|nba paris
sportif|nba paris sportifs|nouveau paris sportif|nouveau site de pari sportif|nouveau site de paris sportif|nouveau site de paris sportif en ligne|nouveau site de paris sportifs|nouveau site pari
sportif|nouveau site paris sportif|nouveau site paris sportif france|nouveau site paris sportifs|nouveaux
sites de paris sportifs|nouveaux sites paris sportifs|nouvelle
appli paris sportif|nouvelle application de paris sportif|numero de match paris sportif|numero match paris sportif|offre 100 euros paris sportif|offre appli pari sportif|offre
bienvenu paris sportif|offre bienvenue pari sportif|offre bienvenue paris sportif|offre bienvenue paris sportifs|offre bienvenue
site paris sportif|offre bonus paris sportif|offre de bienvenu paris sportif|offre de bienvenue pari sportif|offre de bienvenue paris sportif|offre de bienvenue paris sportif belgique|offre de bienvenue paris sportif sans depot|offre de bienvenue paris sportif sans dépôt|offre de bienvenue paris sportifs|offre de bienvenue sans depot paris sportif|offre de
bienvenue site paris sportif|offre euro paris sportif|offre pari
sportif euro|offre paris sportif|offre paris sportif belgique|offre paris sportif
cash|offre paris sportif coupe du monde|offre paris sportif hors arjel|offre paris sportif remboursé|offre paris
sportif remboursé cash|offre paris sportif
sans depot|offre promo paris sportif|offre remboursement paris sportif|offre sans depot paris sportif|offre site paris sportif|offres bienvenue paris sportifs|offres de bienvenue
paris sportifs|ou faire des paris sportif|ou faire des paris sportif en espagne|ou
faire des paris sportifs|outil répartiteur de mise paris sportif|outils repartiteur de mises paris sportif|ouverture compte paris sportifs|ouvrir un compte
paris sportif|pack de bienvenue paris sportif|pack de bienvenue paris sportif hors arjel|pari en ligne sportif|pari sportif|pari sportif 100 euros offert|pari sportif 100 remboursé|pari sportif abandon tennis|pari
sportif aide|pari sportif algérie aujourd’hui|pari sportif appli|pari sportif application|pari sportif argent|pari sportif astuce|pari
sportif aujourd|pari sportif aujourd’hui|pari sportif avec handicap|pari sportif avec orange money|pari sportif avec
paypal|pari sportif avec wave|pari sportif avis|pari sportif basket|pari sportif belgique|pari sportif belgique france|pari sportif bonus|pari sportif buteur
pas titulaire|pari sportif champions league|pari sportif combiné|pari
sportif comment|pari sportif comment gagner|pari sportif comment ça marche|pari sportif comparatif|pari sportif conseil|pari sportif cote|pari sportif cote match|pari sportif cote psg|pari sportif coupe|pari sportif coupe de france|pari sportif coupe du
monde|pari sportif depot|pari sportif du jour|pari sportif en france|pari
sportif en ligne|pari sportif en ligne au cameroun|pari sportif
en ligne belgique|pari sportif en ligne canada|pari sportif
en ligne france|pari sportif en ligne gratuit|pari sportif en ligne suisse|pari sportif en ligne ufc|pari sportif en suisse|pari sportif euro|pari sportif explication|pari sportif faire|pari sportif foot|pari sportif foot resultat|pari sportif football|pari sportif forum|pari sportif francaise des jeux|pari sportif france|pari sportif france angleterre|pari sportif france
argentine|pari sportif france autriche|pari sportif france belgique|pari sportif france espagne|pari sportif france italie|pari sportif france portugal|pari sportif france
usa|pari sportif gagnant|pari sportif gagner|pari sportif
gagner a tous les coups|pari sportif gagner de l’argent|pari sportif gain|pari sportif gratuit|pari sportif gratuit pour gagner des cadeaux|pari
sportif gratuit sans depot|pari sportif handicap|pari sportif hockey|pari sportif hors
arjel|pari sportif jeux olympiques|pari sportif joueur absent|pari sportif le plus rentable|pari sportif leicester champion|pari sportif ligue 1|pari sportif ligue 2|pari sportif ligue des champions|pari sportif ligue europa|pari sportif match|pari sportif match arrete|pari sportif match interrompu|pari
sportif meilleur|pari sportif meilleur cote|pari sportif meilleur site|pari
sportif methode|pari sportif mise|pari sportif mise au jeu|pari sportif mise o jeu|pari sportif nba|pari sportif offre bienvenue|pari
sportif paypal|pari sportif plus|pari sportif prolongation|pari sportif promo|pari sportif pronostic|pari sportif pronostic foot|pari sportif pronostic gagnant|pari sportif pronostic gratuit|pari sportif psg|pari sportif psg bayern|pari sportif psg
inter|pari sportif psg milan|pari sportif regle|pari sportif
rembourse|pari sportif remboursement|pari sportif remboursement cash|pari sportif
remboursé|pari sportif rugby|pari sportif rugby coupe du monde|pari
sportif rugby top 14|pari sportif sans argent|pari sportif sans carte bancaire|pari sportif sans depot|pari sportif signification|pari sportif site|pari sportif statistique|pari
sportif suisse|pari sportif systeme|pari sportif technique|pari sportif technique pour gagner|pari sportif temps
reglementaire|pari sportif tennis|pari sportif tennis abandon|pari sportif top|pari sportif top 14|pari sportif tour de france|parie sportif|parie
sportif comment ca marche|parie sportif du jour|parie sportif en ligne|parie sportif foot|parie sportif football|parie sportif france|parie sportif gratuit|parie sportif pronostic|parie sportif
suisse|paris en ligne sportif|paris en ligne sportifs|paris evenement sportif|paris france sportif|paris hippique
et sportif|paris hippiques et sportifs|paris hippiques paris sportifs|paris
hippiques paris sportifs et poker en ligne|paris hippiques sportifs|paris match sportif|paris sportif|paris sportif 10
euros offerts|paris sportif 100 euros offert|paris sportif 100
euros remboursé|paris sportif 100 offert|paris sportif 100 remboursé|paris sportif 100e offert|paris sportif 150 euros offert|paris sportif 1er pari
remboursé|paris sportif a faire|paris sportif a faire aujourd’hui|paris sportif a faire ce soir|paris sportif abandon tennis|paris sportif abandon tennis parions sport|paris sportif aide|paris sportif algorithme|paris sportif analyse|paris sportif appli|paris sportif application|paris
sportif application android|paris sportif apres prolongation|paris sportif argent|paris sportif argent fictif|paris sportif argent offert|paris sportif argent virtuel|paris sportif arjel|paris sportif arsenal psg|paris sportif astuce|paris sportif au canada|paris sportif aujourd hui|paris sportif aujourd’hui|paris
sportif avec argent fictif|paris sportif avec bonus sans depot|paris sportif avec carte bancaire|paris sportif avec cryptomonnaie|paris sportif avec handicap|paris sportif
avec paypal|paris sportif avec paysafecard|paris sportif avis|paris sportif avis expert|paris sportif avis forum|paris sportif bankroll|paris sportif basket|paris sportif
basket coupe de france|paris sportif basket nba|paris
sportif basket prolongation|paris sportif belgique|paris sportif belgique bonus|paris sportif belgique bonus sans depot|paris sportif belgique france|paris sportif belgique suede|paris sportif bonus|paris sportif bonus bienvenue|paris sportif bonus cash|paris sportif bonus de bienvenue|paris sportif
bonus gratuit|paris sportif bonus gratuit sans depot|paris sportif bonus retirable|paris sportif
bonus sans depot|paris sportif bonus sans depot belgique|paris
sportif bookmaker|paris sportif but contre son camp|paris sportif but temps additionnel|paris sportif buteur|paris sportif buteur blessé|paris sportif buteur carton rouge|paris sportif buteur contre son camp|paris sportif buteur non titulaire|paris sportif buteur prolongation|paris
sportif buteur qui ne joue pas|paris sportif buteur remplacant|paris sportif calcul gain|paris sportif canada|paris sportif cash|paris sportif cash out|paris sportif champion ligue 1|paris sportif
champions league|paris sportif classement ligue 1|paris sportif code promo|paris
sportif combine|paris sportif combiné|paris sportif
combiné comment ça marche|paris sportif combiné du jour|paris sportif combiné match reporté|paris sportif comment ca marche|paris sportif comment faire|paris
sportif comment gagner|paris sportif comment gagner a tous
les coups|paris sportif comment jouer|paris sportif comment ça marche|paris sportif comparateur cote|paris sportif comparatif|paris sportif conseil|paris sportif conseil gratuit|paris sportif conseil pour gagner|paris sportif cote|paris sportif cote et
match|paris sportif cote explication|paris sportif cote psg|paris sportif coupe d’europe|paris
sportif coupe davis|paris sportif coupe de france|paris
sportif coupe du monde|paris sportif coupe du monde de rugby|paris
sportif coupe du monde rugby|paris sportif depot 5 euro|paris sportif depot minimum|paris sportif depot paypal|paris sportif dnb|paris sportif du
jour|paris sportif du jour conseil|paris sportif dépôt 1 euro|paris
sportif dépôt minimum 5 euros|paris sportif en belgique|paris sportif en france|paris sportif en ligne|paris sportif en ligne avec paypal|paris sportif en ligne
avis|paris sportif en ligne belgique|paris sportif en ligne bonus|paris
sportif en ligne cameroun|paris sportif en ligne comment gagner|paris sportif en ligne comment ça marche|paris sportif
en ligne france|paris sportif en ligne gratuit|paris sportif en ligne maroc|paris sportif en ligne
paypal|paris sportif en ligne québec|paris sportif en ligne sans
depot|paris sportif en ligne suisse|paris sportif en suisse|paris sportif espagne france|paris
sportif esport|paris sportif et casino en ligne|paris sportif et hippique|paris sportif et prolongation|paris sportif euro|paris
sportif europa league|paris sportif explication|paris sportif final ligue des champions|paris sportif finale ligue des champions|paris
sportif foot|paris sportif foot aide|paris sportif foot astuce|paris sportif foot aujourd’hui|paris sportif foot ce soir|paris sportif foot comment
ca marche|paris sportif foot conseil|paris sportif foot cote|paris sportif foot
coupe du monde|paris sportif foot en ligne|paris sportif foot feminin|paris sportif
foot gratuit|paris sportif foot prolongation|paris sportif foot pronostic|paris sportif foot pronostic gratuit|paris sportif foot regle|paris sportif foot suisse|paris sportif foot us|paris sportif football|paris sportif football
americain|paris sportif football astuces|paris sportif forfait tennis|paris sportif forum|paris sportif francais|paris sportif francaise des jeux|paris sportif france|paris sportif
france 2|paris sportif france allemagne|paris sportif france angleterre|paris sportif france
argentine|paris sportif france autriche|paris sportif france
belgique|paris sportif france espagne|paris sportif france gibraltar|paris sportif
france italie|paris sportif france nouvelle zelande|paris sportif france pologne|paris sportif france portugal|paris sportif france uruguay|paris sportif france usa|paris
sportif freebet sans depot|paris sportif gagnant|paris sportif gagnant à coup sûr|paris
sportif gagner a coup sur|paris sportif gagner argent|paris sportif gagner de l’argent|paris sportif gain|paris sportif
gain maximum|paris sportif gestion bankroll|paris sportif gratuit|paris sportif gratuit appli|paris sportif
gratuit avec cadeaux|paris sportif gratuit cadeaux|paris sportif gratuit
en ligne|paris sportif gratuit entre amis|paris sportif gratuit sans argent|paris
sportif gratuit sans depot|paris sportif gratuit sans dépôt|paris sportif gratuits|paris sportif gros gain|paris sportif handicap|paris sportif
handicap 0 1|paris sportif handicap 0-1|paris
sportif handicap 1 0|paris sportif handicap 1-0|paris sportif
handicap basket|paris sportif handicap explication|paris sportif handicap foot|paris sportif handicap rugby|paris sportif hippique|paris sportif
hockey|paris sportif hockey nhl|paris sportif hockey sur glace|paris sportif hors arjel|paris sportif hors arjel france|paris sportif jeux olympiques|paris
sportif jeux video|paris sportif joueur blessé|paris sportif
joueur blessé pendant le match|paris sportif joueur de foot|paris sportif joueur decisif|paris sportif joueur declare forfait|paris sportif joueur déclare forfait|paris sportif joueur remplacant|paris
sportif la francaise des jeux|paris sportif le plus rentable|paris sportif legal en france|paris sportif leicester champion|paris sportif les 18 stratégies pour
gagner tous les jours|paris sportif les plus sur|paris sportif les prolongation compte|paris sportif
ligne|paris sportif ligue 1|paris sportif ligue
2|paris sportif ligue des champions|paris sportif ligue des nations|paris
sportif ligue europa|paris sportif liste|paris sportif martingale|paris sportif match|paris sportif match abandonné|paris sportif match annulé|paris
sportif match arrêté|paris sportif match du jour|paris sportif match interrompu|paris sportif match reporté|paris
sportif match suspendu|paris sportif match tennis interrompu|paris sportif match truqué|paris
sportif meilleur bonus|paris sportif meilleur cote|paris sportif
meilleur pronostic|paris sportif meilleur site|paris sportif methode|paris sportif methode 2 3|paris sportif
mi temps fin de match|paris sportif mise au jeu|paris
sportif mise maximum|paris sportif mma france|paris sportif moins de 3.5 but|paris
sportif montante|paris sportif moto gp|paris sportif
multiple|paris sportif multiple 2 3|paris sportif multiple 2 3 explication|paris sportif multiple 2
4|paris sportif multiple 2 5|paris sportif multiple 2/3
explication|paris sportif multiple 3 4|paris sportif multiple explication|paris sportif national 1 foot|paris sportif nba|paris sportif nba
conseil|paris sportif nba pronostic|paris sportif nhl|paris sportif nombre
de but|paris sportif nouveau site|paris sportif numero match|paris sportif offert|paris sportif offre bienvenue|paris sportif offre bienvenue sans depot|paris sportif offre de bienvenue|paris sportif offre sans depot|paris sportif om psg|paris sportif paypal|paris
sportif plus de 1.5 but|paris sportif plus de 2 5 but|paris sportif plus ou moins|paris sportif
plus ou moins 2 5 but|paris sportif premier pari remboursé|paris sportif premier paris remboursé|paris sportif prolongation|paris sportif prolongation basket|paris sportif prolongation foot|paris sportif promo|paris sportif pronostic|paris sportif pronostic basket|paris sportif pronostic des match aujourd hui|paris
sportif pronostic expert gratuit|paris sportif pronostic foot|paris sportif pronostic forum|paris sportif pronostic gratuit|paris sportif pronostic tennis|paris sportif psg|paris sportif psg arsenal|paris sportif psg barcelone|paris sportif
psg bayern|paris sportif psg dortmund|paris sportif psg inter|paris sportif psg inter cote|paris sportif psg liverpool|paris sportif psg om|paris sportif qr code|paris sportif
que veut dire handicap|paris sportif qui rapporte
le plus|paris sportif regle|paris sportif regle prolongation|paris sportif rembourse|paris sportif remboursement
cash|paris sportif rembourser|paris sportif remboursé|paris sportif remboursé cash|paris sportif remboursé en cash|paris sportif retrait paypal|paris sportif rue des joueurs|paris sportif
rugby|paris sportif rugby 6 nations|paris sportif
rugby coupe du monde|paris sportif rugby top 14|paris sportif safe du jour|paris sportif sans
argent|paris sportif sans carte bancaire|paris sportif sans carte d’identité|paris sportif sans compte
bancaire|paris sportif sans depot|paris sportif sans depot minimum|paris sportif si match suspendu|paris sportif si un joueur abandonne|paris sportif si
un joueur ne joue pas|paris sportif si un joueur se blesse|paris sportif
simple ou combiné|paris sportif site|paris sportif statistique|paris sportif stratégie|paris sportif suisse|paris sportif suisse application|paris sportif suisse
en ligne|paris sportif suisse legal|paris sportif
suisse légal|paris sportif suisse romande|paris sportif sur du jour|paris sportif sur le tennis|paris sportif systeme|paris sportif systeme 2 3|paris sportif systeme 2 4|paris sportif systeme 2/3|paris sportif systeme 2/4|paris
sportif systeme 3 4|paris sportif systeme 3/4|paris sportif systeme explication|paris
sportif technique|paris sportif technique pour gagner|paris sportif temps additionnel|paris sportif temps reglementaire|paris sportif tennis|paris sportif tennis abandon|paris sportif tennis conseil|paris sportif tennis de table|paris sportif tennis forfait|paris sportif tennis gratuit|paris sportif tennis pronostic|paris sportif tennis roland garros|paris sportif tir au but|paris sportif top 14|paris sportif tour de france|paris sportif ufc|paris sportif
ufc france|paris sportif unibet|paris sportif
vainqueur euro|paris sportif vainqueur ligue 1|paris sportif vainqueur ligue des champions|paris sportif via paypal|paris sportif victoire
prolongation|paris sportif vip gratuit|paris sportifs|paris sportifs abandon tennis|paris sportifs aide|paris sportifs analyser un match|paris sportifs arjel|paris
sportifs astuces|paris sportifs aujourd’hui|paris sportifs autorisés en france|paris sportifs avec paypal|paris sportifs basket|paris sportifs
belgique|paris sportifs bonus|paris sportifs bookmakers|paris sportifs canada|paris sportifs combiné|paris sportifs comparateur|paris sportifs comparatif|paris sportifs conseils|paris sportifs cotes|paris sportifs coupe du monde|paris sportifs de
football|paris sportifs du jour|paris sportifs en belgique|paris sportifs en france|paris
sportifs en ligne|paris sportifs en ligne belgique|paris sportifs en ligne
france|paris sportifs en ligne gratuit|paris sportifs en ligne suisse|paris sportifs en suisse|paris sportifs et hippiques|paris sportifs euro|paris sportifs foot|paris sportifs foot us|paris sportifs forum|paris
sportifs france|paris sportifs france espagne|paris sportifs gagner à tous les coups|paris sportifs gratuit|paris
sportifs gratuits|paris sportifs gratuits en ligne|paris sportifs handicap|paris sportifs hockey|paris sportifs hockey sur galce|paris sportifs hockey sur glace|paris sportifs hors
arjel|paris sportifs jeux olympiques|paris sportifs les bookmakers raflent la
mise|paris sportifs ligne|paris sportifs ligue 1|paris sportifs ligue
2|paris sportifs ligue des champions|paris sportifs ligue europa|paris
sportifs match interrompu|paris sportifs montante|paris sportifs nba|paris sportifs offre
bienvenue|paris sportifs offre de bienvenue|paris sportifs paypal|paris sportifs pronostics|paris sportifs psg|paris sportifs
psg inter|paris sportifs rugby|paris sportifs sans argent|paris sportifs sans depot|paris sportifs site|paris sportifs sites|paris sportifs statistiques|paris sportifs stratégie|paris sportifs
suisse|paris sportifs technique|paris sportifs techniques|paris sportifs tennis|paris
sportifs tennis astuces|paris sportifs top 14|paris sportifs
tour de france|part de marché paris sportifs|paypal pari
sportif|paypal paris sportif|paypal paris sportifs|perte d’argent
paris sportifs|peut on devenir riche avec les paris
sportifs|peut on gagner de l’argent avec les paris sportifs|peut on gagner sa
vie avec les paris sportif|peut on vraiment gagner de l’argent avec les paris sportifs|plus gros combine paris
sportif|plus gros gagnant paris sportif|plus gros gain paris sportif|plus gros gain paris
sportif au monde|plus gros gain paris sportif france|plus
gros gains paris sportif|plus gros pari sportif|plus gros paris sportif|plus grosse cote gagner paris sportif|plus grosse cote pari sportif|plus grosse cote paris sportif|plus grosse mise
paris sportif|plus grosse somme gagner au paris sportif|plus ou
moins paris sportif|pourcentage de mise paris sportif|premier pari sportif
remboursé|probabilité cote paris sportif|probabilité paris sportif combiné|prolongation basket
paris sportif|prolongation paris sportif|promo pari sportif|promo paris sportif|promo site de
paris sportif|promo site pari sportif|promo site paris sportif|promos paris
sportifs|prono paris sportif foot|prono paris sportif gratuit|prono
paris sportif tennis|pronostic de paris sportif|pronostic du jour
paris sportif|pronostic foot paris sportif|pronostic gratuit paris sportif|pronostic
pari sportif|pronostic pari sportif gratuit|pronostic paris sportif|pronostic paris sportif
aujourd’hui|pronostic paris sportif du jour|pronostic paris sportif foot|pronostic paris sportif gratuit|pronostic paris sportif
tennis|pronostic paris sportifs|pronostics foot statistiques et aides aux paris sportifs|pronostics paris sportif|pronostics paris sportifs|pronostiqueur paris sportif gratuit|psg arsenal paris sportif|psg bayern paris
sportif|psg inter milan paris sportif|psg inter pari sportif|psg inter
paris sportif|psg liverpool paris sportif|psg om paris sportif|psg paris sportif|psg paris
sportifs|qr code paris sportif|qu est ce qu un handicap paris sportif|qu est ce
que handicap dans les paris sportif|qu’est ce qu’un handicap paris sportif|qu’est ce que
handicap dans les paris sportif|quand un joueur se blesse paris sportif|que signifie 1/1 en paris sportif|que signifie 1/2 paris sportif|que signifie 12 en paris sportif|que signifie 1×2 dans les
paris sportifs|que signifie btts en paris sportif|que signifie dnb en paris sportif|que
signifie draw en paris sportif|que signifie ft en paris sportif|que signifie gg dans le pari
sportif|que signifie gg en pari sportif|que signifie gg en paris sportif|que signifie handicap dans les paris sportifs|que veut dire dnb
en paris sportif|que veut dire handicap dans les paris
sportifs|que veut dire handicap paris sportif|quel appli
pari sportif|quel cote jouer paris sportif|quel
est la meilleur appli de paris sportif|quel est le meilleur algorithme de paris sportif|quel
est le meilleur site de pari sportif|quel est le meilleur site de
pari sportif en ligne|quel est le meilleur site de paris sportif|quel est le meilleur site de paris sportif
en ligne|quel est le meilleur site de paris sportifs en ligne|quel est le pari sportif le plus rentable|quel pari sportif est le plus rentable|quel pari sportif est
le plus sûr|quel pari sportif faire aujourd’hui|quel paris sportif faire aujourd’hui|quel paris sportif
rapporte le plus|quel site de paris sportif choisir|quel site
de paris sportif rembourse en cash|quel type de pari sportif est le plus rentable|quelle
application pour paris sportifs|quelle est la meilleure appli de paris sportif|quelle
est la meilleure application de paris sportif|quelle est la meilleure application pour les paris sportifs|quelle est le
meilleur site de paris sportif|quels paris sportifs faire|quels sont les paris sportifs les plus sûrs|rebond basket paris sportif|record de gain paris sportif|regle buteur paris sportif|regle de paris sportif|regle des paris sportif|regle handicap paris sportif|regle handicap paris sportif foot|regle multiple paris sportif|regle
pari sportif|regle paris sportif|regle paris sportif foot|regle paris sportif multiple|regle paris
sportif prolongation|reglement pari sportif|reglement paris sportif|regles
paris sportifs|remboursement cash paris sportif|remboursement en cash paris sportif|remboursement pari sportif|remboursement
paris sportif|repartiteur de mise paris sportif|repartiteur de
mise paris sportifs|repartiteur de mises paris sportif|repartiteur
mise paris sportif|repartition des mises paris sportif|resultat pari sportif|resultat paris sportif|resultat paris sportif en direct|resultat paris sportif foot|resultat sportif hockey|retirer argent paris sportif|rugby pari sportif|rugby paris sportif|règle
paris sportif prolongation|règles paris sportif|répartiteur de mise pari sportif|répartiteur de mise
paris sportif|répartiteur de mise paris sportifs|répartition des mises paris sportif|résultat paris sportif
foot|sans depot paris sportif|se faire interdire de paris sportifs|signification btts paris sportif|signification dnb paris sportif|signification handicap paris sportif|simulateur de
gain paris sportif|simulateur gain paris sportif|simulateur gain paris sportif multiple|simulateur gain paris sportif
systeme|simulateur gain paris sportif système|simulateur montante paris sportif|simulateur paris sportif multiple|simulateur systeme paris sportif|simulation paris
sportif gratuit|site aide paris sportif|site analyse
paris sportif|site analyser paris sportif|site arjel paris sportif|site
conseil paris sportif|site d’analyse de paris sportifs|site d’analyse paris sportif|site de conseil paris sportif|site de pari
en ligne sportif|site de pari sportif|site de pari sportif avec bonus sans depot|site de pari sportif bonus sans depot|site de
pari sportif canada|site de pari sportif en ligne|site de
pari sportif francais|site de pari sportif gratuit|site de pari sportif hors arjel|site de
pari sportif suisse|site de parie sportif|site de
parie sportif en ligne|site de paris en ligne sportif|site de paris
sportif|site de paris sportif acceptant paypal|site de paris sportif arjel|site de paris sportif autorisé en france|site de
paris sportif autorisé en suisse|site de paris sportif avec bonus|site de
paris sportif avec bonus sans depot|site de paris sportif avec bonus sans dépôt|site de
paris sportif avec neosurf|site de paris sportif avec paiement
mobile|site de paris sportif avec paypal|site de
paris sportif avis|site de paris sportif belge avec bonus|site de paris
sportif belgique|site de paris sportif bonus|site de paris sportif bonus sans depot|site de paris sportif canada|site de paris sportif comparatif|site de paris sportif
depot minimum|site de paris sportif en france|site de paris sportif en ligne|site
de paris sportif en ligne suisse|site de paris sportif football|site
de paris sportif francais|site de paris sportif france|site de paris sportif gratuit|site
de paris sportif gratuit pour gagner des cadeaux|site de paris sportif gratuit sans dépôt|site de paris sportif hors arjel|site de paris
sportif le plus fiable|site de paris sportif legal en france|site
de paris sportif meilleur cote|site de paris sportif nouveau|site de paris
sportif offre de bienvenue|site de paris sportif paypal|site de paris sportif premier paris remboursé|site de paris sportif
qui accepte paypal|site de paris sportif qui rembourse en cash|site de
paris sportif remboursé|site de paris sportif sans argent|site de
paris sportif sans carte bancaire|site de paris sportif sans carte d’identité|site de paris sportif sans depot|site
de paris sportif suisse|site de paris sportifs|site
de paris sportifs avec paypal|site de paris sportifs en ligne|site
de paris sportifs francais|site de paris sportifs gratuit|site de paris
sportifs paypal|site de paris sportifs suisse|site de statistique pour paris sportif|site des paris sportifs|site pari en ligne sportif|site
pari sportif|site pari sportif 100 euros offert|site pari
sportif arjel|site pari sportif belgique|site pari sportif bonus|site pari sportif canada|site
pari sportif comparatif|site pari sportif en ligne|site pari
sportif france|site pari sportif gratuit|site pari sportif hors arjel|site pari
sportif suisse|site parie sportif|site paris en ligne sportif|site paris sportif|site paris sportif 100 euros offert|site paris sportif 100 euros remboursé|site
paris sportif 1er paris remboursé|site paris sportif arjel|site paris sportif autorisé en france|site paris sportif avec bonus|site paris sportif avec
bonus sans depot|site paris sportif avec meilleur cote|site
paris sportif belgique|site paris sportif bonus|site paris
sportif bonus cash|site paris sportif bonus sans depot|site paris
sportif canada|site paris sportif comparatif|site paris sportif
depot 5 euro|site paris sportif en ligne|site paris sportif
foot|site paris sportif france|site paris sportif gratuit|site paris sportif hors arjel|site paris
sportif hors arjel france|site paris sportif meilleur cote|site paris sportif nouveau|site paris sportif offre de bienvenue|site paris sportif paypal|site paris sportif remboursement cash|site paris sportif remboursé
en cash|site paris sportif retrait instantané|site paris
sportif sans carte bancaire|site paris sportif sans depot|site paris sportif suisse|site paris sportifs|site paris sportifs
belgique|site paris sportifs en ligne|site paris sportifs france|site paris sportifs hors arjel|site paris sportifs suisse|site pour analyse paris sportif|site pour
paris sportif|site pronostic paris sportif|site statistique paris sportif|site suisse paris sportif|sites de pari sportif|sites de paris
sportif|sites de paris sportifs|sites de paris sportifs arjel|sites de paris
sportifs autorisés en france|sites de paris sportifs belgique|sites de paris sportifs bonus|sites de paris sportifs
en belgique|sites de paris sportifs en france|sites de paris sportifs en ligne|sites
de paris sportifs gratuits|sites de paris sportifs gratuits sans
dépôt|sites de paris sportifs suisse|sites pari sportif|sites paris sportif|sites
paris sportifs|sites paris sportifs arjel|sites paris sportifs belgique|sites paris sportifs france|sites paris sportifs hors arjel|sites paris
sportifs suisse|so foot paris sportif|so foot paris sportifs|specialiste tennis paris
sportif|statistique foot paris sportif|statistique paris sportif|statistique paris sportif
foot|statistique tennis paris sportif|statistiques football paris sportifs|statistiques
paris sportifs|strategie de paris sportif|stratégie big whale paris sportif|stratégie de paris sportifs|stratégie
gagnante paris sportifs|stratégie pari sportif|stratégie paris sportif|stratégie paris sportifs|stratégie paris sportifs
forum|stratégie pour gagner au paris sportif|stratégies paris sportifs|suisse paris sportif|suisse paris sportifs|systeme 2
3 paris sportif|systeme 3 4 paris sportif|systeme de cote paris sportif|systeme de paris sportif|systeme pari
sportif|systeme paris sportif|systeme paris sportifs|systeme reducteur paris sportif|système paris sportif|tableau
bankroll paris sportif|tableau cote paris sportif|tableau de paris sportif|tableau de suivi paris sportifs|tableau excel bankroll paris sportif|tableau excel paris sportif|tableau excel paris sportif
gratuit|tableau excel paris sportifs|tableau excel pour paris sportif|tableau gestion bankroll paris
sportif|tableau mo
nejlepší nové casino České Budějovice Pardubice
sazka ověření tiketu
My page; Adventní Kalendář Od Sazky (https://Precalculus.Maththought.Com/Jake-Faktory-Ovlivnuji-Uspesnost-Tymu-V-Play-Off/)
horse racing bets box tip from ascot bet on it
fastest payout most profitable sports betting [Fran] sites
buchmacher pferderennen
Also visit my webpage … College Basketball Wetten Strategie
This is a super helpful guide! I’ve been wanting to try making a token. On a side note, if you ever need to create images for your project, I highly recommend gpt image 2 for quick, high-quality results.
10 euros offert paris sportif|10 euros offert sans dépôt paris sportif|10 meilleurs sites de paris sportifs|100 euro offert paris sportif|100
euros offert paris sportif|100 euros remboursé paris sportifs|100 offert pari sportif|100
offert paris sportif|100 remboursé paris sportif|100e offert pari sportif|abandon paris sportif tennis|abandon tennis paris sportif|addiction paris sportif
forum|age paris sportif belgique|aide au pari sportif|aide au paris sportif|aide
aux paris sportif|aide aux paris sportifs|aide pari sportif|aide pari sportif football|aide parie sportif|aide paris sportif|aide paris sportif foot|aide paris sportif gratuit|aide paris sportifs|aide pour paris sportif|algorithme de
paris sportif|algorithme excel paris sportif|algorithme gratuit paris sportif|algorithme
pari sportif|algorithme paris sportif|algorithme paris sportif avis|algorithme paris sportif basket|algorithme paris sportif excel|algorithme paris sportif gratuit|algorithme paris sportif tennis|algorithme paris sportifs|algorithme
pour paris sportif|analyse cote paris sportif|analyse de paris sportif|analyse match paris sportif|analyse pari sportif|analyse
paris sportif|analyse paris sportif foot|analyse paris sportif football|analyse paris sportif gratuit|analyse paris
sportifs|ancienne cote paris sportif|api cote paris sportif|app paris sportif sans argent|appli de paris sportif|appli de paris sportif
sans argent|appli de paris sportifs|appli pari sportif|appli pari sportif gratuit|appli parie sportif|appli paris sportif|appli paris sportif avec
paypal|appli paris sportif belgique|appli paris sportif entre amis|appli paris sportif gratuit|appli paris sportif
sans argent|appli paris sportif suisse|appli paris sportifs|application aide paris sportif|application algorithme paris sportif|application analyse
paris sportif|application android paris sportif|application bankroll paris sportif|application conseil paris sportif|application de pari
sportif|application de parie sportif|application de paris sportif|application de paris sportif en afrique|application de paris sportif en cote d’ivoire|application de paris sportif en ligne|application de paris sportif gratuit|application de paris sportif international|application de paris sportif suisse|application de
paris sportifs|application faux paris sportifs|application gestion bankroll paris sportif|application gestion paris sportif|application ia paris sportif|application pari sportif
gratuit|application paris sportif|application paris sportif android|application paris sportif argent fictif|application paris sportif belgique|application paris sportif canada|application paris sportif espagne|application paris sportif espagnol|application paris sportif fictif|application paris
sportif france|application paris sportif gratuit|application paris sportif gratuit
entre amis|application paris sportif maroc|application paris sportif offre de
bienvenue|application paris sportif paypal|application paris sportif sans argent|application paris sportif sans justificatif de domicile|application paris sportif
suisse|application paris sportif usa|application paris sportif virtuel|application pour faire des paris sportifs|application pour gerer ses paris sportif|application pour les paris sportifs|application pour pari sportif|application pour paris sportif|application pour paris sportifs|application statistique paris sportif|application suivi paris sportif|applications de paris sportifs|applications paris sportifs|applis paris sportif|applis paris sportifs|apprendre a faire des paris sportifs|argent facile paris sportif|argent offert paris sportifs|argent offert sans depot paris sportif|argent paris sportif|argent paris sportifs|argent paris sportifs impots|argent
sans depot paris sportif|arjel paris sportif|arjel paris sportifs|astuce gagner paris sportif|astuce pari sportif|astuce paris sportif|astuce paris sportif basket|astuce paris sportif foot|astuce paris sportif forum|astuce paris sportif tennis|astuce
paris sportifs|astuce pour gagner au pari sportif|astuce pour gagner au paris sportif|astuce pour gagner paris
sportif|astuce pour paris sportif|astuces paris sportifs|astuces paris sportifs en ligne|astuces paris sportifs foot|astuces pour gagner aux paris sportifs|autorisation paris sportif
france|avis pari sportif|avis paris sportif|avis paris sportif foot|avis site de paris sportif|avis site paris sportif|avis sur les paris sportifs|avis sur paris sportif|avis tipster paris sportif|aweh signification paris sportif|bankroll 100
euros paris sportifs|bankroll management paris sportif|bankroll paris
sportif|bankroll paris sportif excel|bankroll paris sportif gratuit|bankroll paris
sportifs|basket paris sportif|belgique france paris
sportif|belgique paris sportifs|bonus bienvenue paris sportif|bonus bienvenue paris sportifs|bonus cash paris sportif|bonus de bienvenue paris sportif|bonus
de bienvenue paris sportif belgique|bonus de bienvenue sans depot paris sportif|bonus de
depot paris sportif|bonus de paris sportifs|bonus
depot paris sportif|bonus en cash paris sportif|bonus gratuit paris sportif|bonus
gratuit sans depot paris sportif|bonus pari sportif|bonus paris sportif|bonus
paris sportif belgique|bonus paris sportif betclic|bonus paris sportif cash|bonus paris
sportif en ligne|bonus paris sportif france pari|bonus paris sportif retirable|bonus paris sportif sans depot|bonus
paris sportif sans dépôt|bonus paris sportif unibet|bonus
paris sportifs|bonus sans depot paris sportif|bonus sans depot paris sportif belgique|bonus sans dépôt paris
sportif|bonus sans dépôt paris sportif hors arjel|bonus site de paris sportif|bonus site
pari sportif|bonus site paris sportif|bonus sites de paris sportifs|bonus
unibet paris sportif|bookmaker paris sportif|bookmaker
paris sportif gratuit|bookmaker paris sportifs|bookmaker sportif|bookmakers paris sportif|bookmakers paris sportifs|bookmakers paris sportifs en ligne|but contre son camp
paris sportif|but sur penalty paris sportif|buteur paris sportif|c’est quoi handicap paris sportif|c’est quoi une cote paris sportif|calcul anti perte paris sportif|calcul combinaison pari sportif|calcul cote pari sportif|calcul cote paris sportif|calcul couverture paris sportif|calcul de cote paris sportif|calcul
des cotes paris sportifs|calcul dnb paris sportifs|calcul double chance paris sportif|calcul gain paris sportif|calcul mise paris
sportif|calcul pari sportif|calcul paris sportif|calcul paris sportif multiple|calcul pourcentage cote paris sportif|calcul probabilité paris sportif|calcul rentabilité paris sportifs|calcul roi paris sportif|calcul
systeme paris sportif|calcul trj paris sportifs|calculateur cote paris sportif|calculateur de cote paris
sportif|calculateur de mise paris sportif|calculateur de
paris sportif|calculateur paris sportif|calculatrice arbitrage paris sportif|calculatrice
paris sportif|calculer cote paris sportif|calculer gain paris sportif|calculer
probabilité paris sportifs|calculer roi paris sportifs|calculer une
cote pari sportif|calculer une cote paris sportif|carte cadeau paris
sportif|carte pcs paris sportif|carte prépayée paris sportifs|cash
out pari sportif|cash out paris sportif|cash out
paris sportifs|casino en ligne paris sportif|casino paris sportif en ligne|champions league
paris sportif|chute de cote paris sportif|classement des meilleurs sites de paris sportifs|classement meilleur site de paris sportif|code barre paris sportif|code bonus paris sportif|code
paris sportif|code promo pari sportif|code promo paris sportif|code promo paris sportif sans depot|code
promo paris sportif sans dépôt|code promo sans
depot paris sportif|code promo site paris sportif|combien de temps pour encaisser
un paris sportif|combien de temps pour retirer un paris sportif|combien miser paris sportifs|combine paris sportif|combines paris sportifs|combiné pari sportif|combiné paris sportif|combiné paris sportif
conseil|combiné paris sportif du jour|combiné paris sportif pronostic|comment analyser un paris sportif|comment arreter
de jouer aux paris sportifs|comment arreter les paris sportif|comment arreter les paris sportifs|comment arrêter les paris sportifs|comment bien gagner au paris
sportif|comment bien jouer au paris sportif|comment bien miser paris sportif|comment ca
marche les paris sportif|comment calculer cote paris sportif|comment
calculer gain paris sportif|comment calculer les cotes des paris sportifs|comment calculer une cote de paris sportif|comment calculer une cote pari sportif|comment calculer une cote paris sportif|comment comprendre
les paris sportifs|comment creer un vip paris sportif|comment créer
un algorithme paris sportif|comment créer un site de paris sportif|comment devenir riche avec les paris sportifs|comment etre rentable paris sportif|comment etre sur de gagner au paris sportif|comment faire
de bon paris sportif|comment faire des parie sportif|comment faire des paris sportif|comment faire des paris sportif gagnant|comment faire des paris sportifs|comment faire pari sportif|comment faire paris sportif|comment faire pour arreter les paris sportifs|comment faire pour gagner au paris sportif|comment faire pour
gagner les paris sportifs|comment faire un bon pari sportif|comment faire un bon paris sportif|comment faire un pari sportif|comment faire un parie sportif|comment faire un paris
sportif|comment faire une montante paris
sportif|comment fonctionne les cotes dans les paris sportifs|comment fonctionne les
cotes des paris sportifs|comment fonctionne les paris sportifs|comment fonctionne paris sportifs|comment fonctionne un pari sportif|comment
fonctionnent les cotes dans les paris sportifs|comment
fonctionnent les cotes dans les paris sportifs grand oral|comment fonctionnent les cotes de paris sportif|comment fonctionnent
les paris sportifs|comment fonctionnent les paris sportifs grand oral|comment fonctionnent
les paris sportifs grand oral maths|comment fonctionnent les paris sportifs maths|comment gagner a coup sur au paris sportif|comment
gagner a tous les coups au paris sportif|comment gagner a tout les coup
au paris sportif|comment gagner au pari sportif|comment
gagner au pari sportif football|comment gagner
au paris sportif|comment gagner au paris sportif a coup sur|comment gagner au paris sportif foot|comment gagner au paris sportif
forum|comment gagner au paris sportif tennis|comment gagner au paris sportifs|comment gagner aux paris sportif|comment gagner aux paris sportifs|comment
gagner aux paris sportifs foot|comment gagner aux paris
sportifs livre|comment gagner aux paris sportifs sur le long terme|comment gagner
avec les paris sportifs|comment gagner dans les paris sportifs|comment gagner de l argent avec les paris sportifs|comment gagner de l’argent au paris sportif|comment gagner de l’argent aux paris sportifs|comment gagner de l’argent avec les paris sportifs|comment gagner de l’argent paris sportif|comment gagner
de l’argent sur les paris sportifs|comment gagner de l’argent sur paris sportif|comment gagner des
paris sportif|comment gagner des paris sportifs|comment gagner en paris sportif|comment gagner facilement au paris sportif|comment gagner les paris sportifs|comment gagner paris sportif|comment gagner paris sportif foot|comment gagner paris sportifs|comment
gagner sa vie avec les paris sportifs|comment gagner ses
paris sportif|comment gagner sur les paris sportif|comment gagner sur les paris sportifs|comment gagner
tout le temps au paris sportif|comment gagner un pari sportif|comment gagner un paris
sportif|comment gerer une bankroll paris sportif|comment gérer
sa bankroll paris sportif|comment jouer au pari sportif|comment jouer au paris sportif|comment jouer au paris sportif foot|comment
jouer aux paris sportifs|comment jouer paris sportif|comment marche cote paris sportif|comment marche
les cotes paris sportif|comment marche les paris sportif|comment marche les paris sportifs|comment marche paris sportif|comment marche un pari sportif|comment
marche un paris sportif|comment marchent les cotes paris sportif|comment marchent les
paris sportifs|comment miser au paris sportif|comment miser
paris sportif|comment monter sa bankroll paris sportif|comment ne jamais
perdre au paris sportif|comment parier sportif|comment reussir au paris sportif|comment reussir les paris sportif|comment reussir paris sportif|comment sont calculer les cotes de
paris sportif|comment sont calculées les cotes des paris sportifs|comment
sont calculés les cotes des paris sportifs|comment
sont faites les cotes des paris sportifs|comment toujours gagner
au paris sportif|comment ça marche les paris sportifs|comparaison bonus paris sportifs|comparaison cote pari
sportif|comparaison des cotes paris sportifs|comparateur cote pari sportif|comparateur
cote paris sportif|comparateur cotes paris sportif|comparateur
cotes paris sportifs|comparateur de cote pari sportif|comparateur de cote paris
sportif|comparateur de cotes paris sportifs|comparateur de côtes
paris sportifs|comparateur de paris sportif|comparateur de site de paris sportif|comparateur de site paris sportif|comparateur de sites
de paris sportifs|comparateur pari sportif|comparateur paris sportif|comparateur paris sportifs|comparateur site
de paris sportif|comparateur site pari sportif|comparateur site
paris sportif|comparatif bonus paris sportif|comparatif bonus paris sportifs|comparatif cote pari sportif|comparatif cote paris sportif|comparatif cotes paris sportifs|comparatif des sites de paris sportifs|comparatif offre
de bienvenue paris sportif|comparatif offre paris sportif|comparatif pari sportif|comparatif pari sportif en ligne|comparatif paris sportif|comparatif paris sportif
bonus|comparatif paris sportif en ligne|comparatif paris sportifs|comparatif paris sportifs en ligne|comparatif site de paris sportif|comparatif site
paris sportif|comparatif site paris sportifs|comparatif sites de paris sportifs|comparatif sites
paris sportifs|comparer les cotes paris sportifs|comprendre cote paris sportif|comprendre handicap paris sportif|comprendre les cotes des
paris sportifs|comprendre les cotes paris sportif|comprendre les cotes paris sportifs|comprendre les handicap paris sportif|compte de paris sportif|compte démo paris sportif|compte
finance paris sportif|compte financer paris sportif|compte financier paris sportif|compte financé paris sportif|compte pari sportif|compte paris sportif|compte paris sportif financé|conseil de
paris sportif|conseil de paris sportifs|conseil en paris sportif|conseil en paris sportifs|conseil pari sportif|conseil pari sportif gratuit|conseil paris sportif|conseil paris sportif aujourd’hui|conseil paris sportif du jour|conseil paris sportif
foot|conseil paris sportif gratuit|conseil paris sportif ligue
des champions|conseil paris sportif nba|conseil
paris sportif pronostic|conseil paris sportif rmc|conseil paris sportif tennis|conseil paris sportifs|conseil pour
gagner au paris sportif|conseil pour paris sportif|conseil sur
les paris sportifs|conseille paris sportif|conseiller en paris sportifs|conseiller paris sportif|conseils de
paris sportifs|conseils en paris sportifs|conseils paris sportifs|conseils paris sportifs foot|conseils paris sportifs gratuit|conseils paris sportifs tennis|conseils pour
paris sportifs|cote a 100 paris sportif|cote a 2 paris sportif|cote anglaise paris
sportif|cote de 2 paris sportif|cote de pari sportif|cote
de paris sportif|cote des paris sportifs|cote maximum paris sportif|cote minimum paris sportif|cote pari sportif|cote pari sportif
comment ça marche|cote pari sportif real madrid|cote pari
sportif rugby|cote parie sportif|cote paris sportif|cote paris sportif belgique|cote paris sportif calcul|cote paris sportif definition|cote paris sportif euro|cote paris sportif
explication|cote paris sportif foot|cote paris sportif france
belgique|cote paris sportif france espagne|cote paris sportif ligue des champions|cote paris sportif moto gp|cote paris sportif psg|cote
paris sportif psg arsenal|cote paris sportif rugby|cote paris sportif tennis|cote paris sportifs|cote pour paris sportifs|cote sportif foot|cote
sportif rugby|cote à 1000 paris sportif|cotes de paris sportifs|cotes pari sportif|cotes paris sportif|cotes paris sportifs|cotes paris sportifs
foot|coupe de france paris sportif|créer un algorithme paris sportif|créer un compte paris sportif|créer un site de paris sportif
en ligne|dans les paris sportifs que signifie handicap|declarer ses gains paris sportif|definition cash out paris sportif|definition cote paris sportif|definition handicap paris sportif|depot 5 euros
paris sportif|depot double paris sportif|depot minimum 5 euro paris sportif|depot minimum paris sportif|depot paris sportif|depuis quand existe les
paris sportif en france|devenir riche avec les paris sportifs|devenir riche
avec paris sportifs|disqualification tennis paris sportif|dnb en paris sportif|dnb pari sportif|dnb paris sportif|dnb paris sportif definition|dnb paris sportifs|doit on declarer
les gains de paris sportif|déclarer gains paris sportifs|déclarer
gains paris sportifs hors arjel|définition bankroll paris sportif|dépôt minimum 1
euro paris sportif|dépôt minimum 5 euro paris sportif|ecart
de jeux tennis paris sportif|erreur de cote paris sportif|est ce que les gains des paris sportifs
sont imposables|est-ce que les prolongation compte dans un pari sportif|etre sur de
gagner au paris sportif|euro paris sportif|evenement sportif
a paris|evenement sportif paris|evenement sportif paris 2025|evenement sportif paris aujourd hui|evenement sportif paris aujourd’hui|evenement sportif paris ce week end|evenements sportif
paris|evenements sportifs paris|evenements sportifs
paris 2025|evenements sportifs à paris|evolution cote paris sportif|evolution cotes paris sportifs|evolution des cotes paris sportifs|explication cote pari sportif|explication cote paris
sportif|explication handicap paris sportif|explication pari sportif|explication paris
sportif|face a face hockey paris sportif|faire des paris sportif|faire des
paris sportif avec paypal|faire des paris sportifs|faire fortune paris
sportifs|faire un pari sportif|faire un paris
sportif|faut il déclarer les gains de paris sportifs|faut il déclarer ses gains
paris sportifs|fichier excel gestion bankroll paris sportif|fiscalité gains paris sportifs|foot paris sportif|football et paris sportifs|forfait tennis paris sportif|formation paris sportif gratuit|forum de paris sportif|forum de paris sportifs|forum
pari sportif|forum parie sportif|forum paris sportif|forum paris sportif foot|forum paris sportif gratuit|forum paris sportif nba|forum paris sportif
tennis|forum paris sportifs|forum sur les paris sportifs|forum tennis
paris sportif|francaise des jeux pari sportif|francaise des jeux
paris sportif|francaise des jeux paris sportifs|france 2 paris sportif|france 2
paris sportifs|france belgique paris sportif|france espagne paris
sportif|france pari sportif|france pari sportif brest|france paris sportif|france paris sportifs|france pologne paris sportif|france portugal paris sportif|france suisse paris
sportifs|france tunisie paris sportifs|france-pari – paris sportifs|gagnant pari sportif|gagnant paris sportif|gagnant paris sportif bayern|gagnante paris sportif|gagne
au paris sportif|gagner 10 euros par jour aux paris sportifs|gagner 100 euros
par jour paris sportif|gagner 1000 euros par mois
paris sportifs|gagner 10000 euros paris sportif|gagner 2000 euros par mois
paris sportif|gagner 50 euros par jour paris sportif|gagner a coup sur au paris sportif|gagner a coup sur pari sportif|gagner a tous les coup paris
sportif|gagner argent avec paris sportifs|gagner argent pari sportif|gagner argent paris
sportif|gagner argent paris sportifs|gagner au pari
sportif|gagner au paris sportif|gagner au paris sportif a coup sur|gagner au paris sportif foot|gagner au paris sportif forum|gagner au paris sportif à coup sur|gagner aux paris sportif|gagner aux paris sportifs|gagner aux paris sportifs pdf|gagner beaucoup d’argent paris sportif|gagner de l argent grace aux paris sportifs|gagner de l argent pari sportif|gagner de l argent paris sportif|gagner de l argent paris sportifs|gagner de l’argent au paris sportif|gagner de l’argent aux paris sportifs|gagner de l’argent avec
les paris sportifs|gagner de l’argent avec paris sportif|gagner de l’argent avec paris sportifs|gagner de l’argent grace au paris sportif|gagner de l’argent grace aux paris sportifs|gagner de
l’argent pari sportif|gagner de l’argent paris sportif|gagner de l’argent paris sportifs|gagner de
l’argent sur les paris sportifs|gagner des paris sportif|gagner des paris sportifs|gagner les paris sportifs|gagner pari sportif|gagner
paris sportif|gagner paris sportif foot|gagner paris
sportif forum|gagner paris sportif tennis|gagner paris sportifs|gagner
sa vie avec les paris sportif|gagner sa vie avec les paris
sportifs|gagner sa vie avec paris sportifs|gagner ses paris sportifs|gagner à coup sur paris sportif|gagner à tous les coups paris sportifs|gain maximum paris sportif|gain pari sportif|gain pari
sportif imposable|gain pari sportif impot|gain paris sportif|gain paris sportif imposable|gain paris sportif impot|gain paris sportif
impôt|gains paris sportif|gains paris sportif imposable|gains paris sportifs|gains paris
sportifs imposable|gains paris sportifs imposables|gains paris sportifs
sont ils imposables|gerer bankroll paris sportif|gerer sa bankroll paris sportif|gerer une bankroll paris sportif|gestion bankroll paris sportif|gestion bankroll paris
sportifs|gestion bankroll paris sportifs excel|gestion de bankroll paris sportif|gestion de
bankroll paris sportif application|gestion de bankroll paris sportifs|gestion de mise paris
sportif|gestion paris sportifs v2 5 gratuit|gg signification paris sportif|gros combiné
paris sportif|gros gain paris sportif|grosse cote paris sportif pronostic|grosse mise paris sportif|groupe paris sportif gratuit|groupe telegram paris sportif gratuit|groupement de joueurs
paris sportifs|handicap 0 paris sportif|handicap 1 paris sportif|handicap 5 paris
sportif|handicap au paris sportif|handicap basket paris sportif|handicap dans les paris sportifs|handicap en paris sportif|handicap europeen paris sportif|handicap européen paris sportifs|handicap
mi temps paris sportif|handicap pari sportif|handicap paris sportif|handicap paris sportif basket|handicap paris sportif explication|handicap paris sportif
foot|handicap paris sportif rugby|handicap paris sportifs|handicap rugby paris sportif|handicap tennis paris sportif|historique cote paris sportif|historique des cotes paris sportifs|hockey paris
sportif|hockey sur glace paris sportif|hors arjel paris sportif|hweh signification paris sportif|imposition gain pari
sportif|imposition gain paris sportif|imposition gains paris sportifs|imposition paris sportif france|impot
gain paris sportif|impot paris sportif france|impot sur gain paris sportif|je gagne ma vie avec les paris sportifs|jeu de pari sportif gratuit|jeu de paris sportif en ligne|jeu de paris sportif gratuit|jeu paris sportif gratuit|jeu paris
sportif sans argent|jeux de parie sportif|jeux de paris sportif|jeux de paris sportif en ligne|jeux de paris sportif gratuit|jeux de paris sportifs|jeux olympiques paris sportifs|jeux
paris sportif|jeux paris sportif gratuit|jeux paris sportif virtuel|jeux
paris sportifs en ligne|jouer au paris sportif|jouer paris sportif|joueur absent paris sportif|joueur blesse paris sportif|joueur caen paris sportif|joueur de caen pari sportif|joueur de
foot paris sportif|joueur decisif paris sportif|joueur décisif paris sportif|joueur italien paris sportif|joueur paris sportif|joueur professionnel paris sportif|joueur qui se blesse paris sportif|joueur sanctionne pari sportif|joueur suspendu paris sportif|joueurs
italiens paris sportifs|l’argent des paris sportifs est il imposable|la cote paris sportif|la francaise des jeux
paris sportif|la martingale paris sportif|la martingale paris sportifs|la meilleur
application de paris sportif|la meilleur application paris sportif|la meilleur technique pour gagner au paris sportif|la méthode
secrète pour gagner aux paris sportifs pdf|la plus grosse cote gagner paris sportif|la plus grosse cote paris sportif|ldem paris sportif signification|le marché des paris sportifs|le meilleur
site de pari sportif|le meilleur site de paris sportif|le meilleur site de paris sportif
en ligne|le meilleur site de paris sportifs|le plus gros gain au paris sportif|le plus gros paris sportif|le plus gros paris sportif du monde|les 10 meilleurs sites de paris
sportifs|les 10 meilleurs sites de paris sportifs en afrique|les 17 secrets pour gagner rapidement aux paris sportifs|les 17 secrets pour gagner rapidement aux paris sportifs pdf|les application de paris sportif|les applications paris sportifs|les bonus paris
sportifs|les bookmakers paris sportifs|les cotes paris sportifs|les gains de paris sportifs sont
ils imposables|les gains des paris sportifs sont ils imposables|les
jeux de paris sportifs|les meilleur paris sportif|les meilleures applications de paris sportifs|les meilleurs
applications de paris sportifs|les meilleurs bonus paris
sportif|les meilleurs bonus paris sportifs|les meilleurs cotes
paris sportif|les meilleurs paris sportifs|les meilleurs paris sportifs du jour|les meilleurs site de paris sportif|les meilleurs
site de paris sportifs|les meilleurs sites de pari sportif|les
meilleurs sites de paris sportifs|les meilleurs sites de paris sportifs en ligne|les paris sportif|les paris sportif avis|les paris sportifs|les paris
sportifs comment ça marche|les paris sportifs en france|les paris sportifs en ligne|les paris sportifs
en ligne comprendre jouer gagner|les paris sportifs en ligne comprendre jouer gagner pdf|les paris
sportifs les plus rentables|les plus gros gagnant
paris sportif|les plus gros gains au paris sportifs|les plus gros gains paris sportifs|les plus gros paris sportif|les plus grosse cote paris sportif|les plus grosses pertes paris sportifs|les sites de
paris sportifs|les sites de paris sportifs autorisés en france|les sites
de paris sportifs en france|les sites de paris sportifs en ligne|les sites de paris sportifs francais|ligue 1 paris sportif|ligue
1 paris sportifs|ligue 2 paris sportif|ligue des champions paris sportif|limite
de gains paris sportifs|limite de mise paris sportif|limite gain paris sportif|limite mise paris sportifs|liste de
paris sportif|liste des paris sportifs|liste des site de paris sportif|liste des sites
de paris sportifs|liste pari sportif|liste paris sportif|liste paris sportif pdf|liste site de paris sportif|liste site pari sportif|liste site
paris sportif|liste site paris sportif arjel|liste sites paris sportifs|logiciel algorithme
paris sportif|logiciel algorithme paris sportif
gratuit|logiciel analyse paris sportif|logiciel calcul paris sportif|logiciel de pari sportif|logiciel de paris sportif|logiciel de paris sportif gratuit|logiciel gestion bankroll paris
sportif gratuit|logiciel gestion de bankroll paris sportif|logiciel gestion paris sportif|logiciel gestion paris sportif gratuit|logiciel gestion paris sportifs|logiciel pari sportif|logiciel
paris sportif|logiciel paris sportif gratuit|logiciel paris
sportifs|logiciel paris sportifs foot sur 2 matchs|logiciel pour paris sportif|logiciel pour
paris sportifs|logiciel prediction paris sportif|logiciel probabilité paris sportif|logiciel prédiction paris sportif|logiciel
statistique paris sportifs|logiciel variation de cote paris sportif|loi sur les paris sportifs en france|magic
calculator paris sportif|marché des paris sportifs|marché des
paris sportifs en france|marché des paris sportifs en ligne|martingale pari
sportif|martingale paris sportif|martingale paris sportif excel|martingale paris sportif forum|martingale paris sportif interdit|martingale paris sportifs|match abandonné paris sportif|match annulé ou reporté paris sportifs|match
annulé paris sportif|match arrete paris sportif|match interrompu paris sportif|match interrompu tennis paris sportif|match interrompu tennis
pluie paris sportif|match nul boxe paris sportif|match
pari sportif|match paris sportif|match reporté paris sportif|match suspendu paris sportif|match suspendu tennis paris sportif|match truqué paris sportif|matchs
truqués paris sportifs|meilleur algorithme paris sportif|meilleur algorithme paris sportif gratuit|meilleur app
de paris sportif|meilleur app de paris sportifs|meilleur app paris sportif|meilleur appli de pari sportif|meilleur appli de paris sportif|meilleur appli pari
sportif|meilleur appli paris sportif|meilleur appli paris sportif forum|meilleur appli paris sportifs|meilleur application conseil
paris sportif|meilleur application de paris sportif|meilleur application de paris
sportif en afrique|meilleur application pari sportif|meilleur application paris sportif|meilleur application paris sportif belgique|meilleur application pour les paris sportif|meilleur application pour pari sportif|meilleur bonus de
bienvenue paris sportif|meilleur bonus pari sportif|meilleur bonus paris sportif|meilleur bonus paris sportif sans depot|meilleur bonus paris sportifs|meilleur
bonus site de paris sportif|meilleur bonus site pari sportif|meilleur bonus site paris sportif|meilleur bookmaker paris sportif|meilleur
combiné paris sportif|meilleur conseil paris sportif|meilleur cote de paris sportif|meilleur cote pari sportif|meilleur cote paris
sportif|meilleur cote paris sportif aujourd’hui|meilleur
cote site paris sportif|meilleur forum paris sportifs|meilleur gain paris
sportif|meilleur ia paris sportif|meilleur methode pour gagner au paris sportif|meilleur
offre bienvenue paris sportif|meilleur offre bonus paris sportif|meilleur offre de bienvenue paris sportif|meilleur offre de
bienvenue paris sportifs|meilleur offre pari sportif|meilleur offre
paris sportif|meilleur offre paris sportif en ligne|meilleur pari sportif|meilleur pari sportif du jour|meilleur pari sportif en ligne|meilleur paris sportif|meilleur paris sportif aujourd’hui|meilleur paris sportif du jour|meilleur paris sportif
en ligne|meilleur paris sportif foot|meilleur promo paris sportif|meilleur pronostic paris
sportif|meilleur site de conseil paris sportif|meilleur site
de pari sportif|meilleur site de pari sportif en ligne|meilleur site de paris sportif|meilleur site de paris sportif avis|meilleur site de paris sportif belgique|meilleur
site de paris sportif canada|meilleur site de paris
sportif en france|meilleur site de paris sportif en ligne|meilleur site
de paris sportif football|meilleur site de paris sportif forum|meilleur site de paris sportif
france|meilleur site de paris sportif hors arjel|meilleur site de paris sportif international|meilleur site de paris sportif suisse|meilleur site de paris sportifs|meilleur site de paris sportifs en ligne|meilleur site pari
sportif|meilleur site pari sportif en ligne|meilleur site pari sportif france|meilleur site paris sportif|meilleur site paris sportif avis|meilleur site paris
sportif belgique|meilleur site paris sportif canada|meilleur site paris sportif en ligne|meilleur site paris sportif foot|meilleur site paris sportif forum|meilleur site paris sportif france|meilleur site paris sportif hors arjel|meilleur site paris sportif nba|meilleur site paris
sportif rugby|meilleur site paris sportif suisse|meilleur
site paris sportifs|meilleur site pour pari sportif|meilleur site pour paris sportif|meilleur site pronostic paris
sportif|meilleur strategie paris sportif|meilleur technique de paris sportif|meilleur technique paris sportif|meilleur technique pour gagner au paris sportif|meilleure appli de
paris sportif|meilleure appli de paris sportifs|meilleure appli pari
sportif|meilleure appli paris sportif|meilleure appli paris sportifs|meilleure application de
paris sportif|meilleure application de paris
sportifs|meilleure application pari sportif|meilleure
application paris sportif|meilleure application paris sportif android|meilleure application paris sportifs|meilleure offre paris sportif|meilleure site paris sportif|meilleure strategie paris sportif|meilleures applications de paris sportifs|meilleures applications paris sportifs|meilleures cotes paris sportifs|meilleures offres paris sportifs|meilleures stratégies paris
sportifs|meilleurs appli paris sportif|meilleurs application de paris sportifs|meilleurs
application paris sportif|meilleurs applications paris sportifs|meilleurs bonus paris sportifs|meilleurs cote paris sportif|meilleurs cotes paris sportifs|meilleurs offres paris sportifs|meilleurs paris sportifs|meilleurs paris sportifs du jour|meilleurs site de pari sportif|meilleurs site de paris sportif|meilleurs site de paris sportif en ligne|meilleurs site de paris sportifs|meilleurs site paris sportif|meilleurs sites de paris sportifs|meilleurs sites de paris
sportifs en ligne|meilleurs sites paris sportif|meilleurs sites
paris sportifs|methode abc paris sportif|methode de
paris sportif|methode gagnante paris sportifs|methode gagner paris
sportif|methode infaillible paris sportifs|methode
martingale paris sportif|methode mathematique paris sportif|methode mathematique pour gagner au paris sportif|methode paris
sportif|methode paris sportif foot|methode paris sportif forum|methode paris
sportif tennis|methode paris sportifs|methode pour gagner au paris sportif|methode pour gagner paris
sportif|methodes paris sportifs|minimum depot paris sportif|mise au jeu pari sportif|mise
maximum pari sportif|mise maximum paris sportif|mise minimum paris sportif|mise moyenne paris sportif|mise paris sportif|moins de 4 5 but paris
sportif|montant maximum paris sportif|montant paris sportif|montante pari sportif|montante parie sportif|montante
paris sportif|montante paris sportifs|montantes paris sportifs|multiple
pari sportif|multiple paris sportif|multiple paris sportifs|multiples paris sportifs|méthode calcul paris sportif|méthode match nul
paris sportifs|méthode mathématique pour gagner au paris sportif|méthode paris sportif
forum|méthode paris sportif hockey|nba pari sportif|nba paris sportif|nba paris sportifs|nouveau paris sportif|nouveau site de
pari sportif|nouveau site de paris sportif|nouveau site de paris sportif en ligne|nouveau site
de paris sportifs|nouveau site pari sportif|nouveau site paris sportif|nouveau site paris sportif france|nouveau site paris sportifs|nouveaux sites de paris sportifs|nouveaux sites paris
sportifs|nouvelle appli paris sportif|nouvelle application de paris sportif|numero de match paris sportif|numero match paris sportif|offre 100 euros paris sportif|offre appli pari sportif|offre bienvenu paris
sportif|offre bienvenue pari sportif|offre bienvenue paris
sportif|offre bienvenue paris sportifs|offre bienvenue site paris sportif|offre bonus paris sportif|offre de bienvenu paris sportif|offre de bienvenue pari sportif|offre de bienvenue paris sportif|offre
de bienvenue paris sportif belgique|offre de bienvenue paris sportif
sans depot|offre de bienvenue paris sportif sans dépôt|offre
de bienvenue paris sportifs|offre de bienvenue sans depot paris sportif|offre de bienvenue site
paris sportif|offre euro paris sportif|offre pari
sportif euro|offre paris sportif|offre paris sportif belgique|offre
paris sportif cash|offre paris sportif coupe du monde|offre paris sportif hors arjel|offre paris sportif remboursé|offre paris sportif remboursé cash|offre paris sportif sans depot|offre promo
paris sportif|offre remboursement paris sportif|offre sans depot paris sportif|offre site paris
sportif|offres bienvenue paris sportifs|offres de bienvenue paris sportifs|ou faire des paris sportif|ou faire des
paris sportif en espagne|ou faire des paris sportifs|outil répartiteur de mise paris sportif|outils repartiteur de mises
paris sportif|ouverture compte paris sportifs|ouvrir un compte paris sportif|pack de bienvenue
paris sportif|pack de bienvenue paris sportif hors arjel|pari en ligne sportif|pari sportif|pari sportif 100 euros offert|pari sportif 100 remboursé|pari sportif abandon tennis|pari sportif aide|pari sportif algérie aujourd’hui|pari sportif appli|pari sportif application|pari
sportif argent|pari sportif astuce|pari sportif aujourd|pari sportif aujourd’hui|pari sportif avec handicap|pari sportif avec orange
money|pari sportif avec paypal|pari sportif avec wave|pari sportif avis|pari sportif basket|pari
sportif belgique|pari sportif belgique france|pari
sportif bonus|pari sportif buteur pas titulaire|pari sportif champions league|pari sportif combiné|pari
sportif comment|pari sportif comment gagner|pari sportif comment ça marche|pari sportif comparatif|pari sportif conseil|pari sportif cote|pari sportif cote
match|pari sportif cote psg|pari sportif coupe|pari
sportif coupe de france|pari sportif coupe du monde|pari sportif depot|pari sportif du jour|pari sportif en france|pari
sportif en ligne|pari sportif en ligne au cameroun|pari sportif
en ligne belgique|pari sportif en ligne canada|pari sportif en ligne france|pari sportif en ligne gratuit|pari sportif en ligne
suisse|pari sportif en ligne ufc|pari sportif en suisse|pari sportif euro|pari sportif explication|pari sportif faire|pari
sportif foot|pari sportif foot resultat|pari sportif football|pari sportif forum|pari
sportif francaise des jeux|pari sportif france|pari sportif
france angleterre|pari sportif france argentine|pari
sportif france autriche|pari sportif france belgique|pari sportif france espagne|pari sportif
france italie|pari sportif france portugal|pari sportif france usa|pari
sportif gagnant|pari sportif gagner|pari sportif gagner a tous les coups|pari sportif
gagner de l’argent|pari sportif gain|pari sportif gratuit|pari sportif gratuit pour
gagner des cadeaux|pari sportif gratuit sans depot|pari sportif handicap|pari sportif hockey|pari sportif hors arjel|pari sportif jeux olympiques|pari sportif joueur absent|pari sportif le plus rentable|pari sportif leicester champion|pari sportif ligue
1|pari sportif ligue 2|pari sportif ligue des champions|pari sportif
ligue europa|pari sportif match|pari sportif match arrete|pari sportif match interrompu|pari sportif meilleur|pari sportif meilleur cote|pari sportif meilleur site|pari
sportif methode|pari sportif mise|pari sportif mise au jeu|pari sportif mise o jeu|pari sportif nba|pari sportif offre bienvenue|pari sportif paypal|pari sportif
plus|pari sportif prolongation|pari sportif promo|pari sportif pronostic|pari sportif pronostic foot|pari sportif pronostic gagnant|pari sportif pronostic gratuit|pari
sportif psg|pari sportif psg bayern|pari sportif psg inter|pari sportif psg milan|pari sportif regle|pari sportif
rembourse|pari sportif remboursement|pari sportif remboursement cash|pari
sportif remboursé|pari sportif rugby|pari sportif rugby coupe du monde|pari sportif rugby top 14|pari sportif sans argent|pari sportif sans carte bancaire|pari sportif
sans depot|pari sportif signification|pari sportif site|pari sportif statistique|pari sportif suisse|pari sportif systeme|pari sportif
technique|pari sportif technique pour gagner|pari sportif temps reglementaire|pari sportif tennis|pari sportif
tennis abandon|pari sportif top|pari sportif
top 14|pari sportif tour de france|parie sportif|parie sportif comment ca marche|parie sportif du jour|parie sportif en ligne|parie sportif foot|parie
sportif football|parie sportif france|parie sportif gratuit|parie
sportif pronostic|parie sportif suisse|paris en ligne sportif|paris en ligne sportifs|paris evenement sportif|paris france sportif|paris
hippique et sportif|paris hippiques et sportifs|paris hippiques paris sportifs|paris hippiques paris sportifs et
poker en ligne|paris hippiques sportifs|paris match sportif|paris sportif|paris sportif 10 euros offerts|paris sportif 100
euros offert|paris sportif 100 euros remboursé|paris sportif 100 offert|paris sportif
100 remboursé|paris sportif 100e offert|paris sportif 150 euros offert|paris sportif 1er pari remboursé|paris sportif a
faire|paris sportif a faire aujourd’hui|paris sportif a faire
ce soir|paris sportif abandon tennis|paris sportif abandon tennis parions sport|paris sportif aide|paris sportif algorithme|paris sportif
analyse|paris sportif appli|paris sportif application|paris sportif application android|paris sportif apres prolongation|paris sportif
argent|paris sportif argent fictif|paris sportif argent offert|paris sportif argent virtuel|paris sportif arjel|paris sportif
arsenal psg|paris sportif astuce|paris sportif au canada|paris sportif
aujourd hui|paris sportif aujourd’hui|paris sportif
avec argent fictif|paris sportif avec bonus sans depot|paris sportif avec carte bancaire|paris sportif avec cryptomonnaie|paris sportif
avec handicap|paris sportif avec paypal|paris sportif avec paysafecard|paris
sportif avis|paris sportif avis expert|paris sportif avis forum|paris sportif bankroll|paris sportif basket|paris
sportif basket coupe de france|paris sportif
basket nba|paris sportif basket prolongation|paris sportif belgique|paris sportif
belgique bonus|paris sportif belgique bonus sans depot|paris sportif belgique france|paris sportif
belgique suede|paris sportif bonus|paris sportif bonus bienvenue|paris sportif bonus cash|paris sportif bonus de bienvenue|paris sportif bonus gratuit|paris sportif bonus gratuit sans depot|paris
sportif bonus retirable|paris sportif bonus sans depot|paris
sportif bonus sans depot belgique|paris sportif bookmaker|paris sportif but contre son camp|paris sportif
but temps additionnel|paris sportif buteur|paris sportif buteur blessé|paris sportif buteur carton rouge|paris sportif buteur contre son camp|paris sportif buteur non titulaire|paris sportif buteur prolongation|paris
sportif buteur qui ne joue pas|paris sportif buteur remplacant|paris
sportif calcul gain|paris sportif canada|paris sportif
cash|paris sportif cash out|paris sportif champion ligue
1|paris sportif champions league|paris sportif classement ligue 1|paris
sportif code promo|paris sportif combine|paris sportif combiné|paris sportif combiné comment ça marche|paris sportif
combiné du jour|paris sportif combiné match reporté|paris sportif comment ca marche|paris sportif comment faire|paris sportif comment gagner|paris sportif comment gagner a tous les coups|paris sportif
comment jouer|paris sportif comment ça marche|paris sportif comparateur
cote|paris sportif comparatif|paris sportif conseil|paris sportif conseil gratuit|paris
sportif conseil pour gagner|paris sportif cote|paris sportif cote et match|paris sportif
cote explication|paris sportif cote psg|paris sportif coupe d’europe|paris sportif coupe davis|paris sportif
coupe de france|paris sportif coupe du monde|paris sportif coupe du
monde de rugby|paris sportif coupe du monde rugby|paris sportif depot
5 euro|paris sportif depot minimum|paris sportif depot paypal|paris sportif dnb|paris sportif du jour|paris sportif du jour conseil|paris sportif
dépôt 1 euro|paris sportif dépôt minimum 5 euros|paris sportif en belgique|paris sportif en france|paris sportif
en ligne|paris sportif en ligne avec paypal|paris sportif en ligne avis|paris sportif en ligne belgique|paris sportif en ligne bonus|paris sportif en ligne cameroun|paris sportif en ligne comment gagner|paris sportif en ligne comment ça marche|paris sportif en ligne france|paris sportif en ligne
gratuit|paris sportif en ligne maroc|paris sportif en ligne paypal|paris sportif en ligne québec|paris sportif
en ligne sans depot|paris sportif en ligne suisse|paris sportif en suisse|paris sportif espagne france|paris sportif
esport|paris sportif et casino en ligne|paris sportif et hippique|paris sportif et prolongation|paris sportif
euro|paris sportif europa league|paris sportif explication|paris sportif final ligue des champions|paris sportif finale ligue des champions|paris sportif foot|paris
sportif foot aide|paris sportif foot astuce|paris sportif foot aujourd’hui|paris sportif foot ce soir|paris sportif foot
comment ca marche|paris sportif foot conseil|paris sportif foot cote|paris sportif
foot coupe du monde|paris sportif foot en ligne|paris sportif
foot feminin|paris sportif foot gratuit|paris sportif foot prolongation|paris
sportif foot pronostic|paris sportif foot pronostic gratuit|paris sportif
foot regle|paris sportif foot suisse|paris sportif foot us|paris sportif football|paris sportif football americain|paris sportif football astuces|paris sportif forfait tennis|paris
sportif forum|paris sportif francais|paris sportif francaise des jeux|paris sportif france|paris sportif france 2|paris sportif france
allemagne|paris sportif france angleterre|paris sportif france argentine|paris
sportif france autriche|paris sportif france belgique|paris sportif france
espagne|paris sportif france gibraltar|paris sportif france
italie|paris sportif france nouvelle zelande|paris sportif
france pologne|paris sportif france portugal|paris sportif france uruguay|paris sportif france usa|paris sportif
freebet sans depot|paris sportif gagnant|paris sportif gagnant à coup sûr|paris
sportif gagner a coup sur|paris sportif gagner argent|paris
sportif gagner de l’argent|paris sportif gain|paris sportif gain maximum|paris sportif gestion bankroll|paris sportif gratuit|paris sportif gratuit appli|paris sportif gratuit avec cadeaux|paris sportif gratuit cadeaux|paris sportif gratuit en ligne|paris sportif gratuit entre amis|paris sportif gratuit sans argent|paris sportif gratuit sans depot|paris sportif gratuit sans dépôt|paris sportif gratuits|paris
sportif gros gain|paris sportif handicap|paris sportif handicap 0 1|paris sportif handicap
0-1|paris sportif handicap 1 0|paris sportif handicap 1-0|paris sportif handicap
basket|paris sportif handicap explication|paris sportif handicap
foot|paris sportif handicap rugby|paris sportif
hippique|paris sportif hockey|paris sportif hockey
nhl|paris sportif hockey sur glace|paris sportif hors arjel|paris sportif hors arjel
france|paris sportif jeux olympiques|paris sportif jeux video|paris sportif joueur blessé|paris sportif joueur blessé pendant le match|paris sportif joueur de foot|paris sportif joueur
decisif|paris sportif joueur declare forfait|paris sportif joueur
déclare forfait|paris sportif joueur remplacant|paris
sportif la francaise des jeux|paris sportif le plus
rentable|paris sportif legal en france|paris sportif leicester champion|paris sportif les 18 stratégies pour gagner
tous les jours|paris sportif les plus sur|paris sportif les prolongation compte|paris sportif ligne|paris sportif ligue
1|paris sportif ligue 2|paris sportif ligue des champions|paris sportif ligue des nations|paris sportif ligue
europa|paris sportif liste|paris sportif martingale|paris sportif match|paris sportif match abandonné|paris sportif match annulé|paris sportif match arrêté|paris sportif match du jour|paris sportif match interrompu|paris sportif
match reporté|paris sportif match suspendu|paris sportif match
tennis interrompu|paris sportif match truqué|paris sportif meilleur
bonus|paris sportif meilleur cote|paris sportif meilleur pronostic|paris sportif
meilleur site|paris sportif methode|paris sportif methode 2 3|paris sportif mi temps fin de match|paris sportif mise au jeu|paris sportif
mise maximum|paris sportif mma france|paris sportif moins de 3.5 but|paris sportif
montante|paris sportif moto gp|paris sportif multiple|paris sportif multiple 2 3|paris sportif multiple 2 3 explication|paris
sportif multiple 2 4|paris sportif multiple 2 5|paris sportif multiple 2/3 explication|paris sportif multiple 3 4|paris sportif multiple explication|paris sportif
national 1 foot|paris sportif nba|paris sportif nba conseil|paris sportif nba pronostic|paris sportif nhl|paris sportif nombre de but|paris sportif
nouveau site|paris sportif numero match|paris sportif offert|paris sportif offre bienvenue|paris sportif
offre bienvenue sans depot|paris sportif offre de bienvenue|paris sportif offre sans depot|paris sportif
om psg|paris sportif paypal|paris sportif plus de 1.5 but|paris sportif plus de 2 5 but|paris sportif plus ou moins|paris sportif plus ou moins 2
5 but|paris sportif premier pari remboursé|paris
sportif premier paris remboursé|paris sportif prolongation|paris sportif prolongation basket|paris sportif prolongation foot|paris sportif promo|paris
sportif pronostic|paris sportif pronostic basket|paris sportif pronostic des match
aujourd hui|paris sportif pronostic expert gratuit|paris sportif pronostic foot|paris sportif pronostic forum|paris sportif pronostic gratuit|paris sportif pronostic tennis|paris sportif psg|paris
sportif psg arsenal|paris sportif psg barcelone|paris
sportif psg bayern|paris sportif psg dortmund|paris sportif psg inter|paris sportif psg inter cote|paris sportif
psg liverpool|paris sportif psg om|paris sportif qr code|paris sportif que
veut dire handicap|paris sportif qui rapporte le plus|paris sportif regle|paris sportif regle prolongation|paris sportif rembourse|paris sportif remboursement cash|paris sportif rembourser|paris sportif remboursé|paris sportif remboursé cash|paris sportif
remboursé en cash|paris sportif retrait paypal|paris sportif rue des joueurs|paris sportif rugby|paris sportif rugby 6 nations|paris sportif
rugby coupe du monde|paris sportif rugby top 14|paris sportif safe du jour|paris sportif sans argent|paris sportif sans carte bancaire|paris sportif sans
carte d’identité|paris sportif sans compte bancaire|paris sportif sans depot|paris sportif sans depot minimum|paris sportif si match suspendu|paris
sportif si un joueur abandonne|paris sportif si un joueur
ne joue pas|paris sportif si un joueur se blesse|paris sportif simple ou
combiné|paris sportif site|paris sportif statistique|paris sportif stratégie|paris sportif suisse|paris sportif suisse
application|paris sportif suisse en ligne|paris sportif
suisse legal|paris sportif suisse légal|paris sportif suisse romande|paris sportif sur du
jour|paris sportif sur le tennis|paris sportif systeme|paris sportif systeme 2 3|paris sportif systeme 2 4|paris
sportif systeme 2/3|paris sportif systeme 2/4|paris sportif systeme 3 4|paris sportif systeme 3/4|paris sportif systeme
explication|paris sportif technique|paris sportif technique pour gagner|paris sportif
temps additionnel|paris sportif temps reglementaire|paris sportif tennis|paris sportif tennis
abandon|paris sportif tennis conseil|paris sportif tennis de
table|paris sportif tennis forfait|paris sportif tennis gratuit|paris sportif tennis pronostic|paris sportif
tennis roland garros|paris sportif tir au but|paris sportif top 14|paris sportif tour de france|paris sportif ufc|paris sportif ufc france|paris sportif unibet|paris sportif vainqueur euro|paris sportif vainqueur ligue 1|paris sportif vainqueur ligue des champions|paris sportif via paypal|paris sportif victoire prolongation|paris sportif vip gratuit|paris sportifs|paris sportifs
abandon tennis|paris sportifs aide|paris sportifs analyser un match|paris
sportifs arjel|paris sportifs astuces|paris sportifs aujourd’hui|paris sportifs
autorisés en france|paris sportifs avec paypal|paris sportifs basket|paris sportifs belgique|paris sportifs bonus|paris sportifs bookmakers|paris sportifs canada|paris sportifs combiné|paris sportifs comparateur|paris sportifs comparatif|paris sportifs conseils|paris sportifs
cotes|paris sportifs coupe du monde|paris sportifs de football|paris sportifs du jour|paris sportifs en belgique|paris
sportifs en france|paris sportifs en ligne|paris sportifs en ligne belgique|paris sportifs en ligne
france|paris sportifs en ligne gratuit|paris sportifs en ligne suisse|paris sportifs en suisse|paris sportifs et hippiques|paris
sportifs euro|paris sportifs foot|paris sportifs foot us|paris sportifs forum|paris sportifs france|paris
sportifs france espagne|paris sportifs gagner à tous les coups|paris sportifs gratuit|paris
sportifs gratuits|paris sportifs gratuits en ligne|paris sportifs
handicap|paris sportifs hockey|paris sportifs hockey sur galce|paris
sportifs hockey sur glace|paris sportifs hors arjel|paris sportifs
jeux olympiques|paris sportifs les bookmakers raflent la mise|paris sportifs ligne|paris sportifs ligue
1|paris sportifs ligue 2|paris sportifs ligue des champions|paris sportifs ligue europa|paris sportifs match interrompu|paris sportifs montante|paris sportifs nba|paris sportifs offre bienvenue|paris sportifs offre de bienvenue|paris sportifs paypal|paris
sportifs pronostics|paris sportifs psg|paris sportifs
psg inter|paris sportifs rugby|paris sportifs sans argent|paris sportifs sans depot|paris sportifs site|paris
sportifs sites|paris sportifs statistiques|paris
sportifs stratégie|paris sportifs suisse|paris sportifs technique|paris sportifs techniques|paris sportifs tennis|paris sportifs tennis astuces|paris sportifs top 14|paris sportifs tour
de france|part de marché paris sportifs|paypal pari sportif|paypal paris sportif|paypal paris sportifs|perte d’argent
paris sportifs|peut on devenir riche avec les paris sportifs|peut on gagner de l’argent avec les paris sportifs|peut on gagner sa vie avec les paris sportif|peut on vraiment gagner de l’argent avec
les paris sportifs|plus gros combine paris sportif|plus gros
gagnant paris sportif|plus gros gain paris sportif|plus gros gain paris sportif au monde|plus gros gain paris sportif france|plus gros
gains paris sportif|plus gros pari sportif|plus gros paris sportif|plus grosse cote gagner paris sportif|plus grosse cote pari sportif|plus grosse cote paris sportif|plus grosse mise paris sportif|plus grosse somme gagner au paris sportif|plus ou moins paris
sportif|pourcentage de mise paris sportif|premier pari sportif remboursé|probabilité
cote paris sportif|probabilité paris sportif combiné|prolongation basket paris sportif|prolongation paris sportif|promo pari sportif|promo paris sportif|promo
site de paris sportif|promo site pari sportif|promo site paris sportif|promos paris sportifs|prono paris sportif foot|prono
paris sportif gratuit|prono paris sportif tennis|pronostic de paris sportif|pronostic du
jour paris sportif|pronostic foot paris sportif|pronostic gratuit paris sportif|pronostic pari sportif|pronostic pari sportif gratuit|pronostic paris sportif|pronostic paris sportif aujourd’hui|pronostic paris sportif du jour|pronostic paris sportif foot|pronostic paris sportif gratuit|pronostic paris sportif
tennis|pronostic paris sportifs|pronostics
foot statistiques et aides aux paris sportifs|pronostics paris sportif|pronostics paris sportifs|pronostiqueur paris sportif gratuit|psg arsenal paris sportif|psg bayern paris sportif|psg inter milan paris sportif|psg inter pari sportif|psg inter paris sportif|psg liverpool paris sportif|psg om paris sportif|psg
paris sportif|psg paris sportifs|qr code paris sportif|qu est ce qu
un handicap paris sportif|qu est ce que handicap dans les paris sportif|qu’est ce qu’un handicap paris sportif|qu’est ce que
handicap dans les paris sportif|quand un joueur
se blesse paris sportif|que signifie 1/1 en paris sportif|que signifie 1/2 paris sportif|que signifie 12 en paris
sportif|que signifie 1×2 dans les paris sportifs|que signifie btts en paris sportif|que signifie
dnb en paris sportif|que signifie draw en paris sportif|que signifie ft en paris sportif|que signifie gg dans
le pari sportif|que signifie gg en pari sportif|que signifie
gg en paris sportif|que signifie handicap dans les paris
sportifs|que veut dire dnb en paris sportif|que veut dire handicap dans les paris sportifs|que veut dire handicap paris sportif|quel appli pari sportif|quel cote jouer paris sportif|quel
est la meilleur appli de paris sportif|quel est le meilleur algorithme de paris sportif|quel
est le meilleur site de pari sportif|quel est le meilleur site de pari sportif en ligne|quel est le meilleur site de paris sportif|quel est le meilleur site de paris
sportif en ligne|quel est le meilleur site de paris sportifs en ligne|quel est le pari
sportif le plus rentable|quel pari sportif est le plus rentable|quel pari sportif est le plus sûr|quel pari sportif faire aujourd’hui|quel paris
sportif faire aujourd’hui|quel paris sportif rapporte le plus|quel
site de paris sportif choisir|quel site de paris sportif rembourse en cash|quel type de pari sportif est le plus rentable|quelle
application pour paris sportifs|quelle est la meilleure appli de paris sportif|quelle est
la meilleure application de paris sportif|quelle est la meilleure
application pour les paris sportifs|quelle est le meilleur site
de paris sportif|quels paris sportifs faire|quels sont les paris sportifs les plus sûrs|rebond basket paris sportif|record de gain paris sportif|regle buteur paris sportif|regle de paris sportif|regle
des paris sportif|regle handicap paris sportif|regle handicap paris sportif foot|regle multiple paris sportif|regle pari sportif|regle paris sportif|regle paris sportif foot|regle paris sportif multiple|regle paris sportif
prolongation|reglement pari sportif|reglement paris sportif|regles paris sportifs|remboursement cash
paris sportif|remboursement en cash paris sportif|remboursement pari sportif|remboursement paris sportif|repartiteur de mise
paris sportif|repartiteur de mise paris sportifs|repartiteur de mises paris sportif|repartiteur mise paris sportif|repartition des mises
paris sportif|resultat pari sportif|resultat
paris sportif|resultat paris sportif en direct|resultat paris sportif foot|resultat sportif hockey|retirer argent
paris sportif|rugby pari sportif|rugby paris sportif|règle paris sportif prolongation|règles paris
sportif|répartiteur de mise pari sportif|répartiteur
de mise paris sportif|répartiteur de mise paris sportifs|répartition des mises paris sportif|résultat paris sportif foot|sans depot paris sportif|se faire
interdire de paris sportifs|signification btts
paris sportif|signification dnb paris sportif|signification handicap paris sportif|simulateur de gain paris sportif|simulateur gain paris sportif|simulateur gain paris sportif multiple|simulateur gain paris sportif
systeme|simulateur gain paris sportif système|simulateur montante paris
sportif|simulateur paris sportif multiple|simulateur systeme paris sportif|simulation paris sportif gratuit|site aide paris sportif|site analyse paris sportif|site analyser paris sportif|site arjel paris
sportif|site conseil paris sportif (Bell)|site d’analyse de paris sportifs|site d’analyse
paris sportif|site de conseil paris sportif|site de pari en ligne sportif|site de pari sportif|site de pari sportif avec bonus sans depot|site de pari sportif bonus sans depot|site de pari sportif canada|site de pari sportif en ligne|site de pari sportif francais|site de pari sportif gratuit|site de pari sportif hors arjel|site
de pari sportif suisse|site de parie sportif|site de parie sportif en ligne|site de
paris en ligne sportif|site de paris sportif|site de paris sportif acceptant paypal|site
de paris sportif arjel|site de paris sportif autorisé en france|site
de paris sportif autorisé en suisse|site de paris sportif avec bonus|site de paris
sportif avec bonus sans depot|site de paris sportif avec bonus
sans dépôt|site de paris sportif avec neosurf|site de paris sportif avec paiement mobile|site de
paris sportif avec paypal|site de paris sportif avis|site de paris sportif belge
avec bonus|site de paris sportif belgique|site
de paris sportif bonus|site de paris sportif
bonus sans depot|site de paris sportif canada|site de
paris sportif comparatif|site de paris sportif
depot minimum|site de paris sportif en france|site de paris sportif en ligne|site de paris
sportif en ligne suisse|site de paris sportif football|site de
paris sportif francais|site de paris sportif france|site de paris sportif
gratuit|site de paris sportif gratuit pour gagner des cadeaux|site de paris sportif gratuit sans
dépôt|site de paris sportif hors arjel|site de paris sportif le plus fiable|site de
paris sportif legal en france|site de paris sportif
meilleur cote|site de paris sportif nouveau|site de paris sportif offre de bienvenue|site de paris sportif paypal|site de paris sportif premier
paris remboursé|site de paris sportif qui accepte
paypal|site de paris sportif qui rembourse en cash|site de
paris sportif remboursé|site de paris sportif sans argent|site de
paris sportif sans carte bancaire|site de paris sportif sans carte d’identité|site de paris sportif sans depot|site
de paris sportif suisse|site de paris sportifs|site de paris sportifs avec paypal|site
de paris sportifs en ligne|site de paris sportifs francais|site de paris sportifs gratuit|site de paris sportifs paypal|site de paris sportifs suisse|site de statistique pour paris sportif|site
des paris sportifs|site pari en ligne sportif|site pari sportif|site pari
sportif 100 euros offert|site pari sportif arjel|site pari sportif
belgique|site pari sportif bonus|site pari sportif canada|site
pari sportif comparatif|site pari sportif en ligne|site pari sportif france|site pari sportif gratuit|site pari sportif
hors arjel|site pari sportif suisse|site parie sportif|site paris en ligne
sportif|site paris sportif|site paris sportif 100 euros offert|site paris sportif 100 euros remboursé|site paris sportif 1er paris
remboursé|site paris sportif arjel|site paris sportif autorisé en france|site paris sportif avec bonus|site paris sportif avec
bonus sans depot|site paris sportif avec meilleur cote|site paris sportif
belgique|site paris sportif bonus|site paris sportif bonus cash|site paris sportif bonus sans depot|site paris sportif
canada|site paris sportif comparatif|site paris sportif depot 5 euro|site paris sportif en ligne|site
paris sportif foot|site paris sportif france|site paris sportif gratuit|site paris sportif
hors arjel|site paris sportif hors arjel france|site
paris sportif meilleur cote|site paris sportif nouveau|site paris sportif offre de bienvenue|site paris sportif paypal|site paris
sportif remboursement cash|site paris sportif remboursé en cash|site paris sportif retrait instantané|site paris sportif sans
carte bancaire|site paris sportif sans depot|site paris sportif suisse|site paris sportifs|site paris sportifs
belgique|site paris sportifs en ligne|site paris sportifs france|site
paris sportifs hors arjel|site paris sportifs suisse|site
pour analyse paris sportif|site pour paris sportif|site pronostic paris sportif|site statistique paris sportif|site suisse paris sportif|sites de pari sportif|sites
de paris sportif|sites de paris sportifs|sites de paris sportifs arjel|sites de paris sportifs autorisés en france|sites de paris sportifs belgique|sites de paris
sportifs bonus|sites de paris sportifs en belgique|sites de paris sportifs en france|sites de paris sportifs en ligne|sites de paris sportifs gratuits|sites de paris sportifs gratuits sans dépôt|sites de paris
sportifs suisse|sites pari sportif|sites paris sportif|sites paris
sportifs|sites paris sportifs arjel|sites paris sportifs belgique|sites paris sportifs france|sites
paris sportifs hors arjel|sites paris sportifs suisse|so
foot paris sportif|so foot paris sportifs|specialiste tennis paris
sportif|statistique foot paris sportif|statistique paris sportif|statistique paris sportif foot|statistique tennis paris sportif|statistiques football paris
sportifs|statistiques paris sportifs|strategie de paris sportif|stratégie big
whale paris sportif|stratégie de paris sportifs|stratégie
gagnante paris sportifs|stratégie pari sportif|stratégie paris sportif|stratégie paris sportifs|stratégie
paris sportifs forum|stratégie pour gagner au paris sportif|stratégies paris sportifs|suisse paris sportif|suisse paris sportifs|systeme 2 3 paris sportif|systeme 3
4 paris sportif|systeme de cote paris sportif|systeme de paris sportif|systeme pari sportif|systeme paris sportif|systeme paris sportifs|systeme reducteur paris
sportif|système paris sportif|tableau bankroll paris sportif|tableau cote paris sportif|tableau de paris sportif|tableau de suivi paris sportifs|tableau excel bankroll paris sportif|tableau excel paris sportif|tableau
excel paris sportif gratuit|tableau excel paris sportifs|tableau excel pour paris
sportif|tableau gestion bankroll paris sportif|
live wedden snooker 2026 (https://netinfo.dall4all.org/wk-2026-De-Impact-van-de-locatiekeuze-op-teams/) op paarden
10 euros offert paris sportif|10 euros offert sans dépôt paris sportif|10 meilleurs sites de paris sportifs|100 euro
offert paris sportif|100 euros offert paris sportif|100 euros
remboursé paris sportifs|100 offert pari sportif|100 offert
paris sportif|100 remboursé paris sportif|100e
offert pari sportif|abandon paris sportif tennis|abandon tennis paris sportif|addiction paris sportif forum|age paris sportif belgique|aide au pari sportif|aide
au paris sportif|aide aux paris sportif|aide aux paris sportifs|aide pari sportif|aide pari sportif football|aide parie sportif|aide paris sportif|aide paris sportif foot|aide paris
sportif gratuit|aide paris sportifs|aide pour paris
sportif|algorithme de paris sportif|algorithme excel paris sportif|algorithme gratuit paris sportif|algorithme pari sportif|algorithme paris sportif|algorithme paris sportif
avis|algorithme paris sportif basket|algorithme paris sportif excel|algorithme paris sportif
gratuit|algorithme paris sportif tennis|algorithme paris
sportifs|algorithme pour paris sportif|analyse cote paris sportif|analyse de paris sportif|analyse match paris sportif|analyse
pari sportif|analyse paris sportif|analyse
paris sportif foot|analyse paris sportif football|analyse paris
sportif gratuit|analyse paris sportifs|ancienne cote paris
sportif|api cote paris sportif|app paris sportif sans argent|appli de paris
sportif|appli de paris sportif sans argent|appli de paris sportifs|appli pari sportif|appli
pari sportif gratuit|appli parie sportif|appli paris sportif|appli paris sportif avec paypal|appli paris sportif belgique|appli paris sportif entre amis|appli paris sportif gratuit|appli paris
sportif sans argent|appli paris sportif suisse|appli paris sportifs|application aide paris sportif|application algorithme paris sportif|application analyse paris sportif|application android paris sportif|application bankroll paris sportif|application conseil paris sportif|application de pari sportif|application de parie
sportif|application de paris sportif|application de paris sportif en afrique|application de paris sportif en cote d’ivoire|application de paris sportif en ligne|application de paris
sportif gratuit|application de paris sportif international|application de paris sportif suisse|application de paris sportifs|application faux
paris sportifs|application gestion bankroll paris
sportif|application gestion paris sportif|application ia paris sportif|application pari sportif gratuit|application paris sportif|application paris sportif
android|application paris sportif argent fictif|application paris sportif belgique|application paris sportif canada|application paris sportif espagne|application paris sportif
espagnol|application paris sportif fictif|application paris sportif france|application paris sportif gratuit|application paris sportif gratuit entre amis|application paris sportif maroc|application paris sportif offre de bienvenue|application paris sportif paypal|application paris sportif sans argent|application paris sportif sans justificatif de domicile|application paris sportif suisse|application paris sportif usa|application paris sportif virtuel|application pour faire des paris sportifs|application pour gerer ses paris sportif|application pour les
paris sportifs|application pour pari sportif|application pour paris sportif|application pour paris sportifs|application statistique paris sportif|application suivi paris sportif|applications de paris sportifs|applications paris
sportifs|applis paris sportif|applis paris sportifs|apprendre a faire des paris sportifs|argent facile paris sportif|argent offert paris
sportifs|argent offert sans depot paris sportif|argent paris sportif|argent paris sportifs|argent paris sportifs
impots|argent sans depot paris sportif|arjel
paris sportif|arjel paris sportifs|astuce gagner paris sportif|astuce pari sportif|astuce paris sportif|astuce paris sportif basket|astuce paris sportif foot|astuce paris sportif forum|astuce
paris sportif tennis|astuce paris sportifs|astuce pour gagner au pari sportif|astuce pour gagner au paris sportif|astuce pour gagner paris sportif|astuce
pour paris sportif|astuces paris sportifs|astuces paris
sportifs en ligne|astuces paris sportifs foot|astuces pour gagner aux paris
sportifs|autorisation paris sportif france|avis pari sportif|avis
paris sportif|avis paris sportif foot|avis site de paris sportif|avis site paris sportif|avis sur
les paris sportifs|avis sur paris sportif|avis tipster paris sportif|aweh signification paris sportif|bankroll 100 euros paris sportifs|bankroll management paris sportif|bankroll paris sportif|bankroll paris sportif excel|bankroll paris sportif gratuit|bankroll paris sportifs|basket paris sportif|belgique
france paris sportif|belgique paris sportifs|bonus bienvenue paris sportif|bonus bienvenue
paris sportifs|bonus cash paris sportif|bonus de bienvenue paris sportif|bonus de bienvenue paris sportif belgique|bonus de bienvenue sans depot
paris sportif|bonus de depot paris sportif|bonus de paris
sportifs|bonus depot paris sportif|bonus en cash paris sportif|bonus gratuit paris sportif|bonus gratuit sans depot
paris sportif|bonus pari sportif|bonus paris sportif|bonus
paris sportif belgique|bonus paris sportif betclic|bonus paris sportif cash|bonus paris sportif en ligne|bonus paris
sportif france pari|bonus paris sportif retirable|bonus paris sportif sans depot|bonus paris sportif sans dépôt|bonus paris sportif
unibet|bonus paris sportifs|bonus sans depot paris
sportif|bonus sans depot paris sportif belgique|bonus sans dépôt paris sportif|bonus sans dépôt paris sportif hors arjel|bonus site
de paris sportif|bonus site pari sportif|bonus site paris sportif|bonus
sites de paris sportifs|bonus unibet paris sportif|bookmaker paris
sportif|bookmaker paris sportif gratuit|bookmaker paris
sportifs|bookmaker sportif|bookmakers paris sportif|bookmakers paris sportifs|bookmakers paris sportifs en ligne|but contre
son camp paris sportif|but sur penalty paris sportif|buteur paris sportif|c’est quoi handicap paris sportif|c’est quoi une cote paris sportif|calcul anti perte paris sportif|calcul combinaison pari sportif|calcul cote pari sportif|calcul cote paris sportif|calcul couverture paris sportif|calcul de cote
paris sportif|calcul des cotes paris sportifs|calcul dnb paris sportifs|calcul double chance paris sportif|calcul gain paris sportif|calcul mise paris sportif|calcul pari sportif|calcul paris sportif|calcul paris sportif multiple|calcul
pourcentage cote paris sportif|calcul probabilité paris sportif|calcul rentabilité paris
sportifs|calcul roi paris sportif|calcul systeme paris sportif|calcul trj paris sportifs|calculateur cote paris sportif|calculateur de cote paris sportif|calculateur de mise paris sportif|calculateur de paris
sportif|calculateur paris sportif|calculatrice arbitrage paris sportif|calculatrice
paris sportif|calculer cote paris sportif|calculer gain paris
sportif|calculer probabilité paris sportifs|calculer roi paris sportifs|calculer
une cote pari sportif|calculer une cote paris sportif|carte cadeau paris sportif|carte pcs paris sportif|carte prépayée paris sportifs|cash out pari sportif|cash out paris sportif|cash out paris
sportifs|casino en ligne paris sportif|casino paris sportif
en ligne|champions league paris sportif|chute de
cote paris sportif|classement des meilleurs sites de paris sportifs|classement meilleur site de paris sportif|code barre paris sportif|code bonus paris sportif|code
paris sportif|code promo pari sportif|code promo paris sportif|code promo paris sportif sans depot|code promo paris sportif sans dépôt|code promo sans depot paris sportif|code promo
site paris sportif|combien de temps pour encaisser un paris sportif|combien de temps pour retirer un paris sportif|combien miser paris sportifs|combine paris sportif|combines
paris sportifs|combiné pari sportif|combiné
paris sportif|combiné paris sportif conseil|combiné paris sportif du
jour|combiné paris sportif pronostic|comment analyser un paris
sportif|comment arreter de jouer aux paris sportifs|comment
arreter les paris sportif|comment arreter les paris sportifs|comment arrêter les paris sportifs|comment bien gagner au paris sportif|comment
bien jouer au paris sportif|comment bien miser paris sportif|comment ca marche les paris sportif|comment calculer cote paris sportif|comment calculer gain paris sportif|comment calculer les cotes des paris sportifs|comment calculer une cote de paris sportif|comment calculer une cote pari sportif|comment calculer une cote paris sportif|comment comprendre les paris
sportifs|comment creer un vip paris sportif|comment créer un algorithme paris sportif|comment créer un site de paris sportif|comment devenir riche
avec les paris sportifs|comment etre rentable paris sportif|comment etre sur de gagner au paris
sportif|comment faire de bon paris sportif|comment faire des parie sportif|comment faire des paris sportif|comment
faire des paris sportif gagnant|comment faire des paris sportifs|comment faire pari sportif|comment faire paris sportif|comment faire pour arreter les paris sportifs|comment faire
pour gagner au paris sportif|comment faire pour gagner les paris sportifs|comment faire un bon pari sportif|comment faire un bon paris
sportif|comment faire un pari sportif|comment faire un parie
sportif|comment faire un paris sportif|comment faire une montante paris
sportif|comment fonctionne les cotes dans les paris sportifs|comment fonctionne
les cotes des paris sportifs|comment fonctionne les paris sportifs|comment fonctionne paris sportifs|comment fonctionne
un pari sportif|comment fonctionnent les cotes dans les paris sportifs|comment fonctionnent
les cotes dans les paris sportifs grand oral|comment fonctionnent les cotes de paris sportif|comment fonctionnent les paris
sportifs|comment fonctionnent les paris sportifs grand oral|comment fonctionnent
les paris sportifs grand oral maths|comment fonctionnent les paris sportifs maths|comment gagner a
coup sur au paris sportif|comment gagner a tous les coups au paris sportif|comment gagner
a tout les coup au paris sportif|comment gagner au pari sportif|comment gagner au pari sportif football|comment gagner au paris sportif|comment gagner au paris sportif a
coup sur|comment gagner au paris sportif foot|comment gagner au paris sportif forum|comment gagner au paris sportif tennis|comment gagner au paris
sportifs|comment gagner aux paris sportif|comment gagner aux paris sportifs|comment gagner aux paris sportifs foot|comment gagner aux
paris sportifs livre|comment gagner aux paris sportifs sur le long
terme|comment gagner avec les paris sportifs|comment gagner dans les paris sportifs|comment gagner de l argent
avec les paris sportifs|comment gagner de l’argent au paris sportif|comment gagner de l’argent aux paris sportifs|comment gagner de l’argent avec les paris sportifs|comment gagner de l’argent paris sportif|comment gagner
de l’argent sur les paris sportifs|comment gagner de l’argent sur paris sportif|comment gagner des paris sportif|comment gagner des paris sportifs|comment gagner en paris sportif|comment gagner facilement au paris sportif|comment gagner les
paris sportifs|comment gagner paris sportif|comment gagner paris sportif foot|comment gagner paris sportifs|comment gagner
sa vie avec les paris sportifs|comment gagner ses paris sportif|comment gagner sur
les paris sportif|comment gagner sur les paris sportifs|comment
gagner tout le temps au paris sportif|comment gagner un pari
sportif|comment gagner un paris sportif|comment gerer une
bankroll paris sportif|comment gérer sa bankroll paris
sportif|comment jouer au pari sportif|comment jouer au paris sportif|comment jouer au
paris sportif foot|comment jouer aux paris sportifs|comment jouer paris sportif|comment marche cote paris sportif|comment
marche les cotes paris sportif|comment marche les paris sportif|comment marche les
paris sportifs|comment marche paris sportif|comment marche
un pari sportif|comment marche un paris sportif|comment marchent
les cotes paris sportif|comment marchent les paris sportifs|comment miser au paris
sportif|comment miser paris sportif|comment monter sa bankroll paris sportif|comment ne jamais perdre au paris sportif|comment parier sportif|comment reussir au paris sportif|comment reussir les paris sportif|comment reussir
paris sportif|comment sont calculer les cotes de paris sportif|comment sont calculées les cotes des paris sportifs|comment sont calculés
les cotes des paris sportifs|comment sont faites les cotes des paris sportifs|comment
toujours gagner au paris sportif|comment ça marche les paris sportifs|comparaison bonus paris sportifs|comparaison cote
pari sportif|comparaison des cotes paris sportifs|comparateur cote pari sportif|comparateur cote paris sportif|comparateur cotes paris sportif|comparateur
cotes paris sportifs|comparateur de cote pari sportif|comparateur de cote paris sportif|comparateur de cotes paris sportifs|comparateur de côtes paris sportifs|comparateur de
paris sportif|comparateur de site de paris sportif|comparateur de
site paris sportif|comparateur de sites de paris sportifs|comparateur pari sportif|comparateur paris sportif|comparateur paris sportifs|comparateur
site de paris sportif|comparateur site pari sportif|comparateur site paris sportif|comparatif bonus paris sportif|comparatif bonus paris sportifs|comparatif cote pari sportif|comparatif cote
paris sportif|comparatif cotes paris sportifs|comparatif des
sites de paris sportifs|comparatif offre de bienvenue paris sportif|comparatif
offre paris sportif|comparatif pari sportif|comparatif
pari sportif en ligne|comparatif paris sportif|comparatif paris sportif bonus|comparatif paris sportif en ligne|comparatif paris
sportifs|comparatif paris sportifs en ligne|comparatif site de paris sportif|comparatif site paris sportif|comparatif site
paris sportifs|comparatif sites de paris sportifs|comparatif sites paris sportifs|comparer les cotes paris sportifs|comprendre cote paris sportif|comprendre handicap paris sportif|comprendre
les cotes des paris sportifs|comprendre les cotes paris sportif|comprendre
les cotes paris sportifs|comprendre les handicap paris
sportif|compte de paris sportif|compte démo paris sportif|compte finance paris sportif|compte financer paris
sportif|compte financier paris sportif|compte financé paris sportif|compte pari sportif|compte paris sportif|compte paris sportif financé|conseil de paris sportif|conseil de paris sportifs|conseil en paris sportif|conseil en paris sportifs|conseil pari sportif|conseil pari sportif
gratuit|conseil paris sportif|conseil paris sportif
aujourd’hui|conseil paris sportif du jour|conseil paris
sportif foot|conseil paris sportif gratuit|conseil paris sportif ligue des champions|conseil paris sportif nba|conseil paris sportif pronostic|conseil
paris sportif rmc|conseil paris sportif tennis|conseil paris sportifs|conseil pour gagner au paris sportif|conseil pour paris
sportif|conseil sur les paris sportifs|conseille paris sportif|conseiller en paris sportifs|conseiller paris
sportif, https://www.villasholidaylanzarote.com/2026/07/06/evaluer-les-performances-des-equipes-moins-connues/,|conseils de paris sportifs|conseils en paris sportifs|conseils
paris sportifs|conseils paris sportifs foot|conseils paris sportifs
gratuit|conseils paris sportifs tennis|conseils pour paris sportifs|cote a
100 paris sportif|cote a 2 paris sportif|cote anglaise paris sportif|cote de 2 paris sportif|cote de pari sportif|cote de paris sportif|cote des paris sportifs|cote maximum
paris sportif|cote minimum paris sportif|cote pari sportif|cote pari sportif comment ça marche|cote pari sportif real madrid|cote pari sportif rugby|cote parie sportif|cote paris sportif|cote paris sportif
belgique|cote paris sportif calcul|cote paris sportif definition|cote paris sportif euro|cote paris
sportif explication|cote paris sportif foot|cote
paris sportif france belgique|cote paris sportif france espagne|cote paris
sportif ligue des champions|cote paris sportif moto gp|cote paris sportif psg|cote paris sportif psg arsenal|cote paris sportif rugby|cote paris sportif tennis|cote paris sportifs|cote pour
paris sportifs|cote sportif foot|cote sportif rugby|cote à 1000 paris sportif|cotes de paris sportifs|cotes pari sportif|cotes paris sportif|cotes paris sportifs|cotes paris sportifs foot|coupe de france paris sportif|créer un algorithme
paris sportif|créer un compte paris sportif|créer un site de paris sportif en ligne|dans les
paris sportifs que signifie handicap|declarer ses gains paris sportif|definition cash out paris sportif|definition cote paris sportif|definition handicap paris
sportif|depot 5 euros paris sportif|depot double paris sportif|depot minimum 5 euro
paris sportif|depot minimum paris sportif|depot paris sportif|depuis
quand existe les paris sportif en france|devenir riche avec les paris sportifs|devenir riche avec
paris sportifs|disqualification tennis paris sportif|dnb en paris sportif|dnb pari sportif|dnb paris
sportif|dnb paris sportif definition|dnb paris sportifs|doit on declarer les gains de paris sportif|déclarer gains paris sportifs|déclarer
gains paris sportifs hors arjel|définition bankroll paris sportif|dépôt minimum 1 euro paris sportif|dépôt minimum 5 euro paris sportif|ecart de jeux tennis paris sportif|erreur
de cote paris sportif|est ce que les gains des paris sportifs sont imposables|est-ce que
les prolongation compte dans un pari sportif|etre sur de gagner
au paris sportif|euro paris sportif|evenement sportif a paris|evenement sportif paris|evenement sportif paris 2025|evenement sportif paris aujourd hui|evenement sportif paris aujourd’hui|evenement
sportif paris ce week end|evenements sportif paris|evenements
sportifs paris|evenements sportifs paris 2025|evenements
sportifs à paris|evolution cote paris sportif|evolution cotes paris sportifs|evolution des cotes paris sportifs|explication cote pari sportif|explication cote paris sportif|explication handicap paris sportif|explication pari sportif|explication paris sportif|face a face hockey paris
sportif|faire des paris sportif|faire des paris sportif avec paypal|faire des paris sportifs|faire
fortune paris sportifs|faire un pari sportif|faire un paris sportif|faut il déclarer
les gains de paris sportifs|faut il déclarer ses gains paris sportifs|fichier excel gestion bankroll paris sportif|fiscalité gains paris sportifs|foot paris sportif|football et paris
sportifs|forfait tennis paris sportif|formation paris sportif gratuit|forum de paris sportif|forum de paris sportifs|forum pari
sportif|forum parie sportif|forum paris sportif|forum paris sportif foot|forum paris sportif gratuit|forum paris sportif nba|forum paris
sportif tennis|forum paris sportifs|forum sur les paris sportifs|forum tennis paris
sportif|francaise des jeux pari sportif|francaise des jeux paris sportif|francaise
des jeux paris sportifs|france 2 paris sportif|france 2
paris sportifs|france belgique paris sportif|france
espagne paris sportif|france pari sportif|france pari sportif brest|france
paris sportif|france paris sportifs|france pologne
paris sportif|france portugal paris sportif|france suisse paris sportifs|france tunisie paris sportifs|france-pari – paris sportifs|gagnant pari sportif|gagnant
paris sportif|gagnant paris sportif bayern|gagnante paris sportif|gagne au paris sportif|gagner 10 euros par jour aux paris
sportifs|gagner 100 euros par jour paris sportif|gagner 1000 euros par mois paris sportifs|gagner 10000 euros paris sportif|gagner 2000
euros par mois paris sportif|gagner 50 euros par jour paris sportif|gagner a coup sur au paris
sportif|gagner a coup sur pari sportif|gagner a tous les coup paris sportif|gagner argent
avec paris sportifs|gagner argent pari sportif|gagner argent paris sportif|gagner argent paris sportifs|gagner au pari sportif|gagner au
paris sportif|gagner au paris sportif a coup sur|gagner au paris sportif
foot|gagner au paris sportif forum|gagner au paris sportif à coup sur|gagner aux paris sportif|gagner aux paris sportifs|gagner aux
paris sportifs pdf|gagner beaucoup d’argent paris sportif|gagner de l argent grace
aux paris sportifs|gagner de l argent pari sportif|gagner de l argent paris sportif|gagner de l argent paris sportifs|gagner
de l’argent au paris sportif|gagner de l’argent aux paris sportifs|gagner de l’argent avec les paris sportifs|gagner de l’argent avec paris sportif|gagner de l’argent avec paris sportifs|gagner de l’argent grace au paris sportif|gagner de l’argent grace
aux paris sportifs|gagner de l’argent pari sportif|gagner de l’argent paris sportif|gagner de
l’argent paris sportifs|gagner de l’argent sur les paris sportifs|gagner des
paris sportif|gagner des paris sportifs|gagner les paris sportifs|gagner
pari sportif|gagner paris sportif|gagner paris sportif foot|gagner paris sportif
forum|gagner paris sportif tennis|gagner paris sportifs|gagner sa vie avec les
paris sportif|gagner sa vie avec les paris sportifs|gagner
sa vie avec paris sportifs|gagner ses paris sportifs|gagner à coup sur paris sportif|gagner à tous les coups paris sportifs|gain maximum paris sportif|gain pari sportif|gain pari sportif imposable|gain pari sportif
impot|gain paris sportif|gain paris sportif imposable|gain paris sportif impot|gain paris sportif impôt|gains paris
sportif|gains paris sportif imposable|gains paris sportifs|gains paris
sportifs imposable|gains paris sportifs imposables|gains paris sportifs
sont ils imposables|gerer bankroll paris sportif|gerer sa bankroll paris sportif|gerer une bankroll paris sportif|gestion bankroll paris sportif|gestion bankroll paris sportifs|gestion bankroll paris sportifs excel|gestion de bankroll
paris sportif|gestion de bankroll paris sportif application|gestion de bankroll
paris sportifs|gestion de mise paris sportif|gestion paris
sportifs v2 5 gratuit|gg signification paris sportif|gros
combiné paris sportif|gros gain paris sportif|grosse cote paris sportif pronostic|grosse
mise paris sportif|groupe paris sportif gratuit|groupe
telegram paris sportif gratuit|groupement de joueurs paris sportifs|handicap 0 paris sportif|handicap
1 paris sportif|handicap 5 paris sportif|handicap au paris sportif|handicap
basket paris sportif|handicap dans les paris sportifs|handicap en paris sportif|handicap europeen paris sportif|handicap européen paris sportifs|handicap
mi temps paris sportif|handicap pari sportif|handicap
paris sportif|handicap paris sportif basket|handicap paris sportif explication|handicap paris sportif foot|handicap paris
sportif rugby|handicap paris sportifs|handicap rugby paris sportif|handicap tennis paris sportif|historique cote paris sportif|historique des cotes paris sportifs|hockey
paris sportif|hockey sur glace paris sportif|hors arjel
paris sportif|hweh signification paris sportif|imposition gain pari sportif|imposition gain paris sportif|imposition gains paris sportifs|imposition paris sportif france|impot
gain paris sportif|impot paris sportif france|impot sur gain paris sportif|je gagne ma vie avec les paris
sportifs|jeu de pari sportif gratuit|jeu de paris sportif en ligne|jeu de paris sportif gratuit|jeu paris sportif gratuit|jeu paris
sportif sans argent|jeux de parie sportif|jeux de paris sportif|jeux de paris sportif en ligne|jeux de paris sportif gratuit|jeux de paris sportifs|jeux olympiques paris sportifs|jeux paris sportif|jeux
paris sportif gratuit|jeux paris sportif virtuel|jeux paris sportifs en ligne|jouer au
paris sportif|jouer paris sportif|joueur absent paris sportif|joueur blesse paris sportif|joueur
caen paris sportif|joueur de caen pari sportif|joueur de foot paris sportif|joueur decisif paris sportif|joueur décisif paris sportif|joueur italien paris sportif|joueur paris sportif|joueur professionnel paris sportif|joueur qui se blesse
paris sportif|joueur sanctionne pari sportif|joueur suspendu paris sportif|joueurs italiens paris sportifs|l’argent des paris sportifs est il
imposable|la cote paris sportif|la francaise
des jeux paris sportif|la martingale paris sportif|la martingale paris
sportifs|la meilleur application de paris sportif|la meilleur application paris sportif|la meilleur technique
pour gagner au paris sportif|la méthode secrète pour gagner aux
paris sportifs pdf|la plus grosse cote gagner paris sportif|la plus
grosse cote paris sportif|ldem paris sportif signification|le marché des paris sportifs|le meilleur site de
pari sportif|le meilleur site de paris sportif|le meilleur site de paris sportif en ligne|le meilleur
site de paris sportifs|le plus gros gain au paris sportif|le plus gros
paris sportif|le plus gros paris sportif du monde|les 10
meilleurs sites de paris sportifs|les 10 meilleurs
sites de paris sportifs en afrique|les 17 secrets pour gagner rapidement
aux paris sportifs|les 17 secrets pour gagner rapidement aux paris sportifs pdf|les application de paris sportif|les applications paris sportifs|les bonus paris sportifs|les
bookmakers paris sportifs|les cotes paris sportifs|les
gains de paris sportifs sont ils imposables|les gains des paris
sportifs sont ils imposables|les jeux de paris sportifs|les meilleur paris
sportif|les meilleures applications de paris sportifs|les meilleurs applications de paris sportifs|les meilleurs
bonus paris sportif|les meilleurs bonus paris sportifs|les meilleurs
cotes paris sportif|les meilleurs paris sportifs|les meilleurs paris sportifs du jour|les meilleurs
site de paris sportif|les meilleurs site de paris sportifs|les meilleurs sites de pari sportif|les meilleurs sites de
paris sportifs|les meilleurs sites de paris sportifs en ligne|les paris sportif|les paris sportif avis|les
paris sportifs|les paris sportifs comment ça marche|les paris sportifs en france|les paris sportifs en ligne|les paris
sportifs en ligne comprendre jouer gagner|les paris sportifs en ligne comprendre jouer gagner
pdf|les paris sportifs les plus rentables|les plus gros gagnant
paris sportif|les plus gros gains au paris sportifs|les plus gros gains paris sportifs|les plus gros paris sportif|les plus grosse cote paris sportif|les plus grosses pertes paris
sportifs|les sites de paris sportifs|les sites de paris sportifs autorisés
en france|les sites de paris sportifs en france|les sites de
paris sportifs en ligne|les sites de paris sportifs
francais|ligue 1 paris sportif|ligue 1 paris sportifs|ligue 2 paris sportif|ligue des champions
paris sportif|limite de gains paris sportifs|limite de mise paris sportif|limite gain paris sportif|limite mise paris sportifs|liste de
paris sportif|liste des paris sportifs|liste des site de paris sportif|liste des sites de
paris sportifs|liste pari sportif|liste paris sportif|liste paris
sportif pdf|liste site de paris sportif|liste site pari sportif|liste site
paris sportif|liste site paris sportif arjel|liste sites paris sportifs|logiciel algorithme
paris sportif|logiciel algorithme paris sportif gratuit|logiciel analyse paris sportif|logiciel calcul paris sportif|logiciel de pari sportif|logiciel de paris sportif|logiciel de paris sportif
gratuit|logiciel gestion bankroll paris sportif gratuit|logiciel gestion de bankroll paris
sportif|logiciel gestion paris sportif|logiciel gestion paris sportif gratuit|logiciel
gestion paris sportifs|logiciel pari sportif|logiciel paris sportif|logiciel paris sportif
gratuit|logiciel paris sportifs|logiciel
paris sportifs foot sur 2 matchs|logiciel pour paris sportif|logiciel pour paris sportifs|logiciel prediction paris sportif|logiciel probabilité paris sportif|logiciel prédiction paris sportif|logiciel statistique paris
sportifs|logiciel variation de cote paris sportif|loi sur
les paris sportifs en france|magic calculator paris sportif|marché des paris sportifs|marché des paris sportifs en france|marché des paris sportifs en ligne|martingale pari
sportif|martingale paris sportif|martingale paris sportif excel|martingale
paris sportif forum|martingale paris sportif interdit|martingale paris sportifs|match
abandonné paris sportif|match annulé ou reporté
paris sportifs|match annulé paris sportif|match arrete paris sportif|match interrompu paris sportif|match interrompu
tennis paris sportif|match interrompu tennis pluie paris sportif|match nul boxe paris
sportif|match pari sportif|match paris sportif|match reporté paris sportif|match suspendu
paris sportif|match suspendu tennis paris sportif|match truqué paris sportif|matchs truqués
paris sportifs|meilleur algorithme paris sportif|meilleur algorithme paris sportif gratuit|meilleur app
de paris sportif|meilleur app de paris sportifs|meilleur app paris sportif|meilleur appli de pari
sportif|meilleur appli de paris sportif|meilleur
appli pari sportif|meilleur appli paris sportif|meilleur appli paris sportif forum|meilleur appli paris
sportifs|meilleur application conseil paris sportif|meilleur
application de paris sportif|meilleur application de
paris sportif en afrique|meilleur application pari sportif|meilleur
application paris sportif|meilleur application paris sportif belgique|meilleur application pour les paris sportif|meilleur application pour pari sportif|meilleur bonus de bienvenue paris sportif|meilleur bonus pari sportif|meilleur bonus paris sportif|meilleur bonus paris sportif sans
depot|meilleur bonus paris sportifs|meilleur bonus site de paris sportif|meilleur bonus site pari sportif|meilleur bonus site paris sportif|meilleur bookmaker paris sportif|meilleur combiné paris sportif|meilleur conseil paris sportif|meilleur cote de paris sportif|meilleur cote pari sportif|meilleur cote paris sportif|meilleur cote paris sportif aujourd’hui|meilleur cote site paris sportif|meilleur
forum paris sportifs|meilleur gain paris sportif|meilleur
ia paris sportif|meilleur methode pour gagner au paris sportif|meilleur offre bienvenue paris sportif|meilleur offre bonus paris sportif|meilleur
offre de bienvenue paris sportif|meilleur offre de bienvenue paris sportifs|meilleur offre pari sportif|meilleur
offre paris sportif|meilleur offre paris sportif en ligne|meilleur pari
sportif|meilleur pari sportif du jour|meilleur
pari sportif en ligne|meilleur paris sportif|meilleur paris
sportif aujourd’hui|meilleur paris sportif du jour|meilleur paris
sportif en ligne|meilleur paris sportif foot|meilleur promo paris sportif|meilleur pronostic paris
sportif|meilleur site de conseil paris sportif|meilleur site
de pari sportif|meilleur site de pari sportif en ligne|meilleur site de paris sportif|meilleur site de
paris sportif avis|meilleur site de paris sportif belgique|meilleur site de paris sportif canada|meilleur
site de paris sportif en france|meilleur site de paris
sportif en ligne|meilleur site de paris sportif football|meilleur site de
paris sportif forum|meilleur site de paris sportif france|meilleur site de
paris sportif hors arjel|meilleur site de paris sportif international|meilleur site de paris sportif suisse|meilleur site de paris sportifs|meilleur site de paris sportifs en ligne|meilleur site pari sportif|meilleur site
pari sportif en ligne|meilleur site pari sportif france|meilleur site paris sportif|meilleur site paris sportif avis|meilleur site paris sportif belgique|meilleur site paris sportif canada|meilleur site paris
sportif en ligne|meilleur site paris sportif foot|meilleur site paris sportif forum|meilleur site paris sportif
france|meilleur site paris sportif hors arjel|meilleur
site paris sportif nba|meilleur site paris sportif rugby|meilleur site paris sportif suisse|meilleur site paris sportifs|meilleur site pour pari sportif|meilleur site pour paris sportif|meilleur site pronostic paris sportif|meilleur strategie paris sportif|meilleur technique de paris sportif|meilleur
technique paris sportif|meilleur technique pour gagner au paris sportif|meilleure
appli de paris sportif|meilleure appli de paris sportifs|meilleure appli pari sportif|meilleure
appli paris sportif|meilleure appli paris sportifs|meilleure
application de paris sportif|meilleure application de paris
sportifs|meilleure application pari sportif|meilleure application paris sportif|meilleure application paris sportif android|meilleure
application paris sportifs|meilleure offre paris sportif|meilleure
site paris sportif|meilleure strategie paris sportif|meilleures applications de paris
sportifs|meilleures applications paris sportifs|meilleures cotes paris sportifs|meilleures offres paris sportifs|meilleures
stratégies paris sportifs|meilleurs appli paris sportif|meilleurs application de paris sportifs|meilleurs
application paris sportif|meilleurs applications paris sportifs|meilleurs bonus
paris sportifs|meilleurs cote paris sportif|meilleurs cotes paris sportifs|meilleurs offres
paris sportifs|meilleurs paris sportifs|meilleurs paris sportifs du jour|meilleurs
site de pari sportif|meilleurs site de paris sportif|meilleurs site de paris sportif en ligne|meilleurs site
de paris sportifs|meilleurs site paris sportif|meilleurs sites de paris sportifs|meilleurs sites de
paris sportifs en ligne|meilleurs sites paris sportif|meilleurs sites paris sportifs|methode abc paris sportif|methode
de paris sportif|methode gagnante paris sportifs|methode gagner paris sportif|methode infaillible paris sportifs|methode martingale paris sportif|methode mathematique paris sportif|methode
mathematique pour gagner au paris sportif|methode paris sportif|methode paris sportif
foot|methode paris sportif forum|methode paris sportif tennis|methode paris sportifs|methode pour gagner au paris sportif|methode pour
gagner paris sportif|methodes paris sportifs|minimum depot paris sportif|mise au jeu pari
sportif|mise maximum pari sportif|mise maximum paris sportif|mise minimum
paris sportif|mise moyenne paris sportif|mise paris sportif|moins de 4 5 but paris sportif|montant maximum paris sportif|montant
paris sportif|montante pari sportif|montante parie sportif|montante paris sportif|montante paris sportifs|montantes
paris sportifs|multiple pari sportif|multiple paris sportif|multiple paris sportifs|multiples paris sportifs|méthode calcul paris sportif|méthode match nul paris sportifs|méthode mathématique pour gagner au paris sportif|méthode paris sportif forum|méthode paris sportif hockey|nba pari sportif|nba
paris sportif|nba paris sportifs|nouveau paris sportif|nouveau site de pari sportif|nouveau site de paris sportif|nouveau site de
paris sportif en ligne|nouveau site de paris sportifs|nouveau site pari sportif|nouveau site paris
sportif|nouveau site paris sportif france|nouveau site paris sportifs|nouveaux sites de paris sportifs|nouveaux sites paris
sportifs|nouvelle appli paris sportif|nouvelle application de
paris sportif|numero de match paris sportif|numero
match paris sportif|offre 100 euros paris sportif|offre appli pari sportif|offre bienvenu paris
sportif|offre bienvenue pari sportif|offre bienvenue paris sportif|offre bienvenue
paris sportifs|offre bienvenue site paris sportif|offre bonus paris
sportif|offre de bienvenu paris sportif|offre de bienvenue pari sportif|offre de bienvenue paris sportif|offre de bienvenue paris sportif belgique|offre de bienvenue paris sportif
sans depot|offre de bienvenue paris sportif sans dépôt|offre de bienvenue paris
sportifs|offre de bienvenue sans depot paris sportif|offre de bienvenue site paris sportif|offre
euro paris sportif|offre pari sportif euro|offre paris sportif|offre
paris sportif belgique|offre paris sportif cash|offre paris sportif coupe du
monde|offre paris sportif hors arjel|offre paris
sportif remboursé|offre paris sportif remboursé cash|offre paris sportif sans depot|offre promo paris
sportif|offre remboursement paris sportif|offre sans depot paris
sportif|offre site paris sportif|offres bienvenue paris sportifs|offres de
bienvenue paris sportifs|ou faire des paris sportif|ou faire des paris sportif en espagne|ou faire des paris sportifs|outil répartiteur de mise paris sportif|outils repartiteur de mises paris sportif|ouverture compte paris sportifs|ouvrir un compte paris sportif|pack de bienvenue paris sportif|pack de bienvenue paris sportif hors arjel|pari en ligne sportif|pari sportif|pari sportif
100 euros offert|pari sportif 100 remboursé|pari sportif abandon tennis|pari sportif aide|pari sportif algérie aujourd’hui|pari sportif appli|pari sportif application|pari sportif argent|pari sportif astuce|pari sportif aujourd|pari sportif aujourd’hui|pari sportif
avec handicap|pari sportif avec orange money|pari sportif
avec paypal|pari sportif avec wave|pari sportif avis|pari sportif basket|pari sportif
belgique|pari sportif belgique france|pari sportif bonus|pari sportif buteur pas
titulaire|pari sportif champions league|pari sportif combiné|pari sportif comment|pari sportif comment gagner|pari sportif
comment ça marche|pari sportif comparatif|pari sportif conseil|pari
sportif cote|pari sportif cote match|pari sportif cote psg|pari sportif coupe|pari sportif coupe de france|pari sportif coupe du monde|pari sportif depot|pari sportif du
jour|pari sportif en france|pari sportif en ligne|pari sportif en ligne au cameroun|pari sportif en ligne belgique|pari sportif en ligne
canada|pari sportif en ligne france|pari sportif en ligne gratuit|pari sportif en ligne suisse|pari sportif en ligne ufc|pari sportif en suisse|pari sportif euro|pari sportif explication|pari sportif faire|pari sportif foot|pari
sportif foot resultat|pari sportif football|pari sportif forum|pari sportif francaise
des jeux|pari sportif france|pari sportif france angleterre|pari sportif france
argentine|pari sportif france autriche|pari sportif france belgique|pari sportif france
espagne|pari sportif france italie|pari sportif france portugal|pari sportif
france usa|pari sportif gagnant|pari sportif gagner|pari sportif gagner a
tous les coups|pari sportif gagner de l’argent|pari
sportif gain|pari sportif gratuit|pari sportif gratuit pour gagner des cadeaux|pari sportif gratuit sans depot|pari sportif handicap|pari sportif hockey|pari sportif
hors arjel|pari sportif jeux olympiques|pari sportif
joueur absent|pari sportif le plus rentable|pari
sportif leicester champion|pari sportif ligue 1|pari sportif ligue 2|pari sportif ligue des champions|pari sportif ligue europa|pari sportif match|pari sportif match arrete|pari sportif match interrompu|pari sportif meilleur|pari
sportif meilleur cote|pari sportif meilleur site|pari
sportif methode|pari sportif mise|pari sportif mise
au jeu|pari sportif mise o jeu|pari sportif nba|pari sportif offre bienvenue|pari sportif paypal|pari
sportif plus|pari sportif prolongation|pari sportif promo|pari
sportif pronostic|pari sportif pronostic foot|pari sportif pronostic gagnant|pari sportif pronostic gratuit|pari sportif psg|pari sportif
psg bayern|pari sportif psg inter|pari sportif psg milan|pari sportif regle|pari sportif rembourse|pari
sportif remboursement|pari sportif remboursement cash|pari sportif remboursé|pari sportif rugby|pari sportif rugby coupe du monde|pari sportif rugby top 14|pari sportif sans argent|pari sportif sans carte bancaire|pari sportif sans depot|pari sportif signification|pari sportif site|pari sportif statistique|pari sportif suisse|pari
sportif systeme|pari sportif technique|pari sportif technique pour gagner|pari sportif temps reglementaire|pari
sportif tennis|pari sportif tennis abandon|pari sportif top|pari sportif top 14|pari sportif tour de france|parie sportif|parie sportif comment
ca marche|parie sportif du jour|parie sportif en ligne|parie sportif foot|parie sportif
football|parie sportif france|parie sportif gratuit|parie
sportif pronostic|parie sportif suisse|paris en ligne sportif|paris en ligne sportifs|paris evenement sportif|paris france sportif|paris hippique
et sportif|paris hippiques et sportifs|paris
hippiques paris sportifs|paris hippiques paris sportifs et poker en ligne|paris hippiques sportifs|paris match
sportif|paris sportif|paris sportif 10 euros offerts|paris sportif 100 euros offert|paris sportif 100 euros remboursé|paris sportif
100 offert|paris sportif 100 remboursé|paris sportif
100e offert|paris sportif 150 euros offert|paris sportif 1er pari remboursé|paris sportif
a faire|paris sportif a faire aujourd’hui|paris sportif a faire ce soir|paris
sportif abandon tennis|paris sportif abandon tennis parions sport|paris sportif aide|paris sportif algorithme|paris sportif analyse|paris sportif appli|paris sportif application|paris sportif
application android|paris sportif apres prolongation|paris sportif argent|paris sportif argent fictif|paris sportif argent
offert|paris sportif argent virtuel|paris sportif arjel|paris sportif arsenal psg|paris sportif astuce|paris
sportif au canada|paris sportif aujourd hui|paris sportif aujourd’hui|paris sportif avec argent fictif|paris
sportif avec bonus sans depot|paris sportif avec carte bancaire|paris
sportif avec cryptomonnaie|paris sportif avec handicap|paris sportif avec paypal|paris sportif avec paysafecard|paris
sportif avis|paris sportif avis expert|paris sportif avis forum|paris sportif bankroll|paris sportif basket|paris sportif basket
coupe de france|paris sportif basket nba|paris sportif basket
prolongation|paris sportif belgique|paris sportif belgique bonus|paris sportif belgique
bonus sans depot|paris sportif belgique france|paris sportif belgique suede|paris sportif
bonus|paris sportif bonus bienvenue|paris sportif bonus cash|paris sportif bonus
de bienvenue|paris sportif bonus gratuit|paris sportif bonus gratuit sans depot|paris sportif
bonus retirable|paris sportif bonus sans depot|paris
sportif bonus sans depot belgique|paris sportif bookmaker|paris sportif but contre son camp|paris sportif but temps additionnel|paris
sportif buteur|paris sportif buteur blessé|paris sportif buteur carton rouge|paris sportif buteur contre son camp|paris sportif buteur non titulaire|paris sportif buteur prolongation|paris sportif buteur qui ne
joue pas|paris sportif buteur remplacant|paris sportif calcul gain|paris sportif canada|paris sportif
cash|paris sportif cash out|paris sportif champion ligue 1|paris sportif champions league|paris sportif
classement ligue 1|paris sportif code promo|paris sportif combine|paris sportif combiné|paris sportif combiné comment ça marche|paris
sportif combiné du jour|paris sportif combiné match reporté|paris sportif comment ca marche|paris sportif comment faire|paris sportif comment gagner|paris
sportif comment gagner a tous les coups|paris sportif comment jouer|paris sportif comment ça
marche|paris sportif comparateur cote|paris sportif comparatif|paris sportif conseil|paris sportif conseil gratuit|paris
sportif conseil pour gagner|paris sportif cote|paris sportif cote et match|paris sportif cote explication|paris sportif cote
psg|paris sportif coupe d’europe|paris sportif coupe davis|paris sportif coupe de france|paris sportif coupe du monde|paris sportif coupe du monde de rugby|paris sportif coupe du monde rugby|paris sportif depot 5 euro|paris sportif depot minimum|paris sportif
depot paypal|paris sportif dnb|paris sportif du jour|paris sportif du jour conseil|paris
sportif dépôt 1 euro|paris sportif dépôt minimum 5 euros|paris sportif en belgique|paris sportif en france|paris sportif
en ligne|paris sportif en ligne avec paypal|paris sportif en ligne
avis|paris sportif en ligne belgique|paris sportif en ligne bonus|paris
sportif en ligne cameroun|paris sportif en ligne
comment gagner|paris sportif en ligne comment ça marche|paris
sportif en ligne france|paris sportif en ligne gratuit|paris
sportif en ligne maroc|paris sportif en ligne paypal|paris sportif en ligne québec|paris sportif en ligne sans
depot|paris sportif en ligne suisse|paris sportif en suisse|paris sportif espagne france|paris sportif esport|paris sportif
et casino en ligne|paris sportif et hippique|paris sportif et prolongation|paris sportif euro|paris sportif
europa league|paris sportif explication|paris
sportif final ligue des champions|paris sportif finale ligue des champions|paris
sportif foot|paris sportif foot aide|paris sportif foot astuce|paris sportif foot aujourd’hui|paris sportif foot ce
soir|paris sportif foot comment ca marche|paris sportif foot conseil|paris sportif
foot cote|paris sportif foot coupe du monde|paris sportif foot en ligne|paris sportif foot feminin|paris sportif foot
gratuit|paris sportif foot prolongation|paris sportif foot pronostic|paris sportif foot pronostic
gratuit|paris sportif foot regle|paris sportif foot suisse|paris sportif foot us|paris sportif football|paris sportif
football americain|paris sportif football astuces|paris sportif forfait tennis|paris sportif forum|paris sportif francais|paris sportif francaise des
jeux|paris sportif france|paris sportif france 2|paris sportif france allemagne|paris sportif france angleterre|paris sportif france argentine|paris
sportif france autriche|paris sportif france belgique|paris sportif france espagne|paris sportif france gibraltar|paris sportif france italie|paris sportif france nouvelle zelande|paris
sportif france pologne|paris sportif france portugal|paris sportif france uruguay|paris sportif france usa|paris sportif
freebet sans depot|paris sportif gagnant|paris sportif gagnant à coup sûr|paris
sportif gagner a coup sur|paris sportif gagner argent|paris sportif gagner de l’argent|paris
sportif gain|paris sportif gain maximum|paris sportif gestion bankroll|paris sportif gratuit|paris sportif gratuit appli|paris sportif gratuit avec
cadeaux|paris sportif gratuit cadeaux|paris sportif gratuit en ligne|paris sportif gratuit entre amis|paris sportif gratuit sans argent|paris sportif gratuit sans depot|paris sportif gratuit sans dépôt|paris sportif gratuits|paris
sportif gros gain|paris sportif handicap|paris sportif handicap 0 1|paris
sportif handicap 0-1|paris sportif handicap 1 0|paris sportif handicap
1-0|paris sportif handicap basket|paris sportif handicap explication|paris sportif handicap foot|paris sportif handicap rugby|paris sportif hippique|paris sportif hockey|paris sportif hockey nhl|paris sportif hockey sur glace|paris sportif hors arjel|paris
sportif hors arjel france|paris sportif jeux
olympiques|paris sportif jeux video|paris sportif joueur blessé|paris sportif
joueur blessé pendant le match|paris sportif joueur de foot|paris sportif joueur decisif|paris sportif joueur
declare forfait|paris sportif joueur déclare forfait|paris sportif joueur remplacant|paris sportif
la francaise des jeux|paris sportif le plus rentable|paris sportif legal
en france|paris sportif leicester champion|paris sportif les
18 stratégies pour gagner tous les jours|paris sportif les plus sur|paris sportif les prolongation compte|paris sportif ligne|paris sportif ligue 1|paris sportif ligue 2|paris sportif ligue
des champions|paris sportif ligue des nations|paris sportif ligue europa|paris sportif
liste|paris sportif martingale|paris sportif match|paris sportif match abandonné|paris
sportif match annulé|paris sportif match arrêté|paris sportif match du jour|paris sportif match interrompu|paris sportif match reporté|paris sportif match suspendu|paris sportif match tennis interrompu|paris sportif match truqué|paris sportif meilleur bonus|paris sportif meilleur cote|paris sportif meilleur pronostic|paris sportif meilleur
site|paris sportif methode|paris sportif methode 2 3|paris sportif mi temps fin de match|paris
sportif mise au jeu|paris sportif mise maximum|paris sportif mma
france|paris sportif moins de 3.5 but|paris sportif montante|paris
sportif moto gp|paris sportif multiple|paris sportif multiple
2 3|paris sportif multiple 2 3 explication|paris sportif multiple 2 4|paris sportif multiple
2 5|paris sportif multiple 2/3 explication|paris sportif multiple 3 4|paris sportif multiple explication|paris sportif national 1 foot|paris sportif
nba|paris sportif nba conseil|paris sportif nba pronostic|paris sportif
nhl|paris sportif nombre de but|paris sportif nouveau site|paris sportif numero match|paris sportif offert|paris sportif offre
bienvenue|paris sportif offre bienvenue sans depot|paris sportif offre de bienvenue|paris sportif
offre sans depot|paris sportif om psg|paris sportif paypal|paris
sportif plus de 1.5 but|paris sportif plus de 2 5 but|paris
sportif plus ou moins|paris sportif plus ou moins 2 5 but|paris sportif premier pari remboursé|paris sportif premier paris remboursé|paris sportif prolongation|paris sportif prolongation basket|paris sportif prolongation foot|paris sportif promo|paris sportif pronostic|paris sportif pronostic basket|paris
sportif pronostic des match aujourd hui|paris sportif pronostic expert
gratuit|paris sportif pronostic foot|paris sportif pronostic forum|paris
sportif pronostic gratuit|paris sportif pronostic tennis|paris sportif psg|paris sportif psg arsenal|paris sportif
psg barcelone|paris sportif psg bayern|paris sportif
psg dortmund|paris sportif psg inter|paris sportif psg inter cote|paris sportif
psg liverpool|paris sportif psg om|paris sportif qr
code|paris sportif que veut dire handicap|paris
sportif qui rapporte le plus|paris sportif regle|paris sportif regle prolongation|paris
sportif rembourse|paris sportif remboursement cash|paris sportif rembourser|paris sportif remboursé|paris sportif remboursé cash|paris sportif
remboursé en cash|paris sportif retrait paypal|paris sportif rue des joueurs|paris sportif rugby|paris sportif rugby
6 nations|paris sportif rugby coupe du monde|paris sportif rugby
top 14|paris sportif safe du jour|paris sportif sans argent|paris sportif sans carte bancaire|paris
sportif sans carte d’identité|paris sportif sans compte
bancaire|paris sportif sans depot|paris sportif sans depot minimum|paris sportif si match suspendu|paris sportif si un joueur abandonne|paris sportif si un joueur ne joue pas|paris sportif si un joueur se blesse|paris sportif simple ou combiné|paris sportif
site|paris sportif statistique|paris sportif stratégie|paris sportif
suisse|paris sportif suisse application|paris sportif suisse en ligne|paris sportif suisse legal|paris sportif suisse légal|paris sportif suisse romande|paris sportif sur
du jour|paris sportif sur le tennis|paris sportif systeme|paris sportif systeme 2 3|paris sportif
systeme 2 4|paris sportif systeme 2/3|paris sportif systeme 2/4|paris sportif systeme 3 4|paris sportif systeme 3/4|paris sportif systeme explication|paris sportif
technique|paris sportif technique pour gagner|paris sportif temps additionnel|paris
sportif temps reglementaire|paris sportif tennis|paris sportif tennis abandon|paris sportif tennis conseil|paris sportif
tennis de table|paris sportif tennis forfait|paris sportif tennis gratuit|paris
sportif tennis pronostic|paris sportif tennis roland garros|paris sportif
tir au but|paris sportif top 14|paris sportif tour de france|paris sportif ufc|paris sportif ufc france|paris sportif
unibet|paris sportif vainqueur euro|paris sportif vainqueur ligue 1|paris sportif vainqueur ligue des
champions|paris sportif via paypal|paris sportif
victoire prolongation|paris sportif vip gratuit|paris sportifs|paris sportifs abandon tennis|paris sportifs aide|paris sportifs analyser
un match|paris sportifs arjel|paris sportifs astuces|paris sportifs aujourd’hui|paris sportifs autorisés en france|paris sportifs avec paypal|paris sportifs basket|paris sportifs belgique|paris sportifs bonus|paris sportifs bookmakers|paris sportifs canada|paris sportifs
combiné|paris sportifs comparateur|paris sportifs comparatif|paris sportifs
conseils|paris sportifs cotes|paris sportifs coupe du monde|paris sportifs de football|paris sportifs du jour|paris
sportifs en belgique|paris sportifs en france|paris sportifs en ligne|paris sportifs en ligne belgique|paris sportifs en ligne france|paris
sportifs en ligne gratuit|paris sportifs en ligne suisse|paris sportifs en suisse|paris sportifs et hippiques|paris sportifs euro|paris sportifs foot|paris sportifs
foot us|paris sportifs forum|paris sportifs france|paris sportifs france espagne|paris sportifs gagner
à tous les coups|paris sportifs gratuit|paris sportifs
gratuits|paris sportifs gratuits en ligne|paris sportifs handicap|paris sportifs hockey|paris sportifs hockey sur galce|paris sportifs hockey sur glace|paris sportifs hors
arjel|paris sportifs jeux olympiques|paris sportifs les bookmakers
raflent la mise|paris sportifs ligne|paris
sportifs ligue 1|paris sportifs ligue 2|paris sportifs ligue des champions|paris sportifs ligue europa|paris sportifs match interrompu|paris sportifs montante|paris sportifs nba|paris
sportifs offre bienvenue|paris sportifs offre
de bienvenue|paris sportifs paypal|paris sportifs pronostics|paris sportifs
psg|paris sportifs psg inter|paris sportifs rugby|paris sportifs sans argent|paris sportifs
sans depot|paris sportifs site|paris sportifs sites|paris sportifs statistiques|paris sportifs stratégie|paris sportifs suisse|paris sportifs technique|paris sportifs techniques|paris sportifs tennis|paris sportifs tennis astuces|paris
sportifs top 14|paris sportifs tour de france|part de marché
paris sportifs|paypal pari sportif|paypal paris
sportif|paypal paris sportifs|perte d’argent paris sportifs|peut on devenir riche avec les paris sportifs|peut on gagner de l’argent avec les paris sportifs|peut on gagner sa vie avec les paris sportif|peut
on vraiment gagner de l’argent avec les paris sportifs|plus gros combine paris sportif|plus gros gagnant paris sportif|plus gros gain paris sportif|plus gros gain paris sportif au monde|plus gros gain paris sportif france|plus
gros gains paris sportif|plus gros pari sportif|plus
gros paris sportif|plus grosse cote gagner paris sportif|plus
grosse cote pari sportif|plus grosse cote paris sportif|plus
grosse mise paris sportif|plus grosse somme gagner au paris
sportif|plus ou moins paris sportif|pourcentage de mise paris sportif|premier
pari sportif remboursé|probabilité cote paris sportif|probabilité paris sportif
combiné|prolongation basket paris sportif|prolongation paris
sportif|promo pari sportif|promo paris sportif|promo site de paris sportif|promo site pari
sportif|promo site paris sportif|promos paris sportifs|prono paris sportif foot|prono paris sportif
gratuit|prono paris sportif tennis|pronostic de paris sportif|pronostic du jour paris sportif|pronostic foot paris sportif|pronostic gratuit paris sportif|pronostic pari sportif|pronostic pari sportif gratuit|pronostic paris sportif|pronostic paris
sportif aujourd’hui|pronostic paris sportif du jour|pronostic paris
sportif foot|pronostic paris sportif gratuit|pronostic paris
sportif tennis|pronostic paris sportifs|pronostics foot
statistiques et aides aux paris sportifs|pronostics paris sportif|pronostics paris sportifs|pronostiqueur paris sportif gratuit|psg arsenal paris sportif|psg bayern paris sportif|psg inter milan paris sportif|psg inter pari sportif|psg inter paris sportif|psg liverpool paris
sportif|psg om paris sportif|psg paris sportif|psg paris sportifs|qr code paris sportif|qu est ce qu un handicap paris sportif|qu est ce
que handicap dans les paris sportif|qu’est ce qu’un handicap paris
sportif|qu’est ce que handicap dans les paris sportif|quand un joueur se blesse paris sportif|que signifie 1/1 en paris sportif|que signifie 1/2 paris sportif|que signifie 12 en paris sportif|que signifie 1×2 dans les paris sportifs|que
signifie btts en paris sportif|que signifie dnb en paris sportif|que signifie draw en paris sportif|que signifie ft en paris sportif|que signifie
gg dans le pari sportif|que signifie gg en pari sportif|que signifie gg en paris sportif|que signifie
handicap dans les paris sportifs|que veut dire dnb en paris sportif|que veut dire handicap dans les paris sportifs|que veut dire handicap paris sportif|quel appli pari sportif|quel cote jouer paris sportif|quel
est la meilleur appli de paris sportif|quel est le meilleur
algorithme de paris sportif|quel est le meilleur site de pari
sportif|quel est le meilleur site de pari sportif en ligne|quel est le meilleur site de paris sportif|quel est le meilleur
site de paris sportif en ligne|quel est le meilleur site de paris sportifs en ligne|quel est
le pari sportif le plus rentable|quel pari sportif est le plus rentable|quel pari sportif est le plus sûr|quel pari sportif faire aujourd’hui|quel paris sportif faire aujourd’hui|quel paris sportif rapporte le
plus|quel site de paris sportif choisir|quel site de paris sportif rembourse en cash|quel type de pari sportif
est le plus rentable|quelle application pour
paris sportifs|quelle est la meilleure appli de
paris sportif|quelle est la meilleure application de paris sportif|quelle est la meilleure application pour les paris sportifs|quelle est le meilleur site de paris sportif|quels paris sportifs faire|quels
sont les paris sportifs les plus sûrs|rebond
basket paris sportif|record de gain paris sportif|regle buteur paris sportif|regle de paris sportif|regle des paris
sportif|regle handicap paris sportif|regle handicap paris sportif foot|regle multiple paris sportif|regle pari sportif|regle paris sportif|regle paris sportif foot|regle paris sportif multiple|regle paris sportif prolongation|reglement pari
sportif|reglement paris sportif|regles paris sportifs|remboursement cash paris sportif|remboursement en cash paris sportif|remboursement pari sportif|remboursement paris sportif|repartiteur de mise paris
sportif|repartiteur de mise paris sportifs|repartiteur de mises
paris sportif|repartiteur mise paris sportif|repartition des mises paris sportif|resultat pari sportif|resultat paris sportif|resultat paris
sportif en direct|resultat paris sportif foot|resultat sportif
hockey|retirer argent paris sportif|rugby pari sportif|rugby paris sportif|règle paris sportif prolongation|règles paris sportif|répartiteur
de mise pari sportif|répartiteur de mise paris sportif|répartiteur de mise paris sportifs|répartition des mises paris sportif|résultat paris sportif
foot|sans depot paris sportif|se faire interdire de paris sportifs|signification btts paris
sportif|signification dnb paris sportif|signification handicap paris sportif|simulateur de gain paris sportif|simulateur gain paris sportif|simulateur gain paris sportif multiple|simulateur gain paris sportif systeme|simulateur gain paris sportif système|simulateur montante paris sportif|simulateur paris sportif multiple|simulateur systeme paris sportif|simulation paris
sportif gratuit|site aide paris sportif|site analyse paris
sportif|site analyser paris sportif|site arjel paris sportif|site
conseil paris sportif|site d’analyse de paris sportifs|site d’analyse paris sportif|site de
conseil paris sportif|site de pari en ligne sportif|site de pari sportif|site de pari sportif avec bonus sans depot|site de pari sportif bonus sans depot|site de pari sportif canada|site de pari sportif
en ligne|site de pari sportif francais|site de pari sportif
gratuit|site de pari sportif hors arjel|site de pari sportif suisse|site de parie sportif|site de parie sportif en ligne|site de paris en ligne
sportif|site de paris sportif|site de paris sportif acceptant paypal|site de paris sportif arjel|site de paris sportif autorisé en france|site de paris sportif autorisé en suisse|site de paris
sportif avec bonus|site de paris sportif avec bonus sans depot|site
de paris sportif avec bonus sans dépôt|site de paris
sportif avec neosurf|site de paris sportif avec paiement mobile|site de paris sportif avec
paypal|site de paris sportif avis|site de paris sportif belge avec bonus|site
de paris sportif belgique|site de paris sportif bonus|site de paris sportif bonus sans depot|site
de paris sportif canada|site de paris sportif comparatif|site de paris sportif depot minimum|site
de paris sportif en france|site de paris sportif en ligne|site de paris sportif en ligne
suisse|site de paris sportif football|site de paris sportif
francais|site de paris sportif france|site de paris sportif gratuit|site de paris sportif gratuit pour gagner des cadeaux|site de paris
sportif gratuit sans dépôt|site de paris sportif hors arjel|site de paris sportif le plus fiable|site de paris
sportif legal en france|site de paris sportif meilleur cote|site de paris sportif nouveau|site de paris sportif offre de bienvenue|site de paris sportif
paypal|site de paris sportif premier paris remboursé|site de paris sportif
qui accepte paypal|site de paris sportif qui rembourse en cash|site de paris sportif remboursé|site de paris sportif sans argent|site de paris sportif
sans carte bancaire|site de paris sportif sans carte
d’identité|site de paris sportif sans depot|site de paris sportif
suisse|site de paris sportifs|site de paris sportifs avec paypal|site
de paris sportifs en ligne|site de paris sportifs francais|site de paris sportifs gratuit|site de paris sportifs paypal|site de paris sportifs suisse|site de statistique pour paris
sportif|site des paris sportifs|site pari en ligne
sportif|site pari sportif|site pari sportif 100 euros offert|site pari sportif arjel|site pari sportif belgique|site pari sportif bonus|site pari sportif canada|site pari sportif comparatif|site pari sportif
en ligne|site pari sportif france|site pari sportif gratuit|site pari
sportif hors arjel|site pari sportif suisse|site
parie sportif|site paris en ligne sportif|site paris
sportif|site paris sportif 100 euros offert|site paris sportif 100 euros remboursé|site paris sportif 1er paris remboursé|site paris sportif
arjel|site paris sportif autorisé en france|site paris sportif avec
bonus|site paris sportif avec bonus sans depot|site paris sportif avec meilleur cote|site paris sportif belgique|site paris sportif bonus|site paris sportif bonus cash|site
paris sportif bonus sans depot|site paris
sportif canada|site paris sportif comparatif|site paris sportif depot
5 euro|site paris sportif en ligne|site paris sportif foot|site paris sportif france|site paris sportif gratuit|site paris sportif hors arjel|site paris sportif hors arjel
france|site paris sportif meilleur cote|site paris sportif nouveau|site paris sportif offre
de bienvenue|site paris sportif paypal|site paris sportif remboursement cash|site paris sportif remboursé en cash|site paris sportif retrait instantané|site paris sportif sans carte bancaire|site paris sportif sans depot|site paris sportif suisse|site paris sportifs|site paris sportifs belgique|site paris sportifs en ligne|site paris sportifs
france|site paris sportifs hors arjel|site paris sportifs suisse|site pour analyse paris sportif|site pour paris sportif|site pronostic paris sportif|site statistique paris sportif|site suisse paris
sportif|sites de pari sportif|sites de paris sportif|sites de paris sportifs|sites de paris sportifs arjel|sites de paris sportifs autorisés en france|sites de paris
sportifs belgique|sites de paris sportifs bonus|sites de paris sportifs en belgique|sites de paris sportifs en france|sites de paris
sportifs en ligne|sites de paris sportifs gratuits|sites de paris sportifs gratuits sans dépôt|sites de paris sportifs suisse|sites pari sportif|sites paris sportif|sites paris sportifs|sites paris sportifs arjel|sites
paris sportifs belgique|sites paris sportifs france|sites paris sportifs hors arjel|sites paris sportifs suisse|so
foot paris sportif|so foot paris sportifs|specialiste tennis paris sportif|statistique foot paris sportif|statistique paris sportif|statistique paris sportif foot|statistique
tennis paris sportif|statistiques football paris sportifs|statistiques paris sportifs|strategie
de paris sportif|stratégie big whale paris sportif|stratégie de paris sportifs|stratégie gagnante paris sportifs|stratégie pari sportif|stratégie paris
sportif|stratégie paris sportifs|stratégie paris sportifs forum|stratégie pour
gagner au paris sportif|stratégies paris sportifs|suisse paris sportif|suisse
paris sportifs|systeme 2 3 paris sportif|systeme 3 4 paris sportif|systeme
de cote paris sportif|systeme de paris sportif|systeme pari sportif|systeme
paris sportif|systeme paris sportifs|systeme reducteur paris sportif|système paris sportif|tableau bankroll paris sportif|tableau cote paris sportif|tableau de
paris sportif|tableau de suivi paris sportifs|tableau excel bankroll paris sportif|tableau excel
paris sporti
aposta ganhar
Also visit my page – sistema de apostas hoje (http://Www.Excellence-Research.com)
live Wedden op snooker golf
online casino mit handyguthaben einzahlung
Feel free to visit my webpage gute slots spiele,
Thelma,
The apk file is lightweight, making it suitable for a wide range of Android devices.
Installing the 888starz app on Android requires enabling the unknown sources option in settings.
The apk supports automatic updates so users always have the latest version.
Downloading the apk from the official site is best to avoid untrusted files.
888starz supports iOS devices so iPhone users can install the app easily.
888starz 888starz apk
888starz 888starz
The apk file can be downloaded directly onto Android devices in a few simple steps.
Once the apk is downloaded, the user taps it to start the installation directly.
The apk supports automatic updates so users always have the latest version.
It is always recommended to download the apk from the official source to avoid modified or unsafe versions.
The iOS version delivers a smooth, stable experience matching the Android edition.
top casinos mit niedrige einzahlung
Look into my homepage – casino 4 euro litecoin
wild vegas online casino ohne anzahlung bonuscodes ethereum ab 10 euro
mejor casa de apuestas para ganar (Raffazaundangan.com) en méxico
10 euros offert paris sportif|10 euros offert sans dépôt paris sportif|10 meilleurs
sites de paris sportifs|100 euro offert paris sportif|100 euros offert paris sportif|100 euros remboursé paris sportifs|100
offert pari sportif|100 offert paris sportif|100 remboursé paris sportif|100e offert pari sportif|abandon paris sportif tennis|abandon tennis paris sportif|addiction paris sportif forum|age paris sportif belgique|aide au pari sportif|aide au paris sportif|aide aux
paris sportif|aide aux paris sportifs|aide pari sportif|aide pari
sportif football|aide parie sportif|aide paris sportif|aide
paris sportif foot|aide paris sportif gratuit|aide paris sportifs|aide pour paris sportif|algorithme
de paris sportif|algorithme excel paris sportif|algorithme gratuit
paris sportif|algorithme pari sportif|algorithme paris sportif|algorithme paris sportif avis|algorithme paris
sportif basket|algorithme paris sportif excel|algorithme paris sportif gratuit|algorithme paris sportif tennis|algorithme paris sportifs|algorithme
pour paris sportif|analyse cote paris sportif|analyse
de paris sportif|analyse match paris sportif|analyse pari sportif|analyse paris sportif|analyse paris
sportif foot|analyse paris sportif football|analyse paris sportif gratuit|analyse paris sportifs|ancienne cote paris sportif|api cote paris sportif|app paris sportif sans argent|appli de
paris sportif|appli de paris sportif sans argent|appli de paris sportifs|appli pari sportif|appli pari sportif gratuit|appli parie sportif|appli paris sportif|appli paris sportif avec
paypal|appli paris sportif belgique|appli paris sportif entre amis|appli paris sportif
gratuit|appli paris sportif sans argent|appli paris sportif
suisse|appli paris sportifs|application aide
paris sportif|application algorithme paris sportif|application analyse paris sportif|application android paris sportif|application bankroll paris sportif|application conseil paris sportif|application de
pari sportif|application de parie sportif|application de paris sportif|application de paris sportif en afrique|application de paris sportif en cote d’ivoire|application de paris sportif en ligne|application de paris sportif
gratuit|application de paris sportif international|application de paris sportif suisse|application de paris sportifs|application faux paris sportifs|application gestion bankroll paris sportif|application gestion paris sportif|application ia paris sportif|application pari sportif gratuit|application paris sportif|application paris sportif android|application paris sportif
argent fictif|application paris sportif belgique|application paris sportif canada|application paris sportif espagne|application paris sportif espagnol|application paris sportif fictif|application paris sportif france|application paris sportif gratuit|application paris sportif gratuit entre
amis|application paris sportif maroc|application paris sportif offre de bienvenue|application paris sportif paypal|application paris sportif sans argent|application paris
sportif sans justificatif de domicile|application paris sportif suisse|application paris
sportif usa|application paris sportif virtuel|application pour faire des paris sportifs|application pour gerer
ses paris sportif|application pour les paris sportifs|application pour pari sportif|application pour paris sportif|application pour paris sportifs|application statistique paris sportif|application suivi
paris sportif|applications de paris sportifs|applications
paris sportifs|applis paris sportif|applis paris sportifs|apprendre a faire des paris
sportifs|argent facile paris sportif|argent offert paris sportifs|argent offert
sans depot paris sportif|argent paris sportif|argent paris sportifs|argent
paris sportifs impots|argent sans depot paris sportif|arjel paris sportif|arjel paris
sportifs|astuce gagner paris sportif|astuce pari sportif|astuce paris sportif|astuce paris sportif basket|astuce paris sportif foot|astuce paris sportif
forum|astuce paris sportif tennis|astuce paris sportifs|astuce pour
gagner au pari sportif|astuce pour gagner au
paris sportif|astuce pour gagner paris sportif|astuce pour paris sportif|astuces paris sportifs|astuces paris sportifs en ligne|astuces paris sportifs foot|astuces pour gagner aux paris sportifs|autorisation paris sportif france|avis
pari sportif|avis paris sportif|avis paris sportif
foot|avis site de paris sportif|avis site paris sportif|avis sur les paris sportifs|avis sur paris sportif|avis tipster paris sportif|aweh
signification paris sportif|bankroll 100 euros paris sportifs|bankroll management paris sportif|bankroll paris sportif|bankroll
paris sportif excel|bankroll paris sportif gratuit|bankroll paris sportifs|basket
paris sportif|belgique france paris sportif|belgique paris sportifs|bonus bienvenue paris
sportif|bonus bienvenue paris sportifs|bonus cash paris sportif|bonus de bienvenue paris sportif|bonus de bienvenue paris sportif belgique|bonus de bienvenue sans depot paris
sportif|bonus de depot paris sportif|bonus de paris sportifs|bonus depot paris sportif|bonus en cash
paris sportif|bonus gratuit paris sportif|bonus gratuit sans depot paris sportif|bonus pari sportif|bonus
paris sportif|bonus paris sportif belgique|bonus paris sportif betclic|bonus paris
sportif cash|bonus paris sportif en ligne|bonus
paris sportif france pari|bonus paris sportif retirable|bonus paris sportif
sans depot|bonus paris sportif sans dépôt|bonus paris sportif unibet|bonus paris sportifs|bonus sans
depot paris sportif|bonus sans depot paris sportif belgique|bonus
sans dépôt paris sportif|bonus sans dépôt paris sportif hors arjel|bonus site de paris sportif|bonus site pari sportif|bonus site paris sportif|bonus sites de paris sportifs|bonus unibet paris sportif|bookmaker paris sportif|bookmaker paris sportif gratuit|bookmaker paris sportifs|bookmaker sportif|bookmakers paris sportif|bookmakers
paris sportifs|bookmakers paris sportifs en ligne|but contre son camp paris sportif|but
sur penalty paris sportif|buteur paris sportif|c’est quoi handicap paris sportif|c’est quoi une cote paris
sportif|calcul anti perte paris sportif|calcul combinaison pari sportif|calcul cote pari sportif|calcul cote paris sportif|calcul couverture paris sportif|calcul de cote
paris sportif|calcul des cotes paris sportifs|calcul dnb paris sportifs|calcul double
chance paris sportif|calcul gain paris sportif|calcul mise paris
sportif|calcul pari sportif|calcul paris sportif|calcul paris sportif multiple|calcul pourcentage
cote paris sportif|calcul probabilité paris sportif|calcul rentabilité paris sportifs|calcul
roi paris sportif|calcul systeme paris sportif|calcul trj paris sportifs|calculateur cote paris sportif|calculateur
de cote paris sportif|calculateur de mise paris
sportif|calculateur de paris sportif|calculateur paris sportif|calculatrice arbitrage paris sportif|calculatrice paris sportif|calculer cote paris sportif|calculer
gain paris sportif|calculer probabilité paris sportifs|calculer roi paris
sportifs|calculer une cote pari sportif|calculer une cote paris sportif|carte cadeau paris sportif|carte
pcs paris sportif|carte prépayée paris sportifs|cash out
pari sportif|cash out paris sportif|cash out paris sportifs|casino en ligne paris sportif|casino paris sportif en ligne|champions league paris sportif|chute de cote paris sportif|classement des meilleurs sites de paris sportifs|classement meilleur site de paris sportif|code barre paris sportif|code bonus paris sportif|code paris sportif|code promo pari sportif|code promo paris sportif|code promo
paris sportif sans depot|code promo paris sportif sans dépôt|code promo
sans depot paris sportif|code promo site paris sportif|combien de temps pour encaisser un paris
sportif|combien de temps pour retirer un paris
sportif|combien miser paris sportifs|combine paris sportif|combines paris
sportifs|combiné pari sportif|combiné paris sportif|combiné paris sportif conseil|combiné paris sportif du jour|combiné paris sportif pronostic|comment analyser un paris sportif|comment arreter de jouer
aux paris sportifs|comment arreter les paris sportif|comment arreter les paris
sportifs|comment arrêter les paris sportifs|comment bien gagner au paris sportif|comment bien jouer
au paris sportif|comment bien miser paris sportif|comment
ca marche les paris sportif|comment calculer cote paris sportif|comment calculer gain paris sportif|comment calculer les cotes
des paris sportifs|comment calculer une cote de paris sportif|comment calculer une cote pari
sportif|comment calculer une cote paris sportif|comment comprendre les
paris sportifs|comment creer un vip paris sportif|comment créer
un algorithme paris sportif|comment créer un site de paris sportif|comment devenir
riche avec les paris sportifs|comment etre rentable paris sportif|comment etre sur de gagner au paris sportif|comment
faire de bon paris sportif|comment faire des parie sportif|comment faire des paris sportif|comment faire
des paris sportif gagnant|comment faire des paris sportifs|comment faire
pari sportif|comment faire paris sportif|comment faire pour arreter les paris
sportifs|comment faire pour gagner au paris sportif|comment
faire pour gagner les paris sportifs|comment faire un bon pari
sportif|comment faire un bon paris sportif|comment faire un pari sportif|comment faire un parie sportif|comment faire un paris sportif|comment faire
une montante paris sportif|comment fonctionne les cotes dans les paris sportifs|comment fonctionne
les cotes des paris sportifs|comment fonctionne les
paris sportifs|comment fonctionne paris sportifs|comment fonctionne
un pari sportif|comment fonctionnent les cotes dans
les paris sportifs|comment fonctionnent les cotes dans
les paris sportifs grand oral|comment fonctionnent les cotes de paris
sportif|comment fonctionnent les paris sportifs|comment
fonctionnent les paris sportifs grand oral|comment fonctionnent les paris sportifs grand oral maths|comment fonctionnent les
paris sportifs maths|comment gagner a coup sur au paris sportif|comment gagner a tous les coups
au paris sportif|comment gagner a tout les coup au paris sportif|comment gagner au pari sportif|comment
gagner au pari sportif football|comment gagner au paris sportif|comment gagner au
paris sportif a coup sur|comment gagner au paris sportif foot|comment gagner au
paris sportif forum|comment gagner au paris sportif tennis|comment gagner au paris sportifs|comment gagner aux paris sportif|comment gagner aux paris sportifs|comment gagner
aux paris sportifs foot|comment gagner aux paris sportifs livre|comment gagner aux paris sportifs sur le long terme|comment gagner avec les paris sportifs|comment gagner dans les paris sportifs|comment gagner de l argent avec les paris sportifs|comment gagner de l’argent au paris sportif|comment gagner de l’argent aux paris sportifs|comment
gagner de l’argent avec les paris sportifs|comment gagner de l’argent
paris sportif|comment gagner de l’argent sur les paris sportifs|comment gagner de l’argent sur paris sportif|comment gagner des
paris sportif|comment gagner des paris sportifs|comment gagner en paris sportif|comment gagner
facilement au paris sportif|comment gagner les paris sportifs|comment gagner paris sportif|comment
gagner paris sportif foot|comment gagner paris sportifs|comment gagner sa vie avec
les paris sportifs|comment gagner ses paris sportif|comment gagner sur les paris sportif|comment gagner sur les paris sportifs|comment gagner
tout le temps au paris sportif|comment gagner un pari sportif|comment gagner un paris sportif|comment gerer
une bankroll paris sportif|comment gérer sa bankroll paris sportif|comment jouer au pari sportif|comment jouer au paris sportif|comment
jouer au paris sportif foot|comment jouer aux paris
sportifs|comment jouer paris sportif|comment marche cote paris sportif|comment marche les cotes paris sportif|comment marche les paris sportif|comment marche les paris sportifs|comment marche
paris sportif|comment marche un pari sportif|comment marche un paris sportif|comment marchent les cotes paris sportif|comment marchent les
paris sportifs|comment miser au paris sportif|comment miser paris sportif|comment monter
sa bankroll paris sportif|comment ne jamais perdre au paris sportif|comment parier
sportif|comment reussir au paris sportif|comment reussir les paris
sportif|comment reussir paris sportif|comment sont calculer les cotes de paris sportif|comment sont calculées
les cotes des paris sportifs|comment sont calculés les cotes des paris sportifs|comment sont faites les cotes des paris sportifs|comment toujours gagner
au paris sportif|comment ça marche les paris sportifs|comparaison bonus paris sportifs|comparaison cote pari sportif|comparaison des
cotes paris sportifs|comparateur cote pari sportif|comparateur cote paris
sportif|comparateur cotes paris sportif|comparateur cotes paris sportifs|comparateur de cote pari sportif|comparateur de cote paris sportif|comparateur
de cotes paris sportifs|comparateur de côtes paris
sportifs|comparateur de paris sportif|comparateur de site de paris sportif|comparateur de site
paris sportif|comparateur de sites de paris sportifs|comparateur pari sportif|comparateur paris sportif|comparateur paris sportifs|comparateur site de paris
sportif|comparateur site pari sportif|comparateur site paris
sportif|comparatif bonus paris sportif|comparatif bonus
paris sportifs|comparatif cote pari sportif|comparatif cote paris sportif|comparatif cotes paris sportifs|comparatif des sites de
paris sportifs|comparatif offre de bienvenue paris sportif|comparatif offre
paris sportif|comparatif pari sportif|comparatif pari sportif en ligne|comparatif paris sportif|comparatif paris sportif bonus|comparatif paris sportif en ligne|comparatif paris sportifs|comparatif paris sportifs en ligne|comparatif
site de paris sportif|comparatif site paris sportif|comparatif site paris
sportifs|comparatif sites de paris sportifs|comparatif sites
paris sportifs|comparer les cotes paris sportifs|comprendre
cote paris sportif|comprendre handicap paris sportif|comprendre les cotes
des paris sportifs|comprendre les cotes paris sportif|comprendre les cotes paris sportifs|comprendre les handicap paris sportif|compte de paris sportif|compte démo paris
sportif|compte finance paris sportif|compte financer paris sportif|compte
financier paris sportif|compte financé paris sportif|compte
pari sportif|compte paris sportif|compte paris sportif financé|conseil de paris sportif|conseil de paris sportifs|conseil en paris sportif|conseil
en paris sportifs|conseil pari sportif|conseil pari sportif gratuit|conseil paris
sportif|conseil paris sportif aujourd’hui|conseil paris sportif du jour|conseil paris sportif foot|conseil paris sportif gratuit|conseil
paris sportif ligue des champions|conseil paris sportif
nba|conseil paris sportif pronostic|conseil paris sportif rmc|conseil paris sportif
tennis|conseil paris sportifs|conseil pour gagner au paris sportif|conseil pour paris
sportif|conseil sur les paris sportifs|conseille
paris sportif|conseiller en paris sportifs|conseiller paris sportif|conseils de paris sportifs|conseils en paris sportifs|conseils
paris sportifs|conseils paris sportifs foot|conseils paris sportifs gratuit|conseils paris sportifs tennis|conseils pour paris sportifs|cote
a 100 paris sportif|cote a 2 paris sportif|cote anglaise paris sportif|cote
de 2 paris sportif|cote de pari sportif|cote de paris sportif|cote des paris sportifs|cote maximum paris sportif|cote minimum paris
sportif|cote pari sportif|cote pari sportif comment ça marche|cote pari sportif real madrid|cote pari sportif rugby|cote parie sportif|cote paris sportif|cote paris sportif belgique|cote paris
sportif calcul|cote paris sportif definition|cote paris sportif
euro|cote paris sportif explication|cote paris sportif foot|cote paris
sportif france belgique|cote paris sportif france espagne|cote paris sportif ligue des champions|cote paris sportif moto gp|cote paris sportif psg|cote paris sportif psg arsenal|cote paris sportif rugby|cote paris sportif tennis|cote paris sportifs|cote pour paris sportifs|cote sportif foot|cote sportif rugby|cote à 1000 paris sportif|cotes de paris sportifs|cotes pari
sportif|cotes paris sportif|cotes paris sportifs|cotes paris sportifs foot|coupe de france paris sportif|créer
un algorithme paris sportif|créer un compte paris sportif|créer un site de paris sportif en ligne|dans les paris
sportifs que signifie handicap|declarer ses gains paris sportif|definition cash out paris sportif|definition cote paris sportif|definition handicap paris sportif|depot 5 euros paris sportif|depot double paris
sportif|depot minimum 5 euro paris sportif|depot
minimum paris sportif|depot paris sportif|depuis quand existe les paris
sportif en france|devenir riche avec les paris sportifs|devenir riche avec
paris sportifs|disqualification tennis paris sportif|dnb en paris sportif|dnb pari sportif|dnb
paris sportif|dnb paris sportif definition|dnb paris sportifs|doit
on declarer les gains de paris sportif|déclarer gains paris sportifs|déclarer gains paris sportifs hors arjel|définition bankroll paris sportif|dépôt minimum 1 euro paris sportif|dépôt minimum 5
euro paris sportif|ecart de jeux tennis paris sportif|erreur de cote paris
sportif|est ce que les gains des paris sportifs
sont imposables|est-ce que les prolongation compte dans un pari sportif|etre sur de gagner au paris sportif|euro paris sportif|evenement sportif a
paris|evenement sportif paris|evenement sportif paris
2025|evenement sportif paris aujourd hui|evenement sportif paris aujourd’hui|evenement sportif paris ce week
end|evenements sportif paris|evenements sportifs paris|evenements sportifs paris 2025|evenements sportifs à
paris|evolution cote paris sportif|evolution cotes paris sportifs|evolution des cotes paris sportifs|explication cote pari sportif|explication cote paris sportif|explication handicap
paris sportif|explication pari sportif|explication paris sportif|face a face hockey paris sportif|faire des paris sportif|faire des paris sportif avec paypal|faire des paris sportifs|faire fortune paris sportifs|faire
un pari sportif|faire un paris sportif|faut il déclarer les gains de paris sportifs|faut il déclarer ses gains paris sportifs|fichier excel gestion bankroll paris sportif|fiscalité gains paris sportifs|foot paris sportif|football et paris sportifs|forfait tennis
paris sportif|formation paris sportif gratuit|forum de paris sportif|forum de paris sportifs|forum pari
sportif|forum parie sportif|forum paris sportif|forum paris
sportif foot|forum paris sportif gratuit|forum paris sportif
nba|forum paris sportif tennis|forum paris sportifs|forum
sur les paris sportifs|forum tennis paris sportif|francaise des jeux pari sportif|francaise des jeux paris sportif|francaise des jeux paris sportifs|france 2 paris sportif|france 2 paris sportifs|france belgique paris sportif|france
espagne paris sportif|france pari sportif|france pari sportif brest|france paris sportif|france paris sportifs|france pologne paris sportif|france portugal paris sportif|france suisse paris sportifs|france tunisie
paris sportifs|france-pari – paris sportifs|gagnant pari sportif|gagnant paris sportif|gagnant paris
sportif bayern|gagnante paris sportif|gagne au paris sportif|gagner 10 euros par jour aux paris sportifs|gagner 100 euros par jour paris sportif|gagner 1000 euros par
mois paris sportifs|gagner 10000 euros paris sportif|gagner
2000 euros par mois paris sportif|gagner 50 euros par
jour paris sportif|gagner a coup sur au paris sportif|gagner a
coup sur pari sportif|gagner a tous les coup paris sportif|gagner argent avec paris sportifs|gagner argent pari sportif|gagner argent paris sportif|gagner argent
paris sportifs|gagner au pari sportif|gagner au paris sportif|gagner au paris sportif a coup sur|gagner au paris sportif foot|gagner au paris sportif forum|gagner au paris sportif à
coup sur|gagner aux paris sportif|gagner aux paris sportifs|gagner aux paris sportifs pdf|gagner beaucoup
d’argent paris sportif|gagner de l argent grace aux paris sportifs|gagner de l argent pari sportif|gagner de l argent paris sportif|gagner
de l argent paris sportifs|gagner de l’argent au paris
sportif|gagner de l’argent aux paris sportifs|gagner de
l’argent avec les paris sportifs|gagner de l’argent avec paris sportif|gagner de l’argent
avec paris sportifs|gagner de l’argent grace au paris sportif|gagner
de l’argent grace aux paris sportifs|gagner de l’argent pari sportif|gagner de l’argent paris sportif|gagner de
l’argent paris sportifs|gagner de l’argent sur les paris sportifs|gagner
des paris sportif|gagner des paris sportifs|gagner les paris
sportifs|gagner pari sportif|gagner paris sportif|gagner
paris sportif foot|gagner paris sportif forum|gagner paris sportif
tennis|gagner paris sportifs|gagner sa vie avec les paris sportif|gagner sa vie avec les paris sportifs|gagner sa vie avec paris
sportifs|gagner ses paris sportifs|gagner à
coup sur paris sportif|gagner à tous les coups paris sportifs|gain maximum paris sportif|gain pari
sportif|gain pari sportif imposable|gain pari sportif impot|gain paris sportif|gain paris sportif imposable|gain paris sportif impot|gain paris sportif impôt|gains paris sportif|gains paris
sportif imposable|gains paris sportifs|gains paris sportifs imposable|gains paris sportifs imposables|gains
paris sportifs sont ils imposables|gerer bankroll paris sportif|gerer sa bankroll paris sportif|gerer une bankroll paris sportif|gestion bankroll paris sportif|gestion bankroll paris sportifs|gestion bankroll
paris sportifs excel|gestion de bankroll paris sportif|gestion de bankroll paris sportif application|gestion de bankroll
paris sportifs|gestion de mise paris sportif|gestion paris
sportifs v2 5 gratuit|gg signification paris sportif|gros combiné paris sportif|gros gain paris sportif|grosse
cote paris sportif pronostic|grosse mise paris sportif|groupe paris
sportif gratuit|groupe telegram paris sportif gratuit|groupement de joueurs paris sportifs|handicap 0 paris sportif|handicap 1 paris sportif|handicap 5 paris sportif|handicap au paris sportif|handicap basket paris sportif|handicap dans
les paris sportifs|handicap en paris sportif|handicap europeen paris sportif|handicap européen paris sportifs|handicap
mi temps paris sportif|handicap pari sportif|handicap paris sportif|handicap paris sportif basket|handicap paris sportif explication|handicap paris sportif foot|handicap paris sportif rugby|handicap paris sportifs|handicap
rugby paris sportif|handicap tennis paris sportif|historique
cote paris sportif|historique des cotes paris sportifs|hockey paris sportif|hockey sur glace paris sportif|hors arjel paris sportif|hweh signification paris sportif|imposition gain pari sportif|imposition gain paris sportif|imposition gains paris sportifs|imposition paris sportif france|impot gain paris sportif|impot paris sportif france|impot sur gain paris sportif|je gagne
ma vie avec les paris sportifs|jeu de pari sportif gratuit|jeu de paris sportif en ligne|jeu de paris sportif
gratuit|jeu paris sportif gratuit|jeu paris sportif sans
argent|jeux de parie sportif|jeux de paris sportif|jeux de paris sportif en ligne|jeux de paris sportif gratuit|jeux de paris sportifs|jeux
olympiques paris sportifs|jeux paris sportif|jeux paris sportif gratuit|jeux
paris sportif virtuel|jeux paris sportifs en ligne|jouer au paris sportif|jouer
paris sportif|joueur absent paris sportif|joueur blesse paris sportif|joueur
caen paris sportif|joueur de caen pari sportif|joueur de foot paris sportif|joueur decisif paris sportif|joueur décisif paris sportif|joueur italien paris sportif|joueur paris
sportif|joueur professionnel paris sportif|joueur qui
se blesse paris sportif|joueur sanctionne pari sportif|joueur suspendu paris sportif|joueurs italiens paris sportifs|l’argent des paris sportifs est il imposable|la cote paris sportif|la francaise des jeux
paris sportif|la martingale paris sportif|la martingale paris sportifs|la meilleur application de paris sportif|la meilleur application paris sportif|la meilleur technique pour gagner au paris sportif|la méthode secrète pour gagner aux paris sportifs pdf|la plus grosse cote gagner paris sportif|la plus grosse cote paris sportif|ldem paris
sportif signification|le marché des paris sportifs|le meilleur site de pari
sportif|le meilleur site de paris sportif|le meilleur site de paris sportif
en ligne|le meilleur site de paris sportifs|le plus gros
gain au paris sportif|le plus gros paris sportif|le plus
gros paris sportif du monde|les 10 meilleurs sites de paris sportifs|les 10 meilleurs sites de paris sportifs en afrique|les 17
secrets pour gagner rapidement aux paris sportifs|les 17
secrets pour gagner rapidement aux paris sportifs pdf|les application de paris sportif|les applications paris sportifs|les bonus paris sportifs|les bookmakers paris sportifs|les cotes paris sportifs|les gains
de paris sportifs sont ils imposables|les gains des paris
sportifs sont ils imposables|les jeux de paris sportifs|les meilleur paris sportif|les meilleures
applications de paris sportifs|les meilleurs applications de paris sportifs|les
meilleurs bonus paris sportif|les meilleurs bonus paris sportifs|les meilleurs
cotes paris sportif|les meilleurs paris sportifs|les meilleurs paris sportifs du jour|les meilleurs site de paris sportif|les meilleurs site de
paris sportifs|les meilleurs sites de pari sportif|les meilleurs sites de paris sportifs|les meilleurs sites de
paris sportifs en ligne|les paris sportif|les paris sportif avis|les paris sportifs|les paris sportifs comment ça marche|les paris sportifs en france|les paris sportifs
en ligne|les paris sportifs en ligne comprendre jouer gagner|les paris
sportifs en ligne comprendre jouer gagner pdf|les paris sportifs les plus
rentables|les plus gros gagnant paris sportif|les plus gros gains au paris sportifs|les plus gros gains paris sportifs|les plus
gros paris sportif|les plus grosse cote paris sportif|les plus grosses pertes paris
sportifs|les sites de paris sportifs|les sites de paris sportifs autorisés en france|les sites de paris sportifs en france|les sites de paris sportifs en ligne|les
sites de paris sportifs francais|ligue 1 paris sportif|ligue 1 paris sportifs|ligue 2 paris sportif|ligue des
champions paris sportif|limite de gains paris sportifs|limite de mise paris
sportif|limite gain paris sportif|limite mise paris sportifs|liste de paris sportif|liste
des paris sportifs|liste des site de paris sportif|liste des
sites de paris sportifs|liste pari sportif|liste paris sportif|liste paris sportif pdf|liste site de paris sportif|liste site pari sportif|liste site paris sportif|liste site paris sportif arjel|liste sites paris sportifs|logiciel algorithme paris
sportif|logiciel algorithme paris sportif gratuit|logiciel analyse
paris sportif|logiciel calcul paris sportif|logiciel de pari sportif|logiciel
de paris sportif|logiciel de paris sportif gratuit|logiciel gestion bankroll paris sportif gratuit|logiciel gestion de bankroll paris sportif|logiciel gestion paris sportif|logiciel gestion paris sportif gratuit|logiciel gestion paris sportifs|logiciel pari sportif|logiciel
paris sportif|logiciel paris sportif gratuit|logiciel paris sportifs|logiciel paris sportifs foot sur 2 matchs|logiciel pour
paris sportif|logiciel pour paris sportifs|logiciel prediction paris sportif|logiciel probabilité
paris sportif|logiciel prédiction paris sportif|logiciel statistique paris sportifs|logiciel variation de
cote paris sportif|loi sur les paris sportifs en france|magic calculator paris sportif|marché des paris sportifs|marché des paris sportifs en france|marché
des paris sportifs en ligne|martingale pari sportif|martingale paris
sportif|martingale paris sportif excel|martingale paris sportif forum|martingale paris sportif interdit|martingale
paris sportifs|match abandonné paris sportif|match annulé ou reporté paris sportifs|match annulé paris
sportif|match arrete paris sportif|match interrompu paris sportif|match interrompu tennis paris sportif|match interrompu tennis pluie paris sportif|match nul boxe paris sportif|match pari sportif|match
paris sportif|match reporté paris sportif|match suspendu paris sportif|match suspendu tennis paris sportif|match truqué paris
sportif|matchs truqués paris sportifs|meilleur
algorithme paris sportif|meilleur algorithme paris sportif
gratuit|meilleur app de paris sportif|meilleur app de paris
sportifs|meilleur app paris sportif|meilleur appli de pari sportif|meilleur appli de paris sportif|meilleur appli pari sportif|meilleur appli paris sportif|meilleur appli paris sportif forum|meilleur appli paris sportifs|meilleur application conseil paris sportif|meilleur application de
paris sportif|meilleur application de paris sportif en afrique|meilleur application pari sportif|meilleur
application paris sportif|meilleur application paris sportif belgique|meilleur application pour
les paris sportif|meilleur application pour pari sportif|meilleur bonus de bienvenue paris sportif|meilleur bonus pari
sportif|meilleur bonus paris sportif|meilleur bonus paris sportif sans
depot|meilleur bonus paris sportifs|meilleur bonus site de paris sportif|meilleur bonus site pari sportif|meilleur
bonus site paris sportif|meilleur bookmaker paris sportif|meilleur
combiné paris sportif|meilleur conseil paris
sportif|meilleur cote de paris sportif|meilleur cote pari sportif|meilleur cote paris sportif|meilleur cote paris sportif aujourd’hui|meilleur
cote site paris sportif|meilleur forum paris sportifs|meilleur
gain paris sportif|meilleur ia paris sportif|meilleur methode pour gagner au paris sportif|meilleur offre
bienvenue paris sportif|meilleur offre bonus paris sportif|meilleur offre de bienvenue paris sportif|meilleur offre de
bienvenue paris sportifs|meilleur offre pari sportif|meilleur offre paris sportif|meilleur offre paris sportif en ligne|meilleur pari sportif|meilleur pari sportif
du jour|meilleur pari sportif en ligne|meilleur paris sportif|meilleur
paris sportif aujourd’hui|meilleur paris sportif du jour|meilleur paris sportif en ligne|meilleur paris sportif foot|meilleur promo paris sportif|meilleur
pronostic paris sportif|meilleur site de conseil paris
sportif|meilleur site de pari sportif|meilleur site de pari sportif
en ligne|meilleur site de paris sportif|meilleur site de paris sportif avis|meilleur site de paris sportif belgique|meilleur site de paris sportif canada|meilleur
site de paris sportif en france|meilleur site de paris sportif en ligne|meilleur site de paris
sportif football|meilleur site de paris sportif
forum|meilleur site de paris sportif france|meilleur
site de paris sportif hors arjel|meilleur site de paris sportif international|meilleur site de paris sportif suisse|meilleur site de paris sportifs|meilleur site de paris sportifs en ligne|meilleur site pari sportif|meilleur site pari sportif en ligne|meilleur site pari sportif france|meilleur site paris sportif|meilleur site paris sportif avis|meilleur site paris sportif belgique|meilleur site paris sportif canada|meilleur site paris sportif
en ligne|meilleur site paris sportif foot|meilleur site paris
sportif forum|meilleur site paris sportif france|meilleur site paris sportif hors arjel|meilleur site
paris sportif nba|meilleur site paris sportif rugby|meilleur site paris sportif suisse|meilleur
site paris sportifs|meilleur site pour pari sportif|meilleur site pour paris sportif|meilleur
site pronostic paris sportif|meilleur strategie paris sportif|meilleur technique de paris sportif|meilleur technique paris sportif|meilleur technique pour
gagner au paris sportif|meilleure appli de paris sportif|meilleure
appli de paris sportifs|meilleure appli pari sportif|meilleure appli paris sportif|meilleure appli paris sportifs|meilleure
application de paris sportif|meilleure application de paris sportifs|meilleure
application pari sportif|meilleure application paris
sportif|meilleure application paris sportif android|meilleure application paris
sportifs|meilleure offre paris sportif|meilleure site paris sportif|meilleure strategie paris sportif|meilleures applications de paris sportifs|meilleures
applications paris sportifs|meilleures cotes paris sportifs|meilleures offres paris
sportifs|meilleures stratégies paris sportifs|meilleurs appli paris sportif|meilleurs application de paris sportifs|meilleurs application paris sportif|meilleurs applications paris sportifs|meilleurs bonus paris sportifs|meilleurs
cote paris sportif|meilleurs cotes paris sportifs|meilleurs
offres paris sportifs|meilleurs paris sportifs|meilleurs paris sportifs
du jour|meilleurs site de pari sportif|meilleurs site de paris sportif|meilleurs
site de paris sportif en ligne|meilleurs site de paris sportifs|meilleurs site paris sportif|meilleurs sites de paris sportifs|meilleurs sites de paris sportifs en ligne|meilleurs sites paris sportif|meilleurs sites paris sportifs|methode abc paris sportif|methode de
paris sportif|methode gagnante paris sportifs|methode gagner paris sportif|methode infaillible paris
sportifs|methode martingale paris sportif|methode mathematique paris sportif|methode mathematique pour gagner
au paris sportif|methode paris sportif|methode paris sportif foot|methode paris sportif forum|methode paris
sportif tennis|methode paris sportifs|methode pour gagner au paris sportif|methode pour gagner paris sportif|methodes paris sportifs|minimum depot paris sportif|mise au jeu pari sportif|mise maximum pari sportif|mise
maximum paris sportif|mise minimum paris sportif|mise moyenne
paris sportif|mise paris sportif|moins de 4 5 but paris sportif|montant maximum paris sportif|montant paris sportif|montante pari
sportif|montante parie sportif|montante paris sportif|montante paris sportifs|montantes paris sportifs|multiple pari sportif|multiple paris sportif|multiple paris sportifs|multiples paris sportifs|méthode calcul paris sportif|méthode match nul paris sportifs|méthode mathématique pour
gagner au paris sportif|méthode paris sportif forum|méthode paris sportif hockey|nba pari sportif|nba
paris sportif|nba paris sportifs|nouveau paris sportif|nouveau site de pari sportif|nouveau
site de paris sportif|nouveau site de paris sportif en ligne|nouveau
site de paris sportifs|nouveau site pari sportif|nouveau site paris sportif|nouveau
site paris sportif france|nouveau site paris sportifs|nouveaux
sites de paris sportifs|nouveaux sites paris
sportifs|nouvelle appli paris sportif|nouvelle application de paris
sportif|numero de match paris sportif|numero match paris sportif|offre 100 euros paris
sportif|offre appli pari sportif|offre bienvenu paris sportif|offre bienvenue
pari sportif|offre bienvenue paris sportif|offre bienvenue paris
sportifs|offre bienvenue site paris sportif|offre bonus paris sportif|offre
de bienvenu paris sportif|offre de bienvenue pari sportif|offre de bienvenue
paris sportif|offre de bienvenue paris sportif belgique|offre
de bienvenue paris sportif sans depot|offre de
bienvenue paris sportif sans dépôt|offre de bienvenue paris sportifs|offre de bienvenue sans depot paris
sportif|offre de bienvenue site paris sportif|offre euro paris sportif|offre pari sportif euro|offre paris sportif|offre paris sportif
belgique|offre paris sportif cash|offre paris sportif
coupe du monde|offre paris sportif hors arjel|offre paris
sportif remboursé|offre paris sportif remboursé cash|offre paris sportif
sans depot|offre promo paris sportif|offre remboursement paris sportif|offre sans depot paris sportif|offre
site paris sportif|offres bienvenue paris sportifs|offres de bienvenue paris sportifs|ou faire des paris sportif|ou faire des paris sportif en espagne|ou faire
des paris sportifs|outil répartiteur de mise paris sportif|outils repartiteur de mises paris sportif|ouverture
compte paris sportifs|ouvrir un compte paris sportif|pack de bienvenue paris sportif|pack de bienvenue paris sportif hors arjel|pari en ligne sportif|pari
sportif|pari sportif 100 euros offert|pari sportif 100 remboursé|pari sportif abandon tennis|pari
sportif aide|pari sportif algérie aujourd’hui|pari sportif appli|pari
sportif application|pari sportif argent|pari sportif astuce|pari sportif aujourd|pari sportif aujourd’hui|pari sportif avec handicap|pari sportif avec orange
money|pari sportif avec paypal|pari sportif avec wave|pari sportif avis|pari sportif basket|pari sportif belgique|pari sportif belgique france|pari
sportif bonus|pari sportif buteur pas titulaire|pari sportif champions league|pari
sportif combiné|pari sportif comment|pari sportif comment gagner|pari
sportif comment ça marche|pari sportif comparatif|pari sportif conseil|pari sportif
cote|pari sportif cote match|pari sportif
cote psg|pari sportif coupe|pari sportif coupe de france|pari sportif coupe du monde|pari sportif depot|pari sportif du jour|pari sportif en france|pari
sportif en ligne|pari sportif en ligne au cameroun|pari sportif en ligne belgique|pari sportif en ligne canada|pari
sportif en ligne france|pari sportif en ligne gratuit|pari sportif en ligne suisse|pari sportif en ligne ufc|pari sportif en suisse|pari sportif euro|pari sportif explication|pari sportif faire|pari sportif foot|pari sportif foot resultat|pari
sportif football|pari sportif forum|pari sportif francaise des jeux|pari sportif france|pari sportif france
angleterre|pari sportif france argentine|pari sportif france
autriche|pari sportif france belgique|pari sportif france espagne|pari sportif france italie|pari sportif france portugal|pari sportif france usa|pari sportif gagnant|pari sportif gagner|pari
sportif gagner a tous les coups|pari sportif gagner de
l’argent|pari sportif gain|pari sportif gratuit|pari sportif gratuit pour gagner des cadeaux|pari sportif gratuit sans depot|pari
sportif handicap|pari sportif hockey|pari sportif hors arjel|pari sportif jeux
olympiques|pari sportif joueur absent|pari sportif le plus rentable|pari sportif leicester champion|pari sportif
ligue 1|pari sportif ligue 2|pari sportif ligue des champions|pari
sportif ligue europa|pari sportif match|pari sportif match arrete|pari sportif match interrompu|pari
sportif meilleur|pari sportif meilleur cote|pari sportif meilleur site|pari sportif methode|pari
sportif mise|pari sportif mise au jeu|pari sportif mise o jeu|pari sportif nba|pari sportif offre bienvenue|pari sportif paypal|pari sportif
plus|pari sportif prolongation|pari sportif promo|pari sportif pronostic|pari sportif pronostic foot|pari sportif pronostic gagnant|pari sportif pronostic gratuit|pari sportif psg|pari sportif psg bayern|pari sportif psg inter|pari sportif psg
milan|pari sportif regle|pari sportif rembourse|pari sportif remboursement|pari sportif remboursement cash|pari sportif remboursé|pari sportif rugby|pari sportif rugby
coupe du monde|pari sportif rugby top 14|pari sportif sans argent|pari sportif sans
carte bancaire|pari sportif sans depot|pari sportif signification|pari sportif site|pari sportif statistique|pari sportif suisse|pari sportif systeme|pari sportif
technique|pari sportif technique pour gagner|pari sportif temps reglementaire|pari sportif tennis|pari sportif tennis abandon|pari
sportif top|pari sportif top 14|pari sportif tour de france|parie sportif|parie sportif comment ca marche|parie sportif du jour|parie sportif en ligne|parie sportif foot|parie sportif football|parie sportif france|parie sportif gratuit|parie sportif pronostic|parie sportif suisse|paris en ligne sportif|paris en ligne sportifs|paris evenement sportif|paris france sportif|paris hippique et sportif|paris hippiques et sportifs|paris hippiques
paris sportifs|paris hippiques paris sportifs et poker en ligne|paris hippiques sportifs|paris match sportif|paris sportif|paris sportif 10 euros offerts|paris sportif
100 euros offert|paris sportif 100 euros remboursé|paris sportif 100 offert|paris sportif 100 remboursé|paris sportif 100e offert|paris sportif 150 euros offert|paris sportif 1er pari remboursé|paris sportif a faire|paris
sportif a faire aujourd’hui|paris sportif a faire ce soir|paris sportif abandon tennis|paris sportif
abandon tennis parions sport|paris sportif
aide|paris sportif algorithme|paris sportif analyse|paris sportif
appli|paris sportif application|paris sportif application android|paris sportif
apres prolongation|paris sportif argent|paris sportif argent fictif|paris sportif
argent offert|paris sportif argent virtuel|paris sportif arjel|paris sportif
arsenal psg|paris sportif astuce|paris sportif au canada|paris
sportif aujourd hui|paris sportif aujourd’hui|paris sportif avec
argent fictif|paris sportif avec bonus sans depot|paris sportif avec carte
bancaire|paris sportif avec cryptomonnaie|paris sportif avec handicap|paris
sportif avec paypal|paris sportif avec paysafecard|paris sportif avis|paris sportif avis expert|paris sportif avis
forum|paris sportif bankroll|paris sportif basket|paris sportif basket coupe
de france|paris sportif basket nba|paris sportif basket prolongation|paris sportif belgique|paris
sportif belgique bonus|paris sportif belgique bonus sans depot|paris
sportif belgique france|paris sportif belgique suede|paris sportif bonus|paris sportif bonus bienvenue|paris sportif bonus cash|paris sportif
bonus de bienvenue|paris sportif bonus gratuit|paris sportif
bonus gratuit sans depot|paris sportif bonus retirable|paris
sportif bonus sans depot|paris sportif bonus sans depot belgique|paris sportif bookmaker|paris sportif but contre
son camp|paris sportif but temps additionnel|paris sportif buteur|paris sportif buteur
blessé|paris sportif buteur carton rouge|paris sportif buteur contre son camp|paris sportif buteur non titulaire|paris sportif buteur prolongation|paris sportif buteur qui ne joue pas|paris sportif buteur remplacant|paris sportif calcul gain|paris sportif canada|paris sportif cash|paris sportif cash out|paris sportif champion ligue 1|paris sportif champions league|paris sportif classement ligue 1|paris sportif code promo|paris sportif combine|paris sportif combiné|paris
sportif combiné comment ça marche|paris sportif combiné du jour|paris sportif combiné match reporté|paris sportif comment ca marche|paris
sportif comment faire|paris sportif comment gagner|paris sportif comment gagner a tous les coups|paris sportif comment jouer|paris
sportif comment ça marche|paris sportif comparateur cote|paris sportif comparatif|paris sportif conseil|paris sportif
conseil gratuit|paris sportif conseil pour gagner|paris sportif cote|paris sportif cote et
match|paris sportif cote explication|paris sportif cote psg|paris sportif coupe d’europe|paris
sportif coupe davis|paris sportif coupe de france|paris sportif coupe du monde|paris sportif coupe du monde de rugby|paris sportif coupe du monde rugby|paris sportif depot 5 euro|paris sportif depot minimum|paris
sportif depot paypal|paris sportif dnb|paris sportif du jour|paris sportif du jour conseil|paris sportif
dépôt 1 euro|paris sportif dépôt minimum 5 euros|paris sportif en belgique|paris sportif en france|paris
sportif en ligne|paris sportif en ligne avec paypal|paris sportif en ligne avis|paris sportif en ligne belgique|paris sportif en ligne bonus|paris sportif en ligne cameroun|paris sportif en ligne comment gagner|paris sportif en ligne comment ça marche|paris sportif en ligne france|paris sportif en ligne gratuit|paris sportif en ligne maroc|paris sportif en ligne paypal|paris sportif en ligne québec|paris sportif en ligne sans depot|paris sportif en ligne suisse|paris sportif en suisse|paris sportif espagne france|paris sportif esport|paris sportif et casino en ligne|paris sportif et
hippique|paris sportif et prolongation|paris sportif euro|paris sportif europa league|paris sportif explication|paris sportif final ligue des champions|paris sportif finale ligue des champions|paris sportif foot|paris sportif foot aide|paris sportif foot astuce|paris sportif foot aujourd’hui|paris sportif foot ce soir|paris sportif foot comment ca marche|paris sportif foot conseil|paris sportif foot cote|paris
sportif foot coupe du monde|paris sportif foot en ligne|paris
sportif foot feminin|paris sportif foot gratuit|paris sportif
foot prolongation|paris sportif foot pronostic|paris sportif foot pronostic
gratuit|paris sportif foot regle|paris sportif foot suisse|paris sportif foot us|paris sportif football|paris sportif football
americain|paris sportif football astuces|paris sportif forfait tennis|paris sportif forum|paris sportif francais|paris sportif francaise des jeux|paris sportif france|paris sportif
france 2|paris sportif france allemagne|paris
sportif france angleterre|paris sportif france argentine|paris sportif france autriche|paris
sportif france belgique|paris sportif france espagne|paris sportif france gibraltar|paris sportif france italie|paris sportif france nouvelle zelande|paris sportif france
pologne|paris sportif france portugal|paris sportif france uruguay|paris
sportif france usa|paris sportif freebet sans depot|paris sportif
gagnant|paris sportif gagnant à coup sûr|paris sportif gagner a coup sur|paris sportif
gagner argent|paris sportif gagner de l’argent|paris sportif gain|paris sportif gain maximum|paris sportif gestion bankroll|paris sportif
gratuit|paris sportif gratuit appli|paris sportif gratuit avec cadeaux|paris sportif gratuit cadeaux|paris sportif gratuit en ligne|paris
sportif gratuit entre amis|paris sportif gratuit sans argent|paris sportif
gratuit sans depot|paris sportif gratuit sans dépôt|paris sportif gratuits|paris sportif gros gain|paris sportif handicap|paris sportif handicap 0
1|paris sportif handicap 0-1|paris sportif handicap 1 0|paris sportif handicap 1-0|paris sportif handicap basket|paris sportif handicap explication|paris
sportif handicap foot|paris sportif handicap rugby|paris sportif hippique|paris sportif hockey|paris sportif hockey nhl|paris sportif hockey sur glace|paris sportif hors arjel|paris sportif
hors arjel france|paris sportif jeux olympiques|paris sportif
jeux video|paris sportif joueur blessé|paris sportif joueur blessé pendant
le match|paris sportif joueur de foot|paris sportif joueur decisif|paris sportif joueur declare forfait|paris sportif joueur déclare forfait|paris sportif joueur remplacant|paris
sportif la francaise des jeux|paris sportif le plus rentable|paris sportif
legal en france|paris sportif leicester champion|paris sportif les 18 stratégies pour gagner tous les jours|paris sportif les plus
sur|paris sportif les prolongation compte|paris sportif ligne|paris sportif ligue 1|paris sportif ligue 2|paris sportif
ligue des champions|paris sportif ligue des nations|paris sportif ligue europa|paris sportif
liste|paris sportif martingale|paris sportif match|paris sportif match abandonné|paris sportif match annulé|paris sportif match arrêté|paris sportif match du jour|paris
sportif match interrompu|paris sportif match reporté|paris sportif match suspendu|paris sportif match tennis interrompu|paris sportif match truqué|paris sportif meilleur bonus|paris sportif meilleur cote|paris
sportif meilleur pronostic|paris sportif meilleur site|paris
sportif methode|paris sportif methode 2 3|paris sportif mi temps fin de match|paris sportif mise au jeu|paris sportif mise maximum|paris sportif mma france|paris sportif moins de 3.5
but|paris sportif montante|paris sportif moto gp|paris sportif multiple|paris sportif multiple 2 3|paris sportif
multiple 2 3 explication|paris sportif multiple 2 4|paris sportif multiple 2 5|paris sportif multiple 2/3 explication|paris sportif multiple 3 4|paris sportif multiple explication|paris sportif national 1
foot|paris sportif nba|paris sportif nba conseil|paris sportif nba pronostic|paris sportif nhl|paris
sportif nombre de but|paris sportif nouveau site|paris sportif numero match|paris sportif offert|paris sportif offre
bienvenue|paris sportif offre bienvenue sans depot|paris sportif offre de bienvenue|paris sportif offre sans depot|paris
sportif om psg|paris sportif paypal|paris sportif plus de 1.5 but|paris sportif
plus de 2 5 but|paris sportif plus ou moins|paris sportif plus ou
moins 2 5 but|paris sportif premier pari remboursé|paris sportif premier paris
remboursé|paris sportif prolongation|paris sportif prolongation basket|paris sportif
prolongation foot|paris sportif promo|paris sportif pronostic|paris sportif pronostic basket|paris sportif
pronostic des match aujourd hui|paris sportif pronostic
expert gratuit|paris sportif pronostic foot|paris sportif pronostic forum|paris sportif pronostic gratuit|paris sportif pronostic tennis|paris sportif
psg|paris sportif psg arsenal|paris sportif
psg barcelone|paris sportif psg bayern|paris sportif psg dortmund|paris sportif psg inter|paris
sportif psg inter cote|paris sportif psg liverpool|paris sportif psg om|paris
sportif qr code|paris sportif que veut dire handicap|paris sportif
qui rapporte le plus|paris sportif regle|paris sportif regle prolongation|paris sportif rembourse|paris sportif remboursement cash|paris sportif
rembourser|paris sportif remboursé|paris sportif remboursé cash|paris sportif remboursé en cash|paris sportif retrait paypal|paris
sportif rue des joueurs|paris sportif rugby|paris sportif rugby 6 nations|paris sportif rugby coupe du
monde|paris sportif rugby top 14|paris sportif safe du jour|paris sportif sans
argent|paris sportif sans carte bancaire|paris sportif sans carte d’identité|paris sportif sans compte bancaire|paris sportif
sans depot|paris sportif sans depot minimum|paris sportif si match suspendu|paris sportif si un joueur abandonne|paris sportif si un joueur ne joue pas|paris sportif si un joueur se blesse|paris sportif simple ou combiné|paris sportif site|paris sportif statistique|paris sportif stratégie|paris sportif suisse|paris sportif suisse application|paris
sportif suisse en ligne|paris sportif suisse legal|paris
sportif suisse légal|paris sportif suisse
romande|paris sportif sur du jour|paris sportif sur le tennis|paris sportif systeme|paris sportif systeme 2 3|paris sportif systeme
2 4|paris sportif systeme 2/3|paris sportif systeme 2/4|paris sportif
systeme 3 4|paris sportif systeme 3/4|paris sportif systeme explication|paris
sportif technique|paris sportif technique pour gagner|paris sportif temps additionnel|paris sportif temps reglementaire|paris sportif tennis|paris sportif tennis abandon|paris sportif tennis conseil|paris
sportif tennis de table|paris sportif tennis forfait|paris
sportif tennis gratuit|paris sportif tennis pronostic|paris
sportif tennis roland garros|paris sportif tir au but|paris
sportif top 14|paris sportif tour de france|paris sportif
ufc|paris sportif ufc france|paris sportif unibet|paris
sportif vainqueur euro|paris sportif vainqueur ligue 1|paris sportif vainqueur
ligue des champions|paris sportif via paypal|paris sportif victoire prolongation|paris sportif vip gratuit|paris sportifs|paris sportifs
abandon tennis|paris sportifs aide|paris sportifs analyser un match|paris sportifs arjel|paris sportifs astuces|paris sportifs aujourd’hui|paris sportifs autorisés en france|paris sportifs avec paypal|paris sportifs basket|paris sportifs belgique|paris sportifs bonus|paris
sportifs bookmakers|paris sportifs canada|paris sportifs combiné|paris sportifs comparateur|paris
sportifs comparatif|paris sportifs conseils|paris sportifs cotes|paris sportifs coupe du monde|paris sportifs
de football|paris sportifs du jour|paris sportifs en belgique|paris sportifs en france|paris sportifs en ligne|paris sportifs en ligne belgique|paris
sportifs en ligne france|paris sportifs en ligne gratuit|paris
sportifs en ligne suisse|paris sportifs en suisse|paris sportifs
et hippiques|paris sportifs euro|paris sportifs foot|paris sportifs foot us|paris
sportifs forum|paris sportifs france|paris sportifs france espagne|paris
sportifs gagner à tous les coups|paris sportifs gratuit|paris sportifs gratuits|paris sportifs gratuits en ligne|paris sportifs handicap|paris sportifs hockey|paris sportifs hockey sur galce|paris sportifs hockey sur glace|paris sportifs hors arjel|paris sportifs jeux olympiques|paris sportifs les bookmakers
raflent la mise|paris sportifs ligne|paris sportifs ligue 1|paris sportifs
ligue 2|paris sportifs ligue des champions|paris sportifs ligue
europa|paris sportifs match interrompu|paris sportifs montante|paris sportifs nba|paris sportifs offre bienvenue|paris sportifs offre
de bienvenue|paris sportifs paypal|paris sportifs pronostics|paris sportifs psg|paris sportifs psg inter|paris sportifs rugby|paris sportifs sans argent|paris sportifs
sans depot|paris sportifs site|paris sportifs sites|paris sportifs statistiques|paris sportifs stratégie|paris
sportifs suisse|paris sportifs technique|paris sportifs techniques|paris sportifs tennis|paris sportifs tennis astuces|paris sportifs top 14|paris sportifs tour de france|part de
marché paris sportifs|paypal pari sportif|paypal paris sportif|paypal paris
sportifs|perte d’argent paris sportifs|peut on devenir riche avec les
paris sportifs|peut on gagner de l’argent avec les paris
sportifs|peut on gagner sa vie avec les paris sportif|peut on vraiment gagner de l’argent avec les paris sportifs|plus gros combine paris sportif|plus gros gagnant paris sportif|plus gros gain paris sportif|plus gros gain paris sportif au monde|plus gros gain paris sportif france|plus gros gains paris sportif|plus gros pari
sportif|plus gros paris sportif|plus grosse cote gagner paris sportif|plus
grosse cote pari sportif|plus grosse cote paris sportif|plus grosse mise paris sportif|plus grosse somme gagner au paris sportif|plus ou moins paris sportif|pourcentage de mise paris sportif|premier pari sportif remboursé|probabilité cote paris sportif|probabilité paris sportif combiné|prolongation basket
paris sportif|prolongation paris sportif|promo pari sportif|promo paris sportif|promo site de
paris sportif|promo site pari sportif|promo site paris sportif|promos paris
sportifs|prono paris sportif foot|prono paris sportif gratuit|prono paris sportif tennis|pronostic de paris sportif|pronostic du jour paris sportif|pronostic foot paris sportif|pronostic gratuit paris sportif|pronostic pari sportif|pronostic pari sportif
gratuit|pronostic paris sportif|pronostic paris sportif aujourd’hui|pronostic paris sportif du jour|pronostic paris sportif foot|pronostic paris sportif gratuit|pronostic paris sportif tennis|pronostic paris sportifs|pronostics foot statistiques et aides aux paris sportifs|pronostics paris sportif|pronostics paris sportifs|pronostiqueur paris sportif gratuit|psg
arsenal paris sportif|psg bayern paris sportif|psg inter milan paris
sportif|psg inter pari sportif|psg inter paris sportif|psg liverpool paris sportif|psg om paris sportif|psg
paris sportif|psg paris sportifs|qr code paris sportif|qu est ce qu un handicap paris sportif|qu est ce que handicap dans les paris sportif|qu’est ce
qu’un handicap paris sportif|qu’est ce que handicap dans les
paris sportif|quand un joueur se blesse paris sportif|que signifie 1/1
en paris sportif|que signifie 1/2 paris sportif|que signifie 12 en paris sportif|que
signifie 1×2 dans les paris sportifs|que signifie btts en paris
sportif|que signifie dnb en paris sportif|que signifie draw
en paris sportif|que signifie ft en paris sportif|que signifie gg dans le pari sportif|que signifie gg en pari sportif|que signifie gg en paris sportif|que signifie handicap dans les paris sportifs|que veut dire dnb en paris
sportif|que veut dire handicap dans les paris sportifs|que veut
dire handicap paris sportif|quel appli pari sportif|quel cote jouer paris sportif|quel est la meilleur appli
de paris sportif|quel est le meilleur algorithme de paris
sportif|quel est le meilleur site de pari sportif|quel est le meilleur site
de pari sportif en ligne|quel est le meilleur site de paris sportif|quel
est le meilleur site de paris sportif en ligne|quel est le meilleur site de
paris sportifs en ligne|quel est le pari sportif le plus rentable|quel pari sportif est le plus rentable|quel
pari sportif est le plus sûr|quel pari sportif faire aujourd’hui|quel paris
sportif faire aujourd’hui|quel paris sportif rapporte
le plus|quel site de paris sportif choisir|quel site de paris sportif rembourse en cash|quel type de pari sportif est le plus rentable|quelle application pour paris sportifs|quelle est
la meilleure appli de paris sportif|quelle est la meilleure application de paris
sportif|quelle est la meilleure application pour les paris sportifs|quelle est le meilleur site de paris sportif|quels paris sportifs
faire|quels sont les paris sportifs les plus sûrs|rebond
basket paris sportif|record de gain paris sportif|regle buteur
paris sportif|regle de paris sportif|regle des paris sportif|regle handicap
paris sportif|regle handicap paris sportif foot|regle multiple paris sportif|regle pari
sportif|regle paris sportif|regle paris sportif foot|regle
paris sportif multiple|regle paris sportif prolongation|reglement pari sportif|reglement paris sportif|regles paris
sportifs|remboursement cash paris sportif|remboursement en cash paris sportif|remboursement pari sportif|remboursement paris sportif|repartiteur de mise paris sportif|repartiteur de mise paris sportifs|repartiteur
de mises paris sportif|repartiteur mise paris sportif|repartition des
mises paris sportif|resultat pari sportif|resultat
paris sportif|resultat paris sportif en direct|resultat paris sportif foot|resultat
sportif hockey|retirer argent paris sportif|rugby pari sportif|rugby paris sportif|règle paris sportif prolongation|règles paris sportif|répartiteur de mise
pari sportif|répartiteur de mise paris sportif|répartiteur
de mise paris sportifs|répartition des mises paris sportif|résultat paris sportif
foot|sans depot paris sportif|se faire interdire de paris sportifs|signification btts
paris sportif|signification dnb paris sportif|signification handicap paris sportif|simulateur
de gain paris sportif|simulateur gain paris sportif|simulateur gain paris sportif multiple|simulateur gain paris sportif systeme|simulateur gain paris sportif système|simulateur montante paris sportif|simulateur
paris sportif multiple|simulateur systeme paris sportif|simulation paris
sportif gratuit|site aide paris sportif|site analyse paris sportif|site analyser paris sportif|site arjel paris sportif|site
conseil paris sportif|site d’analyse de paris sportifs|site d’analyse paris sportif|site de conseil paris sportif|site de pari en ligne sportif|site
de pari sportif|site de pari sportif avec bonus sans depot|site de pari sportif bonus sans depot|site
de pari sportif canada|site de pari sportif en ligne|site de pari sportif francais|site de pari sportif gratuit|site de pari sportif hors arjel|site de
pari sportif suisse|site de parie sportif|site de parie
sportif en ligne|site de paris en ligne sportif|site
de paris sportif|site de paris sportif acceptant paypal|site de paris sportif
arjel|site de paris sportif autorisé en france|site de paris sportif autorisé
en suisse|site de paris sportif avec bonus|site de paris sportif avec bonus sans depot|site de paris sportif avec bonus sans dépôt|site de paris sportif
avec neosurf|site de paris sportif avec paiement mobile|site
de paris sportif avec paypal|site de paris sportif avis|site de paris sportif belge avec
bonus|site de paris sportif belgique|site de paris sportif bonus|site de paris sportif bonus sans depot|site
de paris sportif canada|site de paris sportif comparatif|site de paris sportif depot minimum|site de paris sportif
en france|site de paris sportif en ligne|site de paris sportif en ligne
suisse|site de paris sportif football|site de paris sportif francais|site de
paris sportif france|site de paris sportif gratuit|site de
paris sportif gratuit pour gagner des cadeaux|site de paris sportif gratuit sans dépôt|site de
paris sportif hors arjel|site de paris sportif le plus fiable|site de paris sportif
legal en france|site de paris sportif meilleur cote|site de paris sportif nouveau|site de paris sportif offre de bienvenue|site de paris sportif paypal|site de
paris sportif premier paris remboursé|site de paris sportif qui accepte paypal|site de paris sportif qui rembourse en cash|site de paris sportif remboursé|site de paris sportif sans argent|site de
paris sportif sans carte bancaire|site de paris sportif sans carte d’identité|site de paris sportif sans depot|site de paris sportif suisse|site de paris sportifs|site de paris sportifs avec paypal|site de paris sportifs en ligne|site de paris sportifs francais|site
de paris sportifs gratuit|site de paris sportifs paypal|site de paris sportifs suisse|site de statistique pour paris sportif|site des paris sportifs|site pari en ligne sportif|site pari sportif|site pari sportif 100 euros offert|site pari
sportif arjel|site pari sportif belgique|site pari sportif
bonus|site pari sportif canada|site pari sportif comparatif|site pari sportif en ligne|site pari sportif france|site pari sportif gratuit|site pari sportif hors arjel|site pari sportif suisse|site parie sportif|site paris en ligne
sportif|site paris sportif|site paris sportif 100 euros offert|site paris sportif 100 euros remboursé|site paris sportif 1er paris remboursé|site paris sportif arjel|site paris sportif autorisé en france|site paris sportif avec bonus|site paris sportif avec
bonus sans depot|site paris sportif avec meilleur cote|site paris sportif belgique|site paris sportif bonus|site paris sportif bonus
cash|site paris sportif bonus sans depot|site paris sportif
canada|site paris sportif comparatif|site paris sportif depot 5
euro|site paris sportif en ligne|site paris sportif foot|site paris sportif france|site paris sportif gratuit|site paris
sportif hors arjel|site paris sportif hors arjel france|site paris sportif
meilleur cote|site paris sportif nouveau|site paris sportif offre
de bienvenue|site paris sportif paypal|site paris
sportif remboursement cash|site paris sportif remboursé en cash|site paris sportif retrait instantané|site paris sportif sans carte bancaire|site paris sportif sans
depot|site paris sportif suisse|site paris sportifs|site paris sportifs belgique|site
paris sportifs en ligne|site paris sportifs france|site paris sportifs hors arjel|site
paris sportifs suisse|site pour analyse paris sportif|site pour paris sportif|site
pronostic paris sportif|site statistique paris sportif|site suisse paris sportif|sites de pari sportif|sites de paris sportif|sites de paris
sportifs|sites de paris sportifs arjel|sites de
paris sportifs autorisés en france|sites de paris sportifs
belgique|sites de paris sportifs bonus|sites de paris sportifs en belgique|sites de paris sportifs en france|sites
de paris sportifs en ligne|sites de paris sportifs gratuits|sites
de paris sportifs gratuits sans dépôt|sites de paris sportifs suisse|sites pari sportif|sites paris sportif|sites paris sportifs|sites paris sportifs arjel|sites paris sportifs
belgique|sites paris sportifs france|sites paris sportifs hors arjel|sites paris sportifs suisse|so foot paris sportif|so foot
paris sportifs|specialiste tennis paris sportif|statistique foot
paris sportif|statistique paris sportif|statistique paris sportif foot|statistique tennis paris sportif|statistiques football paris sportifs|statistiques paris sportifs|strategie de paris sportif|stratégie big whale paris sportif|stratégie
de paris sportifs|stratégie gagnante paris sportifs|stratégie pari sportif|stratégie paris sportif|stratégie paris sportifs|stratégie paris sportifs forum|stratégie pour gagner au paris sportif|stratégies paris sportifs|suisse paris sportif|suisse paris sportifs|systeme
2 3 paris sportif|systeme 3 4 paris sportif|systeme de cote paris sportif|systeme de paris sportif|systeme pari sportif|systeme paris sportif|systeme paris sportifs|systeme reducteur paris sportif|système
paris sportif|tableau bankroll paris sportif|tableau
cote paris sportif|tableau de paris sportif|tableau de suivi
paris sportifs|tableau excel bankroll paris sportif|tableau excel
paris sportif|tableau excel paris sportif gratuit|tableau excel paris sportifs|tableau excel pour paris sportif|tableau gestion bankroll paris
sporti
Fastest Payout Online Sports Betting (Xapartmentlocators.Com) doubles and trebles
The official True Fortune casino has built a strong reputation with players across the United Kingdom.
Fans of live gaming can join real-dealer tables running 24 hours a day.
Players enjoy recurring promotions including cashback and free spins on selected slots.
Deposits are processed instantly so players can start playing within minutes.
All games run on certified random number generators for provably fair results.
A detailed FAQ and clear terms make it easy for players in the United Kingdom to find answers fast.
true fortune home true fortune home
In Uzbekistan, the official 888starz platform unites online casino and sports betting in one place.
888starz provides more than 5000 titles including slots, roulette and blackjack from leading studios.
The sportsbook on the official 888starz site covers more than 50 sports from around the world.
Recurring offers include 50% cashback and extra bonuses throughout the week.
The official site provides continuous support all day in multiple languages across several channels.
888starz apk 888starz apk
888starz apk 888starz
The 888starz apk is available for direct download on Android phones with ease.
After downloading the file, simply tap it and wait for the installation to complete automatically.
The Android version is compatible with most phones, including lower-spec models.
It is always recommended to download the apk from the official source to avoid modified or unsafe versions.
The iPhone app is known for stable performance and a design tailored to iOS screens.
888starz operates under an official license guaranteeing security and fair play for all users.
The 888starz casino features more than 5000 games from top providers like Pragmatic Play, NetEnt and Microgaming.
Betting markets include top leagues such as the Premier League, La Liga and major local tournaments.
All offers and bonuses are clearly displayed on the official site for easy access.
Registration on the official site takes just minutes via phone, email or one click.
888starz 888starz apk
In the United Kingdom, True Fortune casino stands out as a trusted online gambling destination.
The True Fortune casino features thousands of slots from leading providers like Pragmatic Play, NetEnt and Play’n GO.
Ongoing offers such as weekly cashback and reload deals keep the balance topped up.
The casino aims to process cashouts fast, especially for verified accounts.
Independent audits confirm the games are fair and payouts are genuine.
The site is fully responsive, adapting to any screen size on the go.
true fortune casino ndb true fortune casino ndb
meerdere paarden mobiel wedden op snooker
impuestos por apuestas nba para hoy deportivas
10 euros offert paris sportif|10 euros offert sans dépôt paris sportif|10 meilleurs sites de paris sportifs|100 euro
offert paris sportif|100 euros offert paris sportif|100 euros remboursé paris sportifs|100 offert pari sportif|100 offert paris sportif|100
remboursé paris sportif|100e offert pari sportif|abandon paris sportif tennis|abandon tennis paris sportif|addiction paris sportif forum|age paris sportif belgique|aide au pari sportif|aide au paris sportif|aide aux paris sportif|aide aux paris sportifs|aide pari sportif|aide pari sportif football|aide parie sportif|aide paris sportif|aide paris
sportif foot|aide paris sportif gratuit|aide
paris sportifs|aide pour paris sportif|algorithme de paris sportif|algorithme excel paris
sportif|algorithme gratuit paris sportif|algorithme pari sportif|algorithme paris sportif|algorithme paris sportif
avis|algorithme paris sportif basket|algorithme paris
sportif excel|algorithme paris sportif gratuit|algorithme paris
sportif tennis|algorithme paris sportifs|algorithme pour paris sportif|analyse cote paris sportif|analyse de paris sportif|analyse match paris sportif|analyse pari sportif|analyse paris sportif|analyse paris sportif foot|analyse paris sportif football|analyse paris sportif gratuit|analyse paris sportifs|ancienne cote paris sportif|api cote
paris sportif|app paris sportif sans argent|appli de paris sportif|appli de
paris sportif sans argent|appli de paris sportifs|appli pari sportif|appli pari sportif gratuit|appli parie sportif|appli paris sportif|appli paris sportif avec paypal|appli
paris sportif belgique|appli paris sportif entre amis|appli paris sportif gratuit|appli paris
sportif sans argent|appli paris sportif suisse|appli paris sportifs|application aide paris sportif|application algorithme paris
sportif|application analyse paris sportif|application android paris sportif|application bankroll paris sportif|application conseil paris sportif|application de
pari sportif|application de parie sportif|application de paris sportif|application de paris sportif
en afrique|application de paris sportif en cote d’ivoire|application de paris sportif
en ligne|application de paris sportif gratuit|application de paris sportif international|application de paris sportif suisse|application de paris sportifs|application faux paris sportifs|application gestion bankroll paris
sportif|application gestion paris sportif|application ia paris sportif|application pari
sportif gratuit|application paris sportif|application paris sportif android|application paris sportif argent
fictif|application paris sportif belgique|application paris sportif canada|application paris sportif espagne|application paris sportif espagnol|application paris sportif fictif|application paris sportif france|application paris sportif gratuit|application paris sportif gratuit entre
amis|application paris sportif maroc|application paris sportif offre de bienvenue|application paris sportif paypal|application paris sportif
sans argent|application paris sportif sans justificatif de domicile|application paris sportif suisse|application paris sportif usa|application paris sportif virtuel|application pour faire des paris sportifs|application pour
gerer ses paris sportif|application pour les paris sportifs|application pour pari sportif|application pour paris sportif|application pour paris sportifs|application statistique paris
sportif|application suivi paris sportif|applications de paris sportifs|applications paris sportifs|applis paris
sportif|applis paris sportifs|apprendre a faire des paris sportifs|argent facile paris sportif|argent offert paris sportifs|argent offert
sans depot paris sportif|argent paris sportif|argent
paris sportifs|argent paris sportifs impots|argent sans depot paris sportif|arjel paris sportif|arjel paris sportifs|astuce gagner paris
sportif|astuce pari sportif|astuce paris sportif|astuce paris sportif basket|astuce paris sportif foot|astuce paris sportif forum|astuce paris sportif tennis|astuce paris sportifs|astuce pour gagner au pari sportif|astuce pour gagner au
paris sportif|astuce pour gagner paris sportif|astuce
pour paris sportif|astuces paris sportifs|astuces paris sportifs en ligne|astuces paris sportifs foot|astuces pour
gagner aux paris sportifs|autorisation paris sportif france|avis pari sportif|avis paris sportif|avis paris sportif foot|avis site de paris sportif|avis site paris sportif|avis sur les paris sportifs|avis sur paris sportif|avis tipster paris
sportif|aweh signification paris sportif|bankroll 100 euros paris sportifs|bankroll management paris sportif|bankroll paris sportif|bankroll paris sportif excel|bankroll paris sportif
gratuit|bankroll paris sportifs|basket paris sportif|belgique
france paris sportif|belgique paris sportifs|bonus bienvenue
paris sportif|bonus bienvenue paris sportifs|bonus cash paris sportif|bonus de bienvenue paris sportif|bonus de bienvenue
paris sportif belgique|bonus de bienvenue sans depot paris
sportif|bonus de depot paris sportif|bonus de paris sportifs|bonus depot paris sportif|bonus en cash
paris sportif|bonus gratuit paris sportif|bonus gratuit sans depot paris
sportif|bonus pari sportif|bonus paris sportif|bonus paris sportif belgique|bonus paris sportif betclic|bonus
paris sportif cash|bonus paris sportif en ligne|bonus paris sportif france
pari|bonus paris sportif retirable|bonus paris sportif sans depot|bonus paris sportif sans dépôt|bonus paris sportif unibet|bonus paris sportifs|bonus sans depot
paris sportif|bonus sans depot paris sportif belgique|bonus sans dépôt paris sportif|bonus sans dépôt paris sportif
hors arjel|bonus site de paris sportif|bonus site pari sportif|bonus site paris sportif|bonus
sites de paris sportifs|bonus unibet paris sportif|bookmaker paris sportif|bookmaker paris sportif
gratuit|bookmaker paris sportifs|bookmaker sportif|bookmakers paris sportif|bookmakers paris sportifs|bookmakers paris sportifs en ligne|but
contre son camp paris sportif|but sur penalty paris
sportif|buteur paris sportif|c’est quoi handicap paris sportif|c’est quoi une cote paris sportif|calcul anti perte paris sportif|calcul combinaison pari sportif|calcul
cote pari sportif|calcul cote paris sportif|calcul
couverture paris sportif|calcul de cote paris sportif|calcul des
cotes paris sportifs|calcul dnb paris sportifs|calcul double chance paris sportif|calcul gain paris sportif|calcul mise
paris sportif|calcul pari sportif|calcul paris sportif|calcul paris sportif multiple|calcul pourcentage cote paris sportif|calcul probabilité paris sportif|calcul rentabilité paris sportifs|calcul roi paris sportif|calcul systeme paris sportif|calcul trj paris sportifs|calculateur cote paris sportif|calculateur de cote paris
sportif|calculateur de mise paris sportif|calculateur de paris sportif|calculateur paris sportif|calculatrice
arbitrage paris sportif|calculatrice paris sportif|calculer cote paris sportif|calculer gain paris sportif|calculer
probabilité paris sportifs|calculer roi paris sportifs|calculer
une cote pari sportif|calculer une cote paris sportif|carte cadeau paris
sportif|carte pcs paris sportif|carte prépayée paris sportifs|cash out pari sportif|cash out paris sportif|cash out paris
sportifs|casino en ligne paris sportif|casino paris sportif en ligne|champions league paris sportif|chute de cote
paris sportif|classement des meilleurs sites de paris sportifs|classement meilleur site de
paris sportif|code barre paris sportif|code bonus paris sportif|code paris sportif|code
promo pari sportif|code promo paris sportif|code promo
paris sportif sans depot|code promo paris sportif sans dépôt|code promo sans
depot paris sportif|code promo site paris sportif|combien de temps pour
encaisser un paris sportif|combien de temps pour retirer un paris sportif|combien miser paris sportifs|combine paris
sportif|combines paris sportifs|combiné pari sportif|combiné paris sportif|combiné paris sportif conseil|combiné paris sportif du jour|combiné paris
sportif pronostic|comment analyser un paris sportif|comment arreter de
jouer aux paris sportifs|comment arreter les paris sportif|comment arreter les paris sportifs|comment arrêter
les paris sportifs|comment bien gagner au paris sportif|comment
bien jouer au paris sportif|comment bien miser paris sportif|comment
ca marche les paris sportif|comment calculer
cote paris sportif|comment calculer gain paris sportif|comment
calculer les cotes des paris sportifs|comment calculer une cote
de paris sportif|comment calculer une cote pari sportif|comment calculer une
cote paris sportif|comment comprendre les paris
sportifs|comment creer un vip paris sportif|comment créer un algorithme paris
sportif|comment créer un site de paris sportif|comment devenir riche avec
les paris sportifs|comment etre rentable paris sportif|comment etre sur de gagner au paris
sportif|comment faire de bon paris sportif|comment faire
des parie sportif|comment faire des paris sportif|comment faire des paris sportif gagnant|comment faire des paris sportifs|comment faire pari
sportif|comment faire paris sportif|comment faire pour
arreter les paris sportifs|comment faire pour gagner au paris sportif|comment faire pour gagner les paris sportifs|comment faire un bon pari sportif|comment faire un bon paris sportif|comment faire un pari sportif|comment faire un parie sportif|comment faire un paris sportif|comment faire une montante
paris sportif|comment fonctionne les cotes dans les paris sportifs|comment fonctionne
les cotes des paris sportifs|comment fonctionne les paris sportifs|comment
fonctionne paris sportifs|comment fonctionne un pari sportif|comment
fonctionnent les cotes dans les paris sportifs|comment fonctionnent les
cotes dans les paris sportifs grand oral|comment fonctionnent les cotes de paris sportif|comment fonctionnent
les paris sportifs|comment fonctionnent les paris sportifs grand oral|comment fonctionnent les paris sportifs grand
oral maths|comment fonctionnent les paris sportifs maths|comment gagner
a coup sur au paris sportif|comment gagner
a tous les coups au paris sportif|comment gagner a tout les coup au paris sportif|comment gagner au pari sportif|comment gagner au pari sportif football|comment gagner au paris sportif|comment gagner au paris sportif
a coup sur|comment gagner au paris sportif foot|comment gagner au paris sportif forum|comment gagner au paris sportif tennis|comment
gagner au paris sportifs|comment gagner aux paris sportif|comment gagner aux paris sportifs|comment gagner aux paris sportifs foot|comment gagner
aux paris sportifs livre|comment gagner aux paris sportifs sur le long terme|comment gagner avec les paris sportifs|comment gagner dans les
paris sportifs|comment gagner de l argent avec les paris sportifs|comment
gagner de l’argent au paris sportif|comment gagner
de l’argent aux paris sportifs|comment gagner de l’argent avec
les paris sportifs|comment gagner de l’argent paris sportif|comment gagner de l’argent sur les paris sportifs|comment gagner de l’argent sur paris
sportif|comment gagner des paris sportif|comment gagner des paris sportifs|comment gagner en paris sportif|comment gagner facilement au paris sportif|comment gagner les paris sportifs|comment gagner paris sportif|comment gagner
paris sportif foot|comment gagner paris sportifs|comment gagner
sa vie avec les paris sportifs|comment gagner ses
paris sportif|comment gagner sur les paris sportif|comment gagner
sur les paris sportifs|comment gagner tout le temps au paris sportif|comment
gagner un pari sportif|comment gagner un paris sportif|comment gerer une bankroll paris sportif|comment gérer sa bankroll paris sportif|comment jouer au
pari sportif|comment jouer au paris sportif|comment jouer au paris sportif foot|comment jouer aux
paris sportifs|comment jouer paris sportif|comment marche cote paris sportif|comment marche les cotes paris
sportif|comment marche les paris sportif|comment marche les paris sportifs|comment marche paris sportif|comment marche un pari sportif|comment marche un paris sportif|comment marchent les cotes paris sportif|comment marchent les paris sportifs|comment
miser au paris sportif|comment miser paris sportif|comment monter sa bankroll paris sportif|comment ne jamais perdre au paris sportif|comment
parier sportif|comment reussir au paris sportif|comment reussir les
paris sportif|comment reussir paris sportif|comment sont calculer les cotes de paris sportif|comment
sont calculées les cotes des paris sportifs|comment sont
calculés les cotes des paris sportifs|comment sont faites les cotes des paris sportifs|comment toujours
gagner au paris sportif|comment ça marche les paris sportifs|comparaison bonus paris sportifs|comparaison cote pari sportif|comparaison des cotes paris
sportifs|comparateur cote pari sportif|comparateur cote paris sportif|comparateur
cotes paris sportif|comparateur cotes paris sportifs|comparateur
de cote pari sportif|comparateur de cote paris sportif|comparateur
de cotes paris sportifs|comparateur de côtes paris sportifs|comparateur de paris sportif|comparateur de site de paris sportif|comparateur de site
paris sportif|comparateur de sites de paris
sportifs|comparateur pari sportif|comparateur paris sportif|comparateur paris sportifs|comparateur site
de paris sportif|comparateur site pari sportif|comparateur site paris
sportif|comparatif bonus paris sportif|comparatif bonus
paris sportifs|comparatif cote pari sportif|comparatif cote paris sportif|comparatif
cotes paris sportifs|comparatif des sites de
paris sportifs|comparatif offre de bienvenue paris sportif|comparatif offre paris sportif|comparatif pari sportif|comparatif pari sportif en ligne|comparatif paris sportif|comparatif paris sportif bonus|comparatif paris sportif en ligne|comparatif paris sportifs|comparatif paris sportifs en ligne|comparatif site de paris sportif|comparatif site paris sportif|comparatif site paris
sportifs|comparatif sites de paris sportifs|comparatif sites paris sportifs|comparer les cotes paris sportifs|comprendre cote paris sportif|comprendre handicap paris
sportif|comprendre les cotes des paris sportifs|comprendre les cotes
paris sportif|comprendre les cotes paris sportifs|comprendre les handicap paris sportif|compte de paris sportif|compte démo paris
sportif|compte finance paris sportif|compte financer paris sportif|compte
financier paris sportif|compte financé paris sportif|compte pari sportif|compte paris sportif|compte paris
sportif financé|conseil de paris sportif|conseil de paris
sportifs|conseil en paris sportif|conseil en paris sportifs|conseil pari sportif|conseil pari sportif gratuit|conseil paris
sportif|conseil paris sportif aujourd’hui|conseil paris sportif du jour|conseil paris sportif foot|conseil
paris sportif gratuit|conseil paris sportif ligue des champions|conseil paris sportif nba|conseil paris sportif pronostic|conseil paris sportif rmc|conseil paris sportif tennis|conseil paris sportifs|conseil pour gagner au
paris sportif|conseil pour paris sportif|conseil sur
les paris sportifs|conseille paris sportif|conseiller en paris sportifs|conseiller paris sportif|conseils de paris sportifs|conseils en paris sportifs|conseils paris sportifs|conseils paris sportifs foot|conseils paris sportifs gratuit|conseils paris sportifs tennis|conseils pour paris sportifs|cote a 100 paris sportif|cote
a 2 paris sportif|cote anglaise paris sportif|cote de 2 paris sportif|cote
de pari sportif|cote de paris sportif|cote des paris sportifs|cote maximum paris sportif|cote minimum paris sportif|cote
pari sportif|cote pari sportif comment ça marche|cote pari sportif real madrid|cote pari sportif rugby|cote parie sportif|cote paris sportif|cote paris sportif belgique|cote paris sportif calcul|cote paris sportif definition|cote paris sportif euro|cote paris sportif explication|cote paris sportif foot|cote paris sportif france
belgique|cote paris sportif france espagne|cote paris sportif ligue des champions|cote paris sportif moto gp|cote paris sportif psg|cote paris sportif psg arsenal|cote paris sportif rugby|cote paris sportif tennis|cote paris sportifs|cote pour paris sportifs|cote
sportif foot|cote sportif rugby|cote à 1000 paris sportif|cotes de paris
sportifs|cotes pari sportif|cotes paris sportif|cotes paris sportifs|cotes paris sportifs foot|coupe
de france paris sportif|créer un algorithme paris sportif|créer
un compte paris sportif|créer un site de paris sportif en ligne|dans les
paris sportifs que signifie handicap|declarer ses gains paris sportif|definition cash
out paris sportif|definition cote paris sportif|definition handicap paris
sportif|depot 5 euros paris sportif|depot double paris sportif|depot minimum 5 euro paris sportif|depot minimum
paris sportif|depot paris sportif|depuis quand existe les paris sportif en france|devenir riche avec les paris sportifs|devenir riche avec paris sportifs|disqualification tennis paris sportif|dnb en paris sportif|dnb
pari sportif|dnb paris sportif|dnb paris sportif definition|dnb paris sportifs|doit on declarer les
gains de paris sportif|déclarer gains paris sportifs|déclarer gains paris sportifs hors arjel|définition bankroll paris sportif|dépôt minimum 1 euro paris sportif|dépôt minimum 5 euro paris sportif|ecart
de jeux tennis paris sportif|erreur de cote paris sportif|est ce que
les gains des paris sportifs sont imposables|est-ce que les prolongation compte dans un pari sportif|etre sur de gagner au paris sportif|euro paris sportif|evenement sportif
a paris|evenement sportif paris|evenement sportif paris
2025|evenement sportif paris aujourd hui|evenement sportif paris
aujourd’hui|evenement sportif paris ce week end|evenements sportif paris|evenements sportifs paris|evenements sportifs paris 2025|evenements sportifs
à paris|evolution cote paris sportif|evolution cotes paris sportifs|evolution des
cotes paris sportifs|explication cote pari sportif|explication cote
paris sportif|explication handicap paris sportif|explication pari sportif|explication paris sportif|face
a face hockey paris sportif|faire des paris sportif|faire des paris sportif avec paypal|faire des paris sportifs|faire fortune paris sportifs|faire un pari sportif|faire un paris sportif|faut il déclarer les gains de
paris sportifs|faut il déclarer ses gains paris sportifs|fichier excel gestion bankroll
paris sportif|fiscalité gains paris sportifs|foot paris sportif|football et paris sportifs|forfait tennis paris sportif|formation paris sportif gratuit|forum de paris
sportif|forum de paris sportifs|forum pari sportif|forum
parie sportif|forum paris sportif|forum paris sportif foot|forum paris sportif gratuit|forum
paris sportif nba|forum paris sportif tennis|forum
paris sportifs|forum sur les paris sportifs|forum tennis paris sportif|francaise des jeux pari sportif|francaise des
jeux paris sportif|francaise des jeux paris sportifs|france
2 paris sportif|france 2 paris sportifs|france belgique paris sportif|france espagne paris sportif|france pari sportif|france pari sportif brest|france
paris sportif|france paris sportifs|france pologne paris sportif|france portugal paris sportif|france suisse paris sportifs|france tunisie paris sportifs|france-pari –
paris sportifs|gagnant pari sportif|gagnant paris sportif|gagnant paris
sportif bayern|gagnante paris sportif|gagne au paris sportif|gagner 10 euros par jour aux paris sportifs|gagner 100 euros par
jour paris sportif|gagner 1000 euros par mois paris sportifs|gagner 10000 euros paris sportif|gagner 2000 euros par mois paris sportif|gagner 50 euros par jour paris
sportif|gagner a coup sur au paris sportif|gagner a coup sur pari sportif|gagner
a tous les coup paris sportif|gagner argent avec paris sportifs|gagner
argent pari sportif|gagner argent paris sportif|gagner
argent paris sportifs|gagner au pari sportif|gagner
au paris sportif|gagner au paris sportif a coup sur|gagner au paris sportif foot|gagner au paris sportif forum|gagner au paris sportif à coup sur|gagner aux paris sportif|gagner aux paris sportifs|gagner aux paris sportifs pdf|gagner
beaucoup d’argent paris sportif|gagner de l argent grace aux paris sportifs|gagner de l argent pari sportif|gagner de
l argent paris sportif|gagner de l argent paris sportifs|gagner de l’argent au
paris sportif|gagner de l’argent aux paris sportifs|gagner de l’argent avec les paris sportifs|gagner de l’argent avec
paris sportif|gagner de l’argent avec paris sportifs|gagner
de l’argent grace au paris sportif|gagner de
l’argent grace aux paris sportifs|gagner de l’argent pari
sportif|gagner de l’argent paris sportif|gagner de l’argent
paris sportifs|gagner de l’argent sur les paris sportifs|gagner des paris sportif|gagner des paris sportifs|gagner les paris sportifs|gagner pari sportif|gagner paris sportif|gagner paris sportif foot|gagner paris sportif forum|gagner paris sportif tennis|gagner paris
sportifs|gagner sa vie avec les paris sportif|gagner sa vie avec les paris sportifs|gagner sa vie avec paris sportifs|gagner ses
paris sportifs|gagner à coup sur paris sportif|gagner à tous les
coups paris sportifs|gain maximum paris sportif|gain pari sportif|gain pari sportif imposable|gain pari
sportif impot|gain paris sportif|gain paris sportif imposable|gain paris sportif impot|gain paris sportif impôt|gains paris sportif|gains paris sportif imposable|gains paris sportifs|gains paris sportifs imposable|gains paris sportifs imposables|gains paris
sportifs sont ils imposables|gerer bankroll paris sportif|gerer sa bankroll paris sportif|gerer une
bankroll paris sportif|gestion bankroll paris sportif|gestion bankroll paris sportifs|gestion bankroll
paris sportifs excel|gestion de bankroll paris sportif|gestion de bankroll
paris sportif application|gestion de bankroll paris sportifs|gestion de mise paris sportif|gestion paris sportifs v2 5 gratuit|gg signification paris sportif|gros combiné paris sportif|gros gain paris
sportif|grosse cote paris sportif pronostic|grosse mise paris
sportif|groupe paris sportif gratuit|groupe telegram paris sportif gratuit|groupement de joueurs paris sportifs|handicap 0 paris sportif|handicap 1 paris sportif|handicap
5 paris sportif|handicap au paris sportif|handicap
basket paris sportif|handicap dans les paris sportifs|handicap en paris sportif|handicap europeen paris sportif|handicap européen paris sportifs|handicap mi temps paris sportif|handicap pari sportif|handicap paris sportif|handicap paris sportif basket|handicap paris
sportif explication|handicap paris sportif foot|handicap paris sportif rugby|handicap paris sportifs|handicap rugby paris sportif|handicap tennis paris sportif|historique cote paris sportif|historique des cotes paris sportifs|hockey
paris sportif|hockey sur glace paris sportif|hors arjel paris sportif|hweh signification paris sportif|imposition gain pari sportif|imposition gain paris sportif|imposition gains paris sportifs|imposition paris
sportif france|impot gain paris sportif|impot paris sportif france|impot
sur gain paris sportif|je gagne ma vie avec les paris sportifs|jeu
de pari sportif gratuit|jeu de paris sportif en ligne|jeu de paris sportif
gratuit|jeu paris sportif gratuit|jeu paris sportif sans
argent|jeux de parie sportif|jeux de paris sportif|jeux de paris sportif en ligne|jeux de
paris sportif gratuit|jeux de paris sportifs|jeux olympiques paris sportifs|jeux paris sportif|jeux paris sportif gratuit|jeux paris sportif virtuel|jeux paris sportifs en ligne|jouer au paris sportif|jouer paris sportif|joueur absent
paris sportif|joueur blesse paris sportif|joueur caen paris sportif|joueur de caen pari sportif|joueur de foot paris sportif|joueur
decisif paris sportif|joueur décisif paris sportif|joueur italien paris sportif|joueur paris sportif|joueur professionnel paris sportif|joueur qui se
blesse paris sportif|joueur sanctionne pari sportif|joueur suspendu paris
sportif|joueurs italiens paris sportifs|l’argent des paris sportifs est il imposable|la cote paris sportif|la francaise des jeux
paris sportif|la martingale paris sportif|la martingale paris sportifs|la meilleur application de paris
sportif|la meilleur application paris sportif|la meilleur technique pour gagner au paris sportif|la méthode secrète pour
gagner aux paris sportifs pdf|la plus grosse cote gagner paris sportif|la plus
grosse cote paris sportif|ldem paris sportif signification|le marché des paris sportifs|le meilleur site de pari sportif|le meilleur
site de paris sportif|le meilleur site de paris sportif en ligne|le meilleur
site de paris sportifs|le plus gros gain au paris sportif|le plus gros paris sportif|le plus gros paris sportif
du monde|les 10 meilleurs sites de paris sportifs|les 10 meilleurs sites de paris sportifs en afrique|les 17 secrets pour gagner rapidement aux paris sportifs|les 17 secrets pour gagner
rapidement aux paris sportifs pdf|les application de paris sportif|les applications paris sportifs|les bonus paris sportifs|les bookmakers paris sportifs|les cotes paris sportifs|les gains de paris sportifs sont ils imposables|les gains
des paris sportifs sont ils imposables|les jeux de paris sportifs|les meilleur
paris sportif|les meilleures applications de paris sportifs|les meilleurs applications de paris
sportifs|les meilleurs bonus paris sportif|les meilleurs bonus paris sportifs|les meilleurs cotes paris sportif|les meilleurs paris sportifs|les meilleurs paris sportifs du jour|les meilleurs site de paris sportif|les meilleurs site de paris sportifs|les meilleurs sites de pari sportif|les meilleurs sites de paris sportifs|les meilleurs
sites de paris sportifs en ligne|les paris sportif|les paris sportif avis|les paris sportifs|les paris
sportifs comment ça marche|les paris sportifs en france|les paris sportifs en ligne|les paris sportifs en ligne
comprendre jouer gagner|les paris sportifs en ligne
comprendre jouer gagner pdf|les paris sportifs les plus rentables|les plus gros gagnant paris sportif|les plus gros
gains au paris sportifs|les plus gros gains paris
sportifs|les plus gros paris sportif|les plus
grosse cote paris sportif|les plus grosses pertes paris sportifs|les sites de
paris sportifs|les sites de paris sportifs autorisés en france|les sites de paris sportifs en france|les sites
de paris sportifs en ligne|les sites de paris sportifs francais|ligue 1
paris sportif|ligue 1 paris sportifs|ligue 2 paris sportif|ligue des champions
paris sportif|limite de gains paris sportifs|limite de mise paris sportif|limite gain paris sportif|limite mise paris sportifs|liste de paris sportif|liste des paris sportifs|liste
des site de paris sportif|liste des sites de paris sportifs|liste
pari sportif|liste paris sportif|liste paris sportif pdf|liste site de paris sportif|liste site pari sportif|liste site paris sportif|liste site paris sportif arjel|liste sites paris sportifs|logiciel algorithme paris sportif|logiciel algorithme paris sportif gratuit|logiciel analyse paris sportif|logiciel calcul paris sportif|logiciel de pari sportif|logiciel
de paris sportif|logiciel de paris sportif gratuit|logiciel gestion bankroll paris sportif gratuit|logiciel gestion de bankroll paris
sportif|logiciel gestion paris sportif|logiciel gestion paris sportif
gratuit|logiciel gestion paris sportifs|logiciel pari sportif|logiciel paris sportif|logiciel
paris sportif gratuit|logiciel paris sportifs|logiciel paris sportifs foot sur 2 matchs|logiciel
pour paris sportif|logiciel pour paris sportifs|logiciel prediction paris
sportif|logiciel probabilité paris sportif|logiciel prédiction paris
sportif|logiciel statistique paris sportifs|logiciel variation de cote paris
sportif|loi sur les paris sportifs en france|magic calculator paris sportif|marché des paris sportifs|marché des paris sportifs en france|marché des paris sportifs en ligne|martingale pari sportif|martingale paris sportif|martingale paris sportif excel|martingale paris sportif forum|martingale paris sportif interdit|martingale paris sportifs|match abandonné paris sportif|match annulé ou reporté paris
sportifs|match annulé paris sportif|match arrete
paris sportif|match interrompu paris sportif|match
interrompu tennis paris sportif|match interrompu tennis pluie
paris sportif|match nul boxe paris sportif|match pari sportif|match paris sportif|match reporté paris sportif|match suspendu paris sportif|match
suspendu tennis paris sportif|match truqué paris sportif|matchs
truqués paris sportifs|meilleur algorithme paris sportif|meilleur algorithme paris sportif gratuit|meilleur app de paris sportif|meilleur app de paris sportifs|meilleur
app paris sportif|meilleur appli de pari sportif|meilleur appli de paris
sportif|meilleur appli pari sportif|meilleur appli paris sportif|meilleur appli paris
sportif forum|meilleur appli paris sportifs|meilleur application conseil paris sportif|meilleur application de paris sportif|meilleur application de paris sportif en afrique|meilleur application pari sportif|meilleur application paris sportif|meilleur application paris sportif belgique|meilleur application pour les paris sportif|meilleur application pour
pari sportif|meilleur bonus de bienvenue paris sportif|meilleur bonus pari sportif|meilleur bonus paris sportif|meilleur
bonus paris sportif sans depot|meilleur bonus paris sportifs|meilleur bonus site de paris sportif|meilleur bonus site pari sportif|meilleur bonus site paris sportif|meilleur bookmaker
paris sportif|meilleur combiné paris sportif|meilleur conseil paris sportif|meilleur cote de paris sportif|meilleur cote pari sportif|meilleur
cote paris sportif|meilleur cote paris sportif aujourd’hui|meilleur cote site paris sportif|meilleur forum paris sportifs|meilleur gain paris sportif|meilleur ia paris sportif|meilleur methode pour gagner au paris sportif|meilleur offre bienvenue paris
sportif|meilleur offre bonus paris sportif|meilleur offre de
bienvenue paris sportif|meilleur offre de bienvenue paris sportifs|meilleur offre pari sportif|meilleur offre
paris sportif|meilleur offre paris sportif en ligne|meilleur pari sportif|meilleur
pari sportif du jour|meilleur pari sportif en ligne|meilleur paris sportif|meilleur
paris sportif aujourd’hui|meilleur paris sportif du jour|meilleur paris sportif en ligne|meilleur paris sportif foot|meilleur promo paris sportif|meilleur pronostic
paris sportif|meilleur site de conseil paris sportif|meilleur site de
pari sportif|meilleur site de pari sportif en ligne|meilleur site de paris sportif|meilleur site de paris sportif avis|meilleur site de paris sportif belgique|meilleur site de
paris sportif canada|meilleur site de paris sportif en france|meilleur site
de paris sportif en ligne|meilleur site de paris sportif football|meilleur site de paris sportif forum|meilleur site de
paris sportif france|meilleur site de paris sportif hors arjel|meilleur
site de paris sportif international|meilleur site de paris sportif suisse|meilleur site de
paris sportifs|meilleur site de paris sportifs en ligne|meilleur
site pari sportif|meilleur site pari sportif en ligne|meilleur site pari sportif france|meilleur site paris sportif|meilleur site paris
sportif avis|meilleur site paris sportif belgique|meilleur site
paris sportif canada|meilleur site paris sportif en ligne|meilleur
site paris sportif foot|meilleur site paris sportif forum|meilleur site paris sportif france|meilleur site paris sportif hors arjel|meilleur site paris sportif nba|meilleur site paris sportif rugby|meilleur
site paris sportif suisse|meilleur site paris sportifs|meilleur site pour pari
sportif|meilleur site pour paris sportif|meilleur site pronostic paris sportif|meilleur
strategie paris sportif|meilleur technique de paris sportif|meilleur technique paris sportif|meilleur technique pour gagner au paris sportif|meilleure appli de
paris sportif|meilleure appli de paris sportifs|meilleure appli pari sportif|meilleure appli paris sportif|meilleure appli paris sportifs|meilleure
application de paris sportif|meilleure application de paris sportifs|meilleure application pari sportif|meilleure application paris sportif|meilleure application paris sportif android|meilleure application paris sportifs|meilleure offre paris sportif|meilleure site paris sportif|meilleure strategie paris
sportif|meilleures applications de paris sportifs|meilleures
applications paris sportifs|meilleures cotes paris sportifs|meilleures offres paris sportifs|meilleures stratégies
paris sportifs|meilleurs appli paris sportif|meilleurs application de paris sportifs|meilleurs application paris sportif|meilleurs applications paris sportifs|meilleurs bonus
paris sportifs|meilleurs cote paris sportif|meilleurs cotes paris sportifs|meilleurs
offres paris sportifs|meilleurs paris sportifs|meilleurs paris sportifs
du jour|meilleurs site de pari sportif|meilleurs site de paris sportif|meilleurs site
de paris sportif en ligne|meilleurs site de paris sportifs|meilleurs site paris sportif|meilleurs sites de paris sportifs|meilleurs sites de paris sportifs en ligne|meilleurs sites paris sportif|meilleurs sites paris sportifs|methode abc paris
sportif|methode de paris sportif|methode gagnante paris sportifs|methode gagner paris sportif|methode infaillible
paris sportifs|methode martingale paris sportif|methode
mathematique paris sportif|methode mathematique pour gagner au paris sportif|methode paris sportif|methode paris
sportif foot|methode paris sportif forum|methode
paris sportif tennis|methode paris sportifs|methode pour gagner
au paris sportif|methode pour gagner paris sportif|methodes paris sportifs|minimum depot paris sportif|mise au jeu pari sportif|mise maximum pari
sportif|mise maximum paris sportif|mise minimum paris sportif|mise moyenne paris sportif|mise paris sportif|moins de 4 5 but paris sportif|montant maximum paris sportif|montant paris sportif|montante pari
sportif|montante parie sportif|montante paris sportif|montante paris sportifs|montantes paris sportifs|multiple pari sportif|multiple paris sportif|multiple paris
sportifs|multiples paris sportifs|méthode calcul paris sportif|méthode match nul paris sportifs|méthode mathématique pour gagner au paris sportif|méthode paris sportif forum|méthode paris sportif hockey|nba pari sportif|nba paris sportif|nba paris
sportifs|nouveau paris sportif|nouveau site de pari sportif|nouveau site de paris sportif|nouveau site de paris
sportif en ligne|nouveau site de paris sportifs|nouveau site pari sportif|nouveau
site paris sportif|nouveau site paris sportif france|nouveau site paris sportifs|nouveaux sites de paris sportifs|nouveaux sites paris sportifs|nouvelle appli paris sportif|nouvelle application de paris sportif|numero de match paris sportif|numero match
paris sportif|offre 100 euros paris sportif|offre appli pari sportif|offre
bienvenu paris sportif|offre bienvenue pari
sportif|offre bienvenue paris sportif|offre bienvenue
paris sportifs|offre bienvenue site paris sportif|offre bonus paris sportif|offre de bienvenu paris sportif|offre de bienvenue
pari sportif|offre de bienvenue paris sportif|offre de
bienvenue paris sportif belgique|offre de bienvenue paris sportif sans depot|offre de bienvenue paris sportif sans dépôt|offre de bienvenue paris sportifs|offre
de bienvenue sans depot paris sportif|offre de bienvenue site paris
sportif|offre euro paris sportif|offre pari sportif euro|offre paris sportif|offre paris sportif belgique|offre paris sportif cash|offre paris sportif coupe du monde|offre
paris sportif hors arjel|offre paris sportif remboursé|offre paris sportif remboursé cash|offre paris sportif sans depot|offre promo paris sportif|offre remboursement paris sportif|offre sans depot paris sportif|offre site paris sportif|offres bienvenue paris sportifs|offres de bienvenue
paris sportifs|ou faire des paris sportif|ou faire des paris sportif en espagne|ou faire des paris sportifs|outil répartiteur de mise
paris sportif|outils repartiteur de mises paris sportif|ouverture
compte paris sportifs|ouvrir un compte paris sportif|pack de bienvenue paris sportif|pack de
bienvenue paris sportif hors arjel|pari en ligne sportif|pari sportif|pari sportif 100 euros
offert|pari sportif 100 remboursé|pari sportif abandon tennis|pari sportif aide|pari
sportif algérie aujourd’hui|pari sportif appli|pari sportif application|pari sportif
argent|pari sportif astuce|pari sportif aujourd|pari sportif
aujourd’hui|pari sportif avec handicap|pari sportif avec orange money|pari sportif avec paypal|pari sportif
avec wave|pari sportif avis|pari sportif basket|pari sportif
belgique|pari sportif belgique france|pari sportif bonus|pari sportif buteur pas titulaire|pari sportif champions league|pari sportif combiné|pari
sportif comment|pari sportif comment gagner|pari sportif comment ça marche|pari sportif comparatif|pari sportif conseil|pari
sportif cote|pari sportif cote match|pari sportif cote psg|pari sportif coupe|pari sportif coupe de france|pari sportif coupe du monde|pari sportif depot|pari
sportif du jour|pari sportif en france|pari sportif en ligne|pari sportif en ligne au cameroun|pari sportif en ligne belgique|pari sportif en ligne canada|pari sportif en ligne france|pari
sportif en ligne gratuit|pari sportif en ligne suisse|pari sportif en ligne ufc|pari
sportif en suisse|pari sportif euro|pari sportif explication|pari sportif faire|pari
sportif foot|pari sportif foot resultat|pari sportif football|pari
sportif forum|pari sportif francaise des jeux|pari sportif
france|pari sportif france angleterre|pari sportif france argentine|pari
sportif france autriche|pari sportif france belgique|pari sportif france
espagne|pari sportif france italie|pari sportif france portugal|pari sportif france usa|pari sportif gagnant|pari sportif gagner|pari sportif gagner a tous les coups|pari sportif gagner
de l’argent|pari sportif gain|pari sportif gratuit|pari sportif gratuit pour gagner
des cadeaux|pari sportif gratuit sans depot|pari sportif handicap|pari sportif hockey|pari sportif hors arjel|pari sportif jeux olympiques|pari sportif joueur absent|pari sportif
le plus rentable|pari sportif leicester champion|pari sportif ligue 1|pari sportif ligue 2|pari sportif ligue des champions|pari sportif ligue europa|pari sportif match|pari sportif match arrete|pari sportif match interrompu|pari sportif meilleur|pari sportif meilleur cote|pari sportif meilleur site|pari
sportif methode|pari sportif mise|pari sportif mise au jeu|pari sportif mise o jeu|pari sportif nba|pari sportif offre bienvenue|pari
sportif paypal|pari sportif plus|pari sportif prolongation|pari sportif promo|pari sportif pronostic|pari sportif pronostic foot|pari sportif pronostic
gagnant|pari sportif pronostic gratuit|pari sportif psg|pari sportif psg bayern|pari sportif
psg inter|pari sportif psg milan|pari sportif regle|pari sportif rembourse|pari sportif remboursement|pari sportif remboursement cash|pari sportif remboursé|pari sportif rugby|pari sportif rugby coupe du monde|pari sportif rugby top
14|pari sportif sans argent|pari sportif sans carte bancaire|pari sportif sans
depot|pari sportif signification|pari sportif site|pari sportif statistique|pari sportif suisse|pari sportif systeme|pari sportif technique|pari sportif technique pour
gagner|pari sportif temps reglementaire|pari sportif
tennis|pari sportif tennis abandon|pari sportif top|pari sportif top 14|pari sportif tour de france|parie sportif|parie sportif comment ca marche|parie sportif du
jour|parie sportif en ligne|parie sportif foot|parie sportif football|parie
sportif france|parie sportif gratuit|parie sportif pronostic|parie sportif suisse|paris en ligne sportif|paris en ligne sportifs|paris evenement
sportif|paris france sportif|paris hippique
et sportif|paris hippiques et sportifs|paris hippiques paris sportifs|paris hippiques paris sportifs et poker en ligne|paris hippiques sportifs|paris match sportif|paris sportif|paris sportif 10 euros offerts|paris sportif 100 euros offert|paris sportif 100 euros
remboursé|paris sportif 100 offert|paris sportif 100 remboursé|paris sportif 100e offert|paris sportif
150 euros offert|paris sportif 1er pari
remboursé|paris sportif a faire|paris sportif a faire aujourd’hui|paris sportif a faire ce soir|paris sportif abandon tennis|paris sportif abandon tennis parions sport|paris sportif
aide|paris sportif algorithme|paris sportif analyse|paris sportif appli|paris sportif application|paris sportif application android|paris sportif apres prolongation|paris sportif argent|paris sportif argent fictif|paris sportif argent
offert|paris sportif argent virtuel|paris sportif arjel|paris sportif
arsenal psg|paris sportif astuce|paris sportif au canada|paris sportif aujourd hui|paris sportif aujourd’hui|paris sportif avec argent fictif|paris sportif avec bonus sans depot|paris sportif avec carte bancaire|paris sportif avec cryptomonnaie|paris
sportif avec handicap|paris sportif avec paypal|paris sportif avec paysafecard|paris
sportif avis|paris sportif avis expert|paris sportif avis forum|paris sportif bankroll|paris sportif basket|paris sportif basket coupe de france|paris sportif basket
nba|paris sportif basket prolongation|paris sportif belgique|paris sportif belgique bonus|paris sportif belgique bonus sans depot|paris sportif belgique france|paris sportif belgique suede|paris sportif bonus|paris
sportif bonus bienvenue|paris sportif bonus cash|paris sportif
bonus de bienvenue|paris sportif bonus gratuit|paris sportif bonus gratuit
sans depot|paris sportif bonus retirable|paris sportif bonus
sans depot|paris sportif bonus sans depot belgique|paris sportif bookmaker|paris sportif
but contre son camp|paris sportif but temps additionnel|paris sportif buteur|paris sportif buteur blessé|paris sportif buteur carton rouge|paris
sportif buteur contre son camp|paris sportif buteur non titulaire|paris sportif buteur
prolongation|paris sportif buteur qui ne joue pas|paris sportif buteur
remplacant|paris sportif calcul gain|paris sportif
canada|paris sportif cash|paris sportif cash out|paris sportif
champion ligue 1|paris sportif champions league|paris sportif classement ligue 1|paris sportif code promo|paris sportif
combine|paris sportif combiné|paris sportif combiné comment ça marche|paris sportif
combiné du jour|paris sportif combiné match reporté|paris sportif comment ca marche|paris sportif
comment faire|paris sportif comment gagner|paris sportif comment gagner
a tous les coups|paris sportif comment jouer|paris sportif comment ça marche|paris
sportif comparateur cote|paris sportif comparatif|paris sportif conseil|paris
sportif conseil gratuit|paris sportif conseil pour
gagner|paris sportif cote|paris sportif cote et match|paris sportif cote explication|paris sportif
cote psg|paris sportif coupe d’europe|paris sportif coupe davis|paris
sportif coupe de france|paris sportif coupe du monde|paris
sportif coupe du monde de rugby|paris sportif coupe du monde rugby|paris sportif
depot 5 euro|paris sportif depot minimum|paris sportif depot
paypal|paris sportif dnb|paris sportif du jour|paris sportif du jour conseil|paris sportif dépôt 1 euro|paris
sportif dépôt minimum 5 euros|paris sportif en belgique|paris sportif en france|paris sportif en ligne|paris sportif en ligne avec paypal|paris sportif en ligne avis|paris sportif en ligne belgique|paris sportif en ligne bonus|paris sportif en ligne cameroun|paris sportif en ligne comment gagner|paris sportif en ligne comment ça marche|paris
sportif en ligne france|paris sportif en ligne gratuit|paris sportif
en ligne maroc|paris sportif en ligne paypal|paris sportif en ligne québec|paris sportif en ligne sans depot|paris sportif en ligne suisse|paris sportif en suisse|paris sportif espagne
france|paris sportif esport|paris sportif et casino en ligne|paris sportif et hippique|paris sportif et
prolongation|paris sportif euro|paris sportif europa league|paris sportif explication|paris sportif
final ligue des champions|paris sportif finale ligue des champions|paris sportif foot|paris sportif
foot aide|paris sportif foot astuce|paris sportif foot aujourd’hui|paris sportif foot ce soir|paris sportif foot comment ca
marche|paris sportif foot conseil|paris sportif foot cote|paris sportif foot coupe du monde|paris sportif foot en ligne|paris sportif
foot feminin|paris sportif foot gratuit|paris
sportif foot prolongation|paris sportif foot pronostic|paris sportif foot pronostic gratuit|paris
sportif foot regle|paris sportif foot suisse|paris sportif foot us|paris sportif
football|paris sportif football americain|paris sportif football
astuces|paris sportif forfait tennis|paris sportif
forum|paris sportif francais|paris sportif francaise
des jeux|paris sportif france|paris sportif france 2|paris sportif france allemagne|paris
sportif france angleterre|paris sportif
france argentine|paris sportif france autriche|paris sportif
france belgique|paris sportif france espagne|paris sportif france gibraltar|paris
sportif france italie|paris sportif france nouvelle zelande|paris sportif france pologne|paris sportif france
portugal|paris sportif france uruguay|paris sportif
france usa|paris sportif freebet sans depot|paris sportif gagnant|paris sportif gagnant à coup sûr|paris sportif gagner a coup
sur|paris sportif gagner argent|paris sportif gagner de l’argent|paris sportif gain|paris sportif gain maximum|paris sportif gestion bankroll|paris sportif gratuit|paris sportif gratuit appli|paris sportif gratuit avec cadeaux|paris sportif gratuit cadeaux|paris sportif gratuit en ligne|paris sportif gratuit entre amis|paris sportif gratuit sans argent|paris sportif gratuit sans depot|paris sportif gratuit sans dépôt|paris
sportif gratuits|paris sportif gros gain|paris sportif handicap|paris sportif handicap
0 1|paris sportif handicap 0-1|paris sportif handicap 1 0|paris sportif handicap 1-0|paris sportif handicap basket|paris sportif handicap explication|paris
sportif handicap foot|paris sportif handicap rugby|paris sportif hippique|paris
sportif hockey|paris sportif hockey nhl|paris sportif hockey
sur glace|paris sportif hors arjel|paris sportif hors arjel france|paris sportif jeux olympiques|paris sportif jeux
video|paris sportif joueur blessé|paris sportif joueur blessé pendant
le match|paris sportif joueur de foot|paris sportif joueur decisif|paris sportif
joueur declare forfait|paris sportif joueur déclare forfait|paris sportif joueur
remplacant|paris sportif la francaise des jeux|paris sportif le plus rentable|paris sportif legal en france|paris sportif leicester champion|paris sportif les 18 stratégies pour gagner tous les jours|paris sportif
les plus sur|paris sportif les prolongation compte|paris sportif ligne|paris sportif ligue 1|paris sportif ligue
2|paris sportif ligue des champions|paris sportif ligue des nations|paris sportif ligue europa|paris sportif liste|paris sportif martingale|paris sportif match|paris sportif match abandonné|paris sportif
match annulé|paris sportif match arrêté|paris sportif match du jour|paris sportif match interrompu|paris sportif match reporté|paris sportif
match suspendu|paris sportif match tennis interrompu|paris sportif match truqué|paris sportif meilleur bonus|paris sportif meilleur cote|paris
sportif meilleur pronostic|paris sportif meilleur site|paris sportif
methode|paris sportif methode 2 3|paris sportif mi temps fin de match|paris sportif mise au jeu|paris sportif mise maximum|paris sportif
mma france|paris sportif moins de 3.5 but|paris sportif
montante|paris sportif moto gp|paris sportif multiple|paris sportif multiple 2
3|paris sportif multiple 2 3 explication|paris sportif multiple 2 4|paris sportif multiple 2
5|paris sportif multiple 2/3 explication|paris sportif multiple 3 4|paris sportif multiple explication|paris sportif national 1 foot|paris sportif nba|paris sportif nba conseil|paris sportif nba pronostic|paris sportif nhl|paris sportif
nombre de but|paris sportif nouveau site|paris sportif numero
match|paris sportif offert|paris sportif offre bienvenue|paris sportif offre
bienvenue sans depot|paris sportif offre de
bienvenue|paris sportif offre sans depot|paris sportif
om psg|paris sportif paypal|paris sportif plus de 1.5 but|paris sportif plus de 2 5 but|paris sportif plus ou moins|paris sportif
plus ou moins 2 5 but|paris sportif premier pari remboursé|paris sportif premier paris
remboursé|paris sportif prolongation|paris sportif prolongation basket|paris sportif
prolongation foot|paris sportif promo|paris sportif
pronostic|paris sportif pronostic basket|paris sportif pronostic des match aujourd hui|paris sportif pronostic expert gratuit|paris sportif pronostic foot|paris sportif pronostic forum|paris sportif pronostic gratuit|paris sportif pronostic
tennis|paris sportif psg|paris sportif psg arsenal|paris sportif psg barcelone|paris sportif psg bayern|paris sportif psg
dortmund|paris sportif psg inter|paris sportif psg inter cote|paris sportif
psg liverpool|paris sportif psg om|paris sportif qr code|paris sportif que veut dire handicap|paris sportif qui rapporte le plus|paris sportif regle|paris sportif regle prolongation|paris sportif rembourse|paris sportif
remboursement cash|paris sportif rembourser|paris sportif remboursé|paris sportif remboursé cash|paris sportif remboursé en cash|paris sportif
retrait paypal|paris sportif rue des joueurs|paris sportif rugby|paris sportif rugby 6 nations|paris sportif rugby coupe du monde|paris sportif rugby top 14|paris
sportif safe du jour|paris sportif sans argent|paris sportif sans carte bancaire|paris sportif sans carte d’identité|paris sportif sans compte bancaire|paris sportif sans
depot|paris sportif sans depot minimum|paris sportif si match suspendu|paris sportif
si un joueur abandonne|paris sportif si un joueur ne joue pas|paris sportif si un joueur se blesse|paris sportif
simple ou combiné|paris sportif site|paris sportif statistique|paris sportif stratégie|paris sportif suisse|paris sportif suisse application|paris sportif
suisse en ligne|paris sportif suisse legal|paris sportif suisse légal|paris sportif suisse
romande|paris sportif sur du jour|paris sportif sur le tennis|paris sportif systeme|paris sportif systeme
2 3|paris sportif systeme 2 4|paris sportif systeme 2/3|paris sportif systeme 2/4|paris sportif systeme 3
4|paris sportif systeme 3/4|paris sportif systeme
explication|paris sportif technique|paris sportif technique pour gagner|paris sportif temps additionnel|paris sportif temps reglementaire|paris sportif tennis|paris sportif tennis abandon|paris sportif tennis conseil|paris
sportif tennis de table|paris sportif tennis forfait|paris sportif tennis gratuit|paris sportif tennis pronostic|paris sportif tennis roland
garros|paris sportif tir au but|paris sportif top
14|paris sportif tour de france|paris sportif ufc|paris sportif ufc france|paris sportif unibet|paris
sportif vainqueur euro|paris sportif vainqueur ligue 1|paris sportif vainqueur ligue des champions|paris sportif via paypal|paris sportif victoire prolongation|paris sportif vip
gratuit|paris sportifs|paris sportifs abandon tennis|paris sportifs aide|paris sportifs analyser un match|paris sportifs arjel|paris sportifs astuces|paris sportifs aujourd’hui|paris sportifs
autorisés en france|paris sportifs avec paypal|paris sportifs
basket|paris sportifs belgique|paris sportifs bonus|paris sportifs bookmakers|paris sportifs
canada|paris sportifs combiné|paris sportifs comparateur|paris
sportifs comparatif|paris sportifs conseils|paris sportifs cotes|paris sportifs coupe du monde|paris sportifs de football|paris sportifs du jour|paris sportifs en belgique|paris sportifs en france|paris sportifs en ligne|paris sportifs en ligne belgique|Paris Sportifs En Ligne France
(https://Casasanmartinhostel.Com/2026/07/22/Monter-Un-Plan-D-Entrainement-Efficace-Pour-Le-Cyclisme/)|paris sportifs en ligne gratuit|paris sportifs en ligne suisse|paris sportifs en suisse|paris
sportifs et hippiques|paris sportifs euro|paris sportifs foot|paris sportifs
foot us|paris sportifs forum|paris sportifs france|paris sportifs france espagne|paris sportifs
gagner à tous les coups|paris sportifs gratuit|paris sportifs gratuits|paris
sportifs gratuits en ligne|paris sportifs handicap|paris sportifs hockey|paris sportifs hockey sur galce|paris sportifs hockey sur glace|paris sportifs hors arjel|paris sportifs jeux olympiques|paris sportifs les bookmakers raflent la mise|paris sportifs ligne|paris sportifs ligue 1|paris sportifs
ligue 2|paris sportifs ligue des champions|paris sportifs ligue europa|paris
sportifs match interrompu|paris sportifs montante|paris sportifs nba|paris sportifs offre bienvenue|paris sportifs offre de bienvenue|paris sportifs
paypal|paris sportifs pronostics|paris sportifs psg|paris sportifs psg inter|paris sportifs rugby|paris sportifs sans argent|paris sportifs sans depot|paris sportifs
site|paris sportifs sites|paris sportifs statistiques|paris sportifs stratégie|paris
sportifs suisse|paris sportifs technique|paris sportifs
techniques|paris sportifs tennis|paris sportifs tennis astuces|paris sportifs top
14|paris sportifs tour de france|part de marché paris sportifs|paypal
pari sportif|paypal paris sportif|paypal paris sportifs|perte d’argent paris sportifs|peut on devenir
riche avec les paris sportifs|peut on gagner de l’argent avec les paris sportifs|peut on gagner
sa vie avec les paris sportif|peut on vraiment gagner de l’argent avec les paris sportifs|plus gros combine paris sportif|plus gros gagnant paris sportif|plus gros gain paris sportif|plus gros
gain paris sportif au monde|plus gros gain paris sportif france|plus gros gains paris
sportif|plus gros pari sportif|plus gros paris sportif|plus grosse
cote gagner paris sportif|plus grosse cote pari sportif|plus grosse cote paris sportif|plus grosse mise paris sportif|plus grosse somme gagner au paris sportif|plus ou moins paris sportif|pourcentage de mise paris sportif|premier pari sportif
remboursé|probabilité cote paris sportif|probabilité paris sportif combiné|prolongation basket paris sportif|prolongation paris sportif|promo pari sportif|promo
paris sportif|promo site de paris sportif|promo site pari sportif|promo site paris
sportif|promos paris sportifs|prono paris sportif foot|prono paris sportif gratuit|prono paris sportif tennis|pronostic de paris
sportif|pronostic du jour paris sportif|pronostic foot paris
sportif|pronostic gratuit paris sportif|pronostic pari sportif|pronostic pari sportif gratuit|pronostic paris sportif|pronostic paris sportif aujourd’hui|pronostic paris sportif du jour|pronostic paris
sportif foot|pronostic paris sportif gratuit|pronostic paris sportif tennis|pronostic paris sportifs|pronostics
foot statistiques et aides aux paris sportifs|pronostics paris sportif|pronostics paris sportifs|pronostiqueur paris
sportif gratuit|psg arsenal paris sportif|psg bayern paris sportif|psg inter milan paris
sportif|psg inter pari sportif|psg inter paris sportif|psg liverpool paris
sportif|psg om paris sportif|psg paris sportif|psg paris
sportifs|qr code paris sportif|qu est ce qu un handicap paris sportif|qu est ce que handicap
dans les paris sportif|qu’est ce qu’un handicap paris sportif|qu’est ce que handicap
dans les paris sportif|quand un joueur se blesse paris sportif|que signifie 1/1 en paris sportif|que signifie 1/2 paris
sportif|que signifie 12 en paris sportif|que signifie
1×2 dans les paris sportifs|que signifie btts en paris sportif|que signifie dnb en paris sportif|que signifie draw en paris sportif|que signifie ft en paris sportif|que signifie gg dans le pari sportif|que signifie gg en pari sportif|que signifie gg en paris sportif|que signifie handicap dans les paris sportifs|que veut dire dnb en paris sportif|que veut dire handicap dans les paris sportifs|que veut dire handicap paris sportif|quel appli pari sportif|quel cote jouer paris sportif|quel est
la meilleur appli de paris sportif|quel est
le meilleur algorithme de paris sportif|quel est
le meilleur site de pari sportif|quel est le meilleur site de pari sportif en ligne|quel
est le meilleur site de paris sportif|quel est le meilleur site de paris sportif en ligne|quel est le meilleur site de paris sportifs en ligne|quel
est le pari sportif le plus rentable|quel pari sportif est le plus rentable|quel pari sportif est le plus sûr|quel pari sportif
faire aujourd’hui|quel paris sportif faire aujourd’hui|quel paris sportif rapporte le plus|quel site de paris sportif choisir|quel site
de paris sportif rembourse en cash|quel type de pari sportif est le
plus rentable|quelle application pour paris sportifs|quelle est la meilleure appli de paris sportif|quelle est la meilleure application de paris sportif|quelle est la meilleure application pour les paris sportifs|quelle est le meilleur site
de paris sportif|quels paris sportifs faire|quels sont les
paris sportifs les plus sûrs|rebond basket paris sportif|record de gain paris sportif|regle buteur paris
sportif|regle de paris sportif|regle des paris sportif|regle handicap paris sportif|regle handicap paris sportif foot|regle
multiple paris sportif|regle pari sportif|regle paris sportif|regle paris sportif foot|regle paris sportif multiple|regle
paris sportif prolongation|reglement pari sportif|reglement paris sportif|regles paris sportifs|remboursement cash paris sportif|remboursement en cash paris
sportif|remboursement pari sportif|remboursement paris sportif|repartiteur de mise paris sportif|repartiteur de mise paris sportifs|repartiteur de
mises paris sportif|repartiteur mise paris
sportif|repartition des mises paris sportif|resultat pari sportif|resultat paris sportif|resultat paris sportif en direct|resultat paris sportif foot|resultat sportif hockey|retirer argent paris sportif|rugby pari sportif|rugby paris sportif|règle paris sportif prolongation|règles paris sportif|répartiteur de mise pari sportif|répartiteur de mise
paris sportif|répartiteur de mise paris sportifs|répartition des mises paris sportif|résultat paris
sportif foot|sans depot paris sportif|se faire interdire de
paris sportifs|signification btts paris sportif|signification dnb paris sportif|signification handicap paris sportif|simulateur de gain paris sportif|simulateur gain paris sportif|simulateur gain paris
sportif multiple|simulateur gain paris sportif systeme|simulateur gain paris sportif
système|simulateur montante paris sportif|simulateur paris sportif multiple|simulateur systeme paris sportif|simulation paris sportif gratuit|site aide paris sportif|site analyse paris
sportif|site analyser paris sportif|site arjel paris sportif|site conseil paris sportif|site d’analyse de paris sportifs|site d’analyse paris sportif|site
de conseil paris sportif|site de pari en ligne sportif|site de pari sportif|site de pari
sportif avec bonus sans depot|site de pari sportif bonus sans depot|site de pari sportif canada|site de
pari sportif en ligne|site de pari sportif francais|site de pari sportif gratuit|site de pari sportif hors arjel|site de pari sportif suisse|site de parie sportif|site de parie sportif en ligne|site de paris en ligne sportif|site de paris sportif|site de paris sportif acceptant paypal|site de paris sportif arjel|site de paris sportif autorisé en france|site de paris sportif autorisé en suisse|site de paris sportif
avec bonus|site de paris sportif avec bonus sans depot|site de paris sportif avec bonus sans dépôt|site de paris sportif avec neosurf|site de paris
sportif avec paiement mobile|site de paris sportif avec paypal|site de paris sportif avis|site de paris sportif belge avec bonus|site de paris sportif belgique|site
de paris sportif bonus|site de paris sportif bonus sans depot|site
de paris sportif canada|site de paris sportif
comparatif|site de paris sportif depot minimum|site de paris sportif
en france|site de paris sportif en ligne|site de paris sportif en ligne
suisse|site de paris sportif football|site de paris sportif francais|site de paris sportif france|site de paris sportif gratuit|site
de paris sportif gratuit pour gagner des cadeaux|site de paris sportif gratuit sans dépôt|site de
paris sportif hors arjel|site de paris sportif le plus
fiable|site de paris sportif legal en france|site de paris sportif meilleur cote|site de
paris sportif nouveau|site de paris sportif offre de
bienvenue|site de paris sportif paypal|site de paris sportif premier paris remboursé|site de paris sportif qui accepte paypal|site de paris sportif qui rembourse en cash|site de paris sportif remboursé|site de paris sportif sans argent|site
de paris sportif sans carte bancaire|site de paris sportif sans carte d’identité|site de paris sportif sans depot|site de paris sportif suisse|site de paris sportifs|site
de paris sportifs avec paypal|site de paris sportifs en ligne|site de paris sportifs francais|site de paris sportifs
gratuit|site de paris sportifs paypal|site de paris sportifs suisse|site de statistique pour paris sportif|site des paris
sportifs|site pari en ligne sportif|site pari sportif|site
pari sportif 100 euros offert|site pari sportif arjel|site pari sportif
belgique|site pari sportif bonus|site pari sportif canada|site pari sportif comparatif|site pari sportif en ligne|site pari sportif france|site
pari sportif gratuit|site pari sportif hors arjel|site pari sportif suisse|site parie sportif|site paris en ligne sportif|site paris
sportif|site paris sportif 100 euros offert|site paris sportif 100 euros remboursé|site paris sportif
1er paris remboursé|site paris sportif arjel|site paris sportif autorisé en france|site paris sportif avec
bonus|site paris sportif avec bonus sans depot|site paris sportif avec
meilleur cote|site paris sportif belgique|site paris sportif bonus|site
paris sportif bonus cash|site paris sportif bonus sans
depot|site paris sportif canada|site paris sportif comparatif|site paris sportif depot 5
euro|site paris sportif en ligne|site paris sportif foot|site paris sportif france|site
paris sportif gratuit|site paris sportif hors arjel|site paris sportif hors
arjel france|site paris sportif meilleur cote|site paris sportif nouveau|site paris sportif offre de
bienvenue|site paris sportif paypal|site paris sportif remboursement cash|site paris sportif remboursé en cash|site paris sportif
retrait instantané|site paris sportif sans carte bancaire|site paris sportif sans depot|site paris sportif suisse|site
paris sportifs|site paris sportifs belgique|site paris sportifs en ligne|site paris sportifs france|site paris sportifs hors
arjel|site paris sportifs suisse|site pour analyse paris sportif|site pour paris sportif|site pronostic paris sportif|site statistique
paris sportif|site suisse paris sportif|sites de pari sportif|sites de paris sportif|sites de paris sportifs|sites de paris sportifs arjel|sites de paris sportifs autorisés en france|sites de paris sportifs belgique|sites de paris sportifs
bonus|sites de paris sportifs en belgique|sites de paris sportifs en france|sites
de paris sportifs en ligne|sites de paris sportifs gratuits|sites de paris
sportifs gratuits sans dépôt|sites de paris sportifs suisse|sites pari sportif|sites
paris sportif|sites paris sportifs|sites paris sportifs arjel|sites paris sportifs belgique|sites paris sportifs france|sites paris sportifs
hors arjel|sites paris sportifs suisse|so foot paris sportif|so foot paris sportifs|specialiste tennis
paris sportif|statistique foot paris sportif|statistique paris sportif|statistique
paris sportif foot|statistique tennis paris sportif|statistiques football paris sportifs|statistiques paris
sportifs|strategie de paris sportif|stratégie big whale paris sportif|stratégie de paris sportifs|stratégie gagnante paris sportifs|stratégie
pari sportif|stratégie paris sportif|stratégie paris sportifs|stratégie paris sportifs forum|stratégie pour
gagner au paris sportif|stratégies paris sportifs|suisse paris sportif|suisse paris sportifs|systeme 2 3 paris sportif|systeme 3
4 paris sportif|systeme de cote paris sportif|systeme de paris sportif|systeme pari sportif|systeme paris sportif|systeme
paris sportifs|systeme reducteur paris sportif|système paris sportif|tableau bankroll paris sportif|tableau cote paris sportif|tableau de paris sportif|tableau de suivi paris sportifs|tableau excel bankroll paris sportif|tableau excel
paris sportif|tableau excel paris sportif gratuit|tableau exce
cual que Es un yankee en apuestas (https://poolqualityservices.com/estudio-de-caso-las-apuestas-en-la-final-de-la-nfl/) la mejor pagina de apuestas
best usa pc slot game, forms of gambling in canada and free spins no
deposit keep your winnings uk, or big uk slot wins
Check out my homepage … what does it mean blackjack pays 3 to 2
corner betting strategy
my web-site :: Free Bet No Deposit
bonos de bienvenida apuestas deportivas dnb
The casino welcomes players from the United Kingdom with a localised experience and responsive support.
Big-money jackpots and trending games are easy to find on the homepage.
New players in the United Kingdom can claim a generous welcome bonus with free spins on their first deposit.
Adding funds takes just a moment and play begins straight away.
Certified RNG technology ensures every spin and hand is completely random.
True Fortune works seamlessly on smartphones and tablets straight from the browser.
true fortune casino uk true fortune casino uk