
Creating a token on the Polygon PoS Network is now something anyone can do, even without technical skills. You don’t need to learn programming, write code, or hire a developer. With tools like Token Peddler, you can use a clean and easy polygon token generator to build your own token in just a few minutes.
With Polygon’s low gas fees and high transaction speed, it’s one of the best ecosystems for creators, developers, startups, meme-coin communities, and blockchain beginners. Whether you’re building a utility token, a governance token, an experimental project, or simply testing ideas on the Polygon Amoy Testnet, Token Peddler makes Polygon token creation effortless using a guided interface and pre-audited smart contract templates.
This guide walks you through each step of the process, from wallet connection to deployment and verification. The goal is to give you a complete, beginner-friendly walkthrough—no coding required, no experience needed.
Let’s begin.
Step 1: Visit the Token Generator and Connect Your Wallet
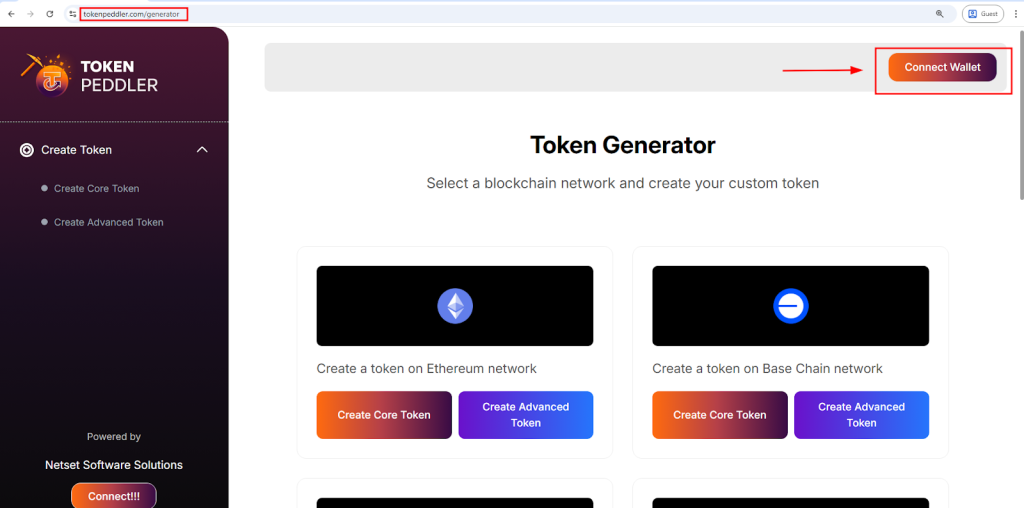
To start creating your token, visit the official Token Peddler generator. On this page, you’ll immediately notice a “Connect Wallet” button at the top and also on the right-hand panel. Clicking this button lets you connect your MetaMask wallet, which supports Polygon PoS and all EVM-compatible networks. Token Peddler handles authentication securely, without storing private keys, seed phrases, or sensitive wallet data.
Once connected, you will see a list of networks supported by the generator. Select “Create a Token on Polygon Network” to proceed. This brings you to the Polygon token creation interface, where you can choose between the Core Creator and the Advanced Creator, depending on your customisation needs.
Highlights:
- Start at the Token Peddler generator
- Click Connect Wallet (top or right side)
- Works with MetaMask and EVM wallets
- Select Create a Token on Polygon
- Choose Core or Advanced creation modes
Read About
How to Create a BEP20 Token on Binance Smart Chain Without Coding
Step 2: Configure Your Polygon Token Details
After entering the creation interface, it’s time to configure the core details of your Polygon-based token. Token Peddler provides clean, guided input fields for entering your token name, symbol, total supply, and decimal precision. These values define your token’s identity and behaviour on the Polygon blockchain.
If you choose the Core Creator, you can quickly generate a standard ERC20-compatible token. The Advanced Creator, on the other hand, allows you to enable extra features such as minting, burning, pausing, blacklisting, max-supply control, and more. Each selection you make is automatically integrated into your contract using secure, pre-audited templates built specifically for ERC20 token creation on Polygon. No coding is needed, and the interface keeps everything clear and beginner-friendly.
Highlights:
- Set name, symbol, decimals, and supply
- Optional features: mint, burn, pause, max supply
- Choose simple or advanced configurations
- Uses secure, pre-audited ERC20 templates for Polygon
Step 3: Create Your Token Instantly With One Click
Once your token details and optional features are finalised, you are ready to generate your token. Simply click the “Create Token” button, and Token Peddler’s automated engine will instantly build your Polygon-compatible smart contract. You do not need to write, edit, or review any Solidity code — the platform uses secure, pre-audited templates for safe Polygon token generation.
After clicking the button, your wallet (MetaMask) will display a confirmation pop-up showing estimated gas fees and network details for Polygon PoS or the Polygon Amoy Testnet. Since Polygon’s gas fees are extremely low, generating and preparing your token contract typically costs only a few cents. Once you confirm the action in your wallet, the contract is compiled and fully prepared for deployment—all in a single click.
Highlights:
- Click Create Token to auto-generate the contract
- No coding required—secure templates handle everything
- Wallet shows gas fees before confirming
- Contract is fully compiled and deploy-ready
Step 4: Deploy Your Token to the Polygon PoS Network
With your smart contract generated, the next step is deployment. Once you click the Create Token button, your wallet automatically prompts you to confirm the deployment transaction on the Polygon PoS blockchain (or Amoy Testnet, if you’re testing).
Token Peddler does not charge platform fees; you only pay the blockchain gas fee, which is extremely low on Polygon. Once you confirm the transaction, the network processes it within seconds. After confirmation, your token becomes live, permanent, immutable, and fully owned by your wallet. From this moment on, your token officially exists on the Polygon blockchain and can be viewed publicly on PolygonScan.
Highlights:
- Deploy to Polygon PoS or Amoy Testnet in seconds
- Only pay Polygon gas fees—no platform costs
- Token becomes immutable and on-chain permanently
- Full contract ownership stays with your wallet
Step 5: Verify, Add, and Use Your Polygon Token
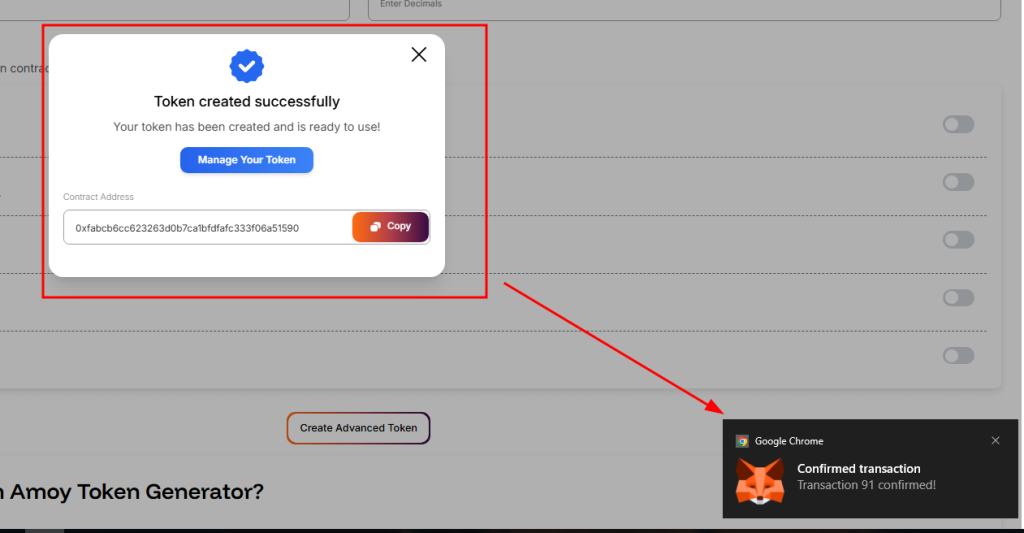
Once deployment is complete, Token Peddler displays your contract address and deployment details. You can paste this address into PolygonScan to verify your token contract and see your token live on the blockchain. You can now add the token to your wallet using the “Add Custom Token” option in MetaMask and entering the contract address.
If you enabled minting or burning during setup, you can perform supply management actions directly from your wallet. Your Polygon token is instantly compatible with DEXs, DApps, NFT marketplaces, and Web3 tools across the Polygon ecosystem, allowing you to integrate it into games, apps, community projects, fundraising systems, and more.
Highlights:
- View and verify your token on PolygonScan
- Add token to MetaMask or Web3 wallets
- Use minting or burning features (if enabled)
- Ready for DEXs, DApps, and Web3 integrations
Advantages of Using a Token Generator vs Coding Manually
Using a no-code Polygon token generator provides significant advantages over manual smart contract development. Writing your own ERC20 contract requires coding, debugging, testing, and a security audit. Token Peddler simplifies all of this with time-tested templates.
| Feature | Coding Yourself | Token Generator (No-Code) |
| Coding required | ✔ Yes | ❌ No |
| Time to deploy | Weeks | Minutes |
| Contract security | Needs audit | Pre-audited templates |
| Cost | $1,000s+ | Gas fees only |
| Ownership | Varies (depends on developer) | 100% user-owned (from wallet) |
| Risk of bugs | Higher without audit | Lower using templates |
| Multi-chain support | Hard | One-click (if supported) |
A trusted no-code platform lowers technical barriers, reduces risk, and lets your wallet remain in complete control of deployment and ownership.
Quick Summary of All Steps
✅ Step 1: Visit the Token Generator & Connect Wallet
Go to tokenpeddler.com/generator, connect your MetaMask wallet, and select the Polygon PoS network to begin building your token.
✅ Step 2: Configure Your Token Parameters
Enter your token name, symbol, decimals, total supply, and optional features like minting, burning, pausing, or max supply control.
✅ Step 3: Create Your Token With One Click
Click “Create Token” to generate your Polygon ERC20 smart contract instantly using secure, pre-audited templates — without writing any code.
✅ Step 4: Deploy Your Token to Polygon PoS
Confirm the deployment through MetaMask and pay only the Polygon gas fee. Your token is then permanently deployed on-chain and fully owned by your wallet.
✅ Step 5: Verify, Add, and Use Your Token
Verify your contract on PolygonScan, add the token to your wallet, and start using it across wallets, DEXs, DApps, and Web3 tools on the Polygon network.
Quick Safety Checklist Before Deployment
Before deploying your Polygon token, keep these best practices in mind:
- Double-check your token name, symbol, decimals, and supply — these cannot be changed later.
- Use Polygon Amoy Testnet first if you’re unsure about configuration.
- Stick to OpenZeppelin-style templates for security and reliability.
- Avoid enabling advanced admin features unless you know how to manage them.
- If launching a public project, consider a third-party audit.
- Secure private keys, liquidity, and admin roles — use multisig or timelocks for added trust.
Conclusion
If you’re ready to create your Polygon token, you can deploy it instantly through the Token Peddler generator using a simple, structured, step-by-step workflow. And if you’d like to practice the process before going live on Polygon Mainnet, you can safely test everything using our Polygon Amoy token generator, allowing you to become comfortable with token creation and deployment without any real cost.
By eliminating technical complexity and simplifying smart-contract deployment, Token Peddler empowers creators, developers, entrepreneurs, and innovators to bring their Web3 ideas to life quickly, affordably, and with complete confidence on the Polygon PoS Network.
Frequently Asked Questions (FAQs)
1. How long does it take to deploy a Polygon token?
Usually under a minute. Polygon offers fast confirmations, so your token goes live almost instantly.
2. How much does it cost to deploy a token on Polygon?
Token Peddler is free; you only pay the gas fee on Polygon, which is very low compared to Ethereum.
3. Is the Polygon token generator free?
Yes. Token Peddler charges no platform fees for token creation or deployment.
4. Which networks are supported?
You can create tokens on:
- Polygon Mainnet
- Polygon Amoy
- Ethereum
- BNB Smart Chain
- Base
- Solana
- Multiple testnets
5. Can I customise my Polygon token?
Yes. You can enable minting, burning, pausing, and many optional features.
6. Can I mint more tokens after deployment?
Yes — as long as minting was enabled during creation.
7. Can I edit my token after deployment?
No. Smart contracts are immutable once deployed.
8. Can I renounce ownership?
Yes. If your token includes owner-controlled features, you can renounce ownership for decentralisation.

One Response