
Testing your Ethereum token on a testnet is one of the smartest steps you can take before deploying on the Ethereum mainnet. With gas fees rising in 2025 and smart contracts becoming more feature-rich, building and testing your token on the Sepolia test network allows you to experiment safely, confirm functionality, and fix mistakes without spending real ETH. Thanks to no-code token creation platforms like Token Peddler, the entire process — from generating your ERC20 contract to deploying it on Sepolia — becomes simple, fast, and completely beginner-friendly.
Whether you’re learning Solidity, preparing for a real token launch, or testing minting/burning mechanics, Sepolia is the ideal sandbox environment. It is lightweight, reliable, widely supported across Ethereum tools, and designed for developers to build with zero financial risk. And when you use a guided Ethereum token generator, you don’t need to write code or worry about contract compilation — everything is handled for you.
What Is the Sepolia Testnet?
Sepolia is Ethereum’s current primary test network used for development, testing, and pre-deployment validation. In 2023–2025, it became the officially recommended Ethereum testnet after Goerli’s deprecation. Sepolia mirrors Ethereum’s architecture and functionality but operates with test ETH, allowing developers to experiment without risking real funds.
The network is known for being stable, lightweight, and easy to use with tools like MetaMask, Etherscan, Hardhat, Foundry, and all major RPC providers. Because Sepolia follows Ethereum’s consensus and environment closely, any token you deploy on Sepolia behaves exactly like it would on mainnet — except that gas fees are essentially free. This makes it perfect for testing token creation, advanced ERC20 features, ownership transfers, and verification workflows before going live.
Read About:-
Why Create and Test Your Token on Sepolia First?
Creating an ERC20 token directly on the Ethereum mainnet is expensive, irreversible, and risky if you’re not 100% confident in your smart contract. Testing on Sepolia helps you identify issues beforehand, saving time and avoiding costly mistakes. You can test supply management, minting logic, burning capabilities, decimals, ownership handling, and transfer mechanics in a risk-free environment.
Sepolia also helps you ensure compatibility with DApps, wallets, DEXs, and custom tools before going live. Whether you’re building utility coins, governance tokens, meme coins, or learning ERC20 deployment, Sepolia is your ideal practice ground.
Highlights:
- Test token behavior without spending real ETH
- Avoid irreversible mistakes on the Ethereum mainnet
- Confirm compatibility with wallets, DEXs, and tools
- Ideal for debugging and learning
- Perfect environment for no-code users and developers
Tools You Need Before Getting Started
Before creating your Sepolia test token, make sure you have the basic tools ready. You’ll need a Web3 wallet like MetaMask to interact with the token creation platform. You also need a small amount of Sepolia ETH, which you can obtain for free from public faucets. Ensure your browser is updated and your MetaMask wallet is set to the Sepolia test network. Token Peddler uses secure, audited templates to help you create tokens without writing any code.
What you need:
- MetaMask wallet
- Sepolia ETH (from a faucet)
- Access to https://tokenpeddler.com/generator
- Internet browser
- Basic understanding of ERC20 token parameters
Step 1: Visit the Token Generator & Connect Your Wallet
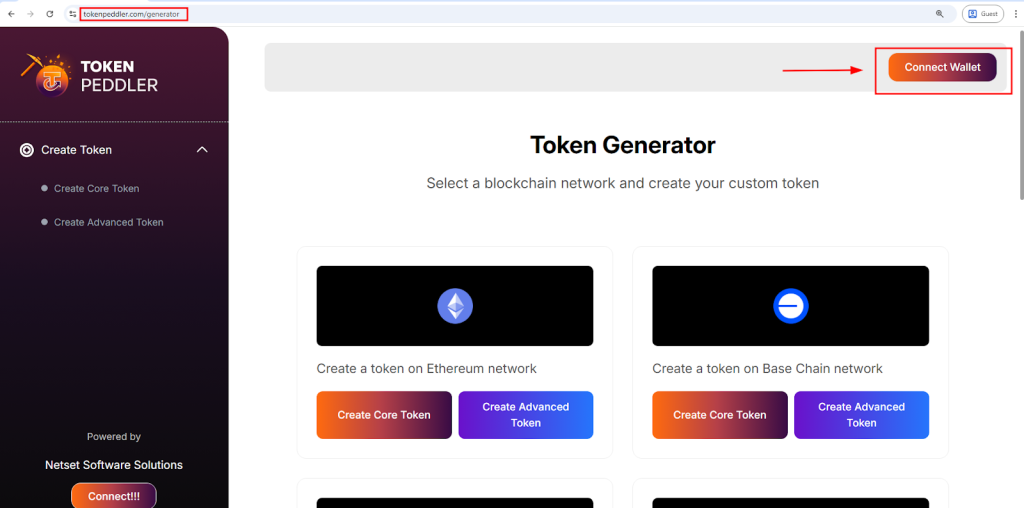
Start by visiting the official Token Peddler generator page:
👉 https://tokenpeddler.com/generator
Once the page loads, look for the “Connect Wallet” button at the top-right corner. Clicking this will prompt MetaMask (or another supported wallet) to request a secure connection. Token Peddler never stores private keys, seed phrases, or sensitive data — everything stays inside your wallet.
After connecting, select the Sepolia Testnet from the network list to begin building your token. Once your wallet is connected, Token Peddler will take you to its token creation interface, where you can choose between two modes:
- Core Token Creator – ideal for beginners
- Advanced Token Creator – for users who want custom features
Highlights:
- Visit tokenpeddler.com/generator
- Click “Connect Wallet”
- Select Sepolia Test Network
- Choose Core or Advanced creation mode
Step 2: Configure Your ERC20 Token Details
This step is where you define all your token’s fundamental properties. The interface will show fields for token name, symbol, total supply, and decimals. You can create any test token you want — for example, a utility token, a meme coin, or a governance token.
Next, choose optional advanced features such as mintable, burnable, pausable, or capped supply. These options help you test real-world token behavior on Sepolia. Every option you enable will appear in your final smart contract and can be tested afterward.
Highlights:
- Enter token name, symbol, supply, decimals
- Test advanced options like mint/burn
- Configure supply management
- Perfect for experimenting safely
- No coding or contract editing required
Step 3: Create Your Token Instantly With One Click
After filling out your token details, click the “Create Token” button. Token Peddler automatically generates a complete ERC20 smart contract using secure, pre-audited templates aligned with industry standards. You don’t have to write or modify Solidity code — the system handles all compilation behind the scenes.
Once you initiate creation, MetaMask will open a window showing the transaction, gas usage, and contract creation process. Because Sepolia uses test ETH, you can proceed freely without worrying about real expenses. After approval, your wallet signs the transaction and prepares your contract for deployment.
Highlights:
- One-click contract creation
- No coding required
- Uses secure ERC20 templates
- MetaMask shows gas fees and contract details
- Fully prepared for deployment
Step 4: Deploy Your Token on Sepolia Testnet
Deployment is the moment your token becomes real on the blockchain. After your contract is prepared, MetaMask will ask you to confirm the deployment transaction. Since Sepolia uses test ETH, gas fees are extremely low and cost nothing in real value.
Once confirmed, your contract is broadcast to the Sepolia network. Within seconds, the deployment will be mined and visible on Sepolia Etherscan. Your token now exists on-chain and is fully owned by your wallet.
Highlights:
- Deploy with test ETH
- Wallet signs the deployment transaction
- Your token goes live immediately
- Contract appears on Sepolia Etherscan
- You retain full ownership
Step 5: Verify, View & Test Your Token
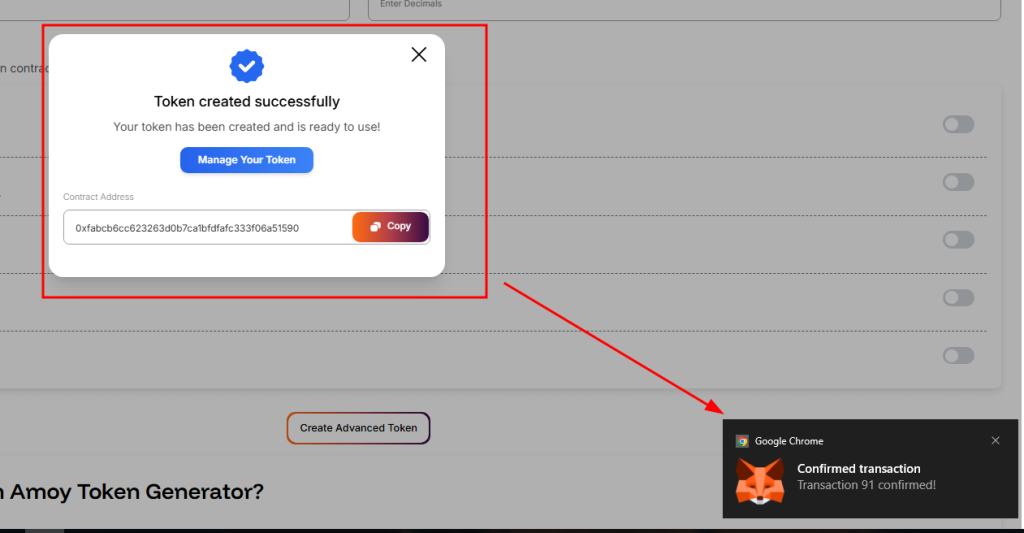
Once deployed, you can visit the contract on Sepolia Etherscan to view its details. You may also add the token to MetaMask by clicking “Import Token” and entering the contract address. This makes the token visible in your wallet.
Now test your token thoroughly:
- Try sending tokens to other wallets
- Test minting operations (if enabled)
- Test burning, pausing, or capped supply
- Connect to testnet DEXs and dApps
This ensures everything behaves as expected before moving to Ethereum mainnet.
Highlights:
- Verify contract on Sepolia Etherscan
- Add token to MetaMask
- Test transfers and admin functions
- Use with DApps and testnet tools
- Validate readiness for mainnet
Advantages of Using a Token Generator vs Coding Manually
Using a no-code Ethereum token generator like Token Peddler dramatically simplifies the entire ERC20 creation and testing workflow. Traditionally, developers needed to manually write Solidity code, compile the contract, debug errors, deploy via Hardhat or Remix, and then verify everything. This process requires technical expertise, and even experienced developers can unintentionally introduce bugs.
Token Peddler removes this complexity by using standardized, secure, pre-audited templates. You simply configure your parameters, generate the contract, and deploy. Because it is testnet-friendly, you can safely experiment with advanced token features without risking high mainnet gas fees.
Below is a clear comparison:
| Feature | Coding Yourself | Token Generator (No-Code) |
| Coding required | ✔ Yes | ❌ No |
| Time to deploy | Days or weeks | Minutes |
| Contract security | Needs manual auditing | Pre-audited ERC20 templates |
| Cost | High (developer fees + audits) | Gas fees only (test ETH on Sepolia) |
| Risk of bugs | High without review | Low — standardized templates |
| Ownership | Depends on developer | Fully owned by your wallet |
| Multi-network support | Hard to configure | One-click switching |
A reputable no-code generator significantly lowers development friction and ensures that your Sepolia token behaves reliably during testing.
Quick Safety Checklist Before You Deploy on Ethereum Mainnet
Testing on Sepolia is the perfect opportunity to validate your token, but following best practices ensures that your mainnet deployment goes smoothly. Below is a concise but essential safety checklist:
- Double-check your token name, symbol, decimals, and supply — these are permanent once deployed on mainnet.
- Thoroughly test advanced functions such as minting, burning, pausing, or capped supply.
- Ensure ownership and admin roles work as intended (renounce or transfer ownership if needed).
- Use Sepolia faucets to ensure enough test ETH for multiple experiments.
- Test token transfers across wallets and testnet DApps to confirm compatibility.
- Avoid enabling admin features you don’t fully understand, such as pausable or blacklist functions.
- Consider security audits before mainnet deployment, especially for public projects or tokens with large communities.
- Keep private keys secure, and avoid testing with your main wallet or hardware wallet.
This checklist ensures you deploy safely, confidently, and professionally.
Common Mistakes to Avoid When Testing on Sepolia
Many beginners run into simple issues during ERC20 token testing. Avoiding these mistakes will save time and reduce confusion:
- Not switching MetaMask to the Sepolia network, resulting in deployment errors.
- Entering incorrect decimals, causing unexpected token behavior.
- Forgetting to test transfer functions after deployment, which is crucial for confirming ERC20 compliance.
- Not having enough Sepolia ETH, which can interrupt the testing flow.
- Confusing testnet tokens with mainnet tokens, especially when using similar names.
- Skipping verification on Sepolia Etherscan, which prevents transparency and recognition by wallets.
- Not testing advanced features like mint/burn if they will be required on mainnet.
Testing thoroughly ensures a smooth transition to the Ethereum mainnet.
When Should You Move From Sepolia to Ethereum Mainnet?
You should only deploy your ERC20 token to Ethereum mainnet after completing a full test cycle on Sepolia. Here are key indicators that you’re ready:
- Your token performs correctly across all expected use cases.
- All advanced functions (mint, burn, pause, transfer ownership) work as intended.
- Your contract compiles and deploys without errors.
- Token transfers work seamlessly with MetaMask, wallets, and test DApps.
- You’ve verified the contract successfully on Sepolia Etherscan.
- You’ve conducted independent or third-party code reviews for safety.
- You have a clear purpose for mainnet deployment (utility, sale, governance, etc.).
- You’re fully aware that mainnet deployments are permanent and cost real ETH.
Once all these boxes are checked, you can confidently deploy your ERC20 token to Ethereum mainnet.
Quick Summary of All Steps
✅ Step 1: Visit the Token Generator & Connect Wallet
Go to tokenpeddler.com/generator, connect MetaMask, and select the Sepolia network.
✅ Step 2: Configure Your ERC20 Token Parameters
Enter your token’s name, symbol, decimals, and supply. Add optional advanced features.
✅ Step 3: Create Your Token Instantly With One Click
Click “Create Token” to auto-generate your contract using secure ERC20 templates.
✅ Step 4: Deploy Your Token on Sepolia
Confirm the transaction in MetaMask and deploy your token using Sepolia test ETH.
✅ Step 5: Verify, Add, and Test Your Token
View your contract on Sepolia Etherscan, add it to MetaMask, and test transfers, minting, and burning.
FAQs
1. Is Sepolia free to use?
Yes. Sepolia uses test ETH, which can be claimed from faucets at zero cost.
2. How do I get Sepolia ETH?
You can request Sepolia ETH from public faucets, GitHub faucets, or official testnet faucets integrated with MetaMask.
3. Do I need coding skills to create a token on Sepolia?
No. Token Peddler allows complete ERC20 token creation without writing code.
4. Can I deploy advanced ERC20 tokens on Sepolia?
Yes. Mintable, burnable, capped, and pausable tokens can be tested easily.
5. Can I migrate my Sepolia token to mainnet?
Not directly — Sepolia is only for testing. You must create a new deployment on mainnet.
6. Does Token Peddler store private keys?
Never. All actions are performed through your wallet.
7. What if I find a bug?
Fix it while on Sepolia — that’s the purpose of testing before mainnet.
Conclusion
Testing your token on the Sepolia network is one of the safest and smartest approaches before launching on the Ethereum mainnet. Sepolia’s fast confirmations, no-cost test ETH, and compatibility with Ethereum tools make it the perfect environment for experimenting with ERC20 smart contracts.
By using Token Peddler’s no-code Ethereum token generator, the entire process becomes simple — from configuring your token settings to deploying your contract and verifying it on Sepolia. Whether you’re a developer validating logic or a beginner exploring Web3, this workflow ensures a smooth transition to mainnet deployment.
Take the time to test thoroughly, verify your results, and ensure everything is functioning as intended. Doing so protects your project, your users, and your resources once your token goes live on Ethereum.

Геморрой — это распространённая проблема, нуждающаяся своевременного терапии.
Игнорирование симптомов или затягивание визита к специалисту способно обернуться опасными осложнениями, такими как кровотечение.
Современная проктология располагает многочисленные методы лечения: от малоинвазивных вмешательств до консервативной терапии.
проктолог клиника
Ранняя помощь позволяет быстро устранить дискомфортные проявления и восстановить повседневный комфорт.
При появлении первых признаков (зуд, боль, следы крови) важно как можно скорее записаться к проктологу для диагностики.
Адекватное воздействие не лишь избавляет от телесного дискомфорта, но и препятствует прогрессированию заболевания и потребности в оперативном вмешательстве.
Почва повсеместно применяется в аграрном производстве для культивации насаждений.
В закрытых помещениях земля является базой для зеленных растений.
На открытых полях почва используется для сева кормовых и промышленных культур.
купить плодородную землю
Почвенные составы требуются для устройства лужаек и ландшафтного обустройства.
В дендрариях грунт играет важную функцию при производстве рассады.
Помимо этого грунт применяется для восстановления деградированных территорий.
Драфт сюрвей — это способ измерения погружения корпуса для вычисления массы перевозимого товара.
Этот подход основан на закон Архимеда и служит для определения объёма груза по изменению осадки.
Операция осуществляется перед и по окончании погрузки или разгрузки, чтобы зафиксировать реальное вес перемещённого груза.
https://eurogal-surveys.ru/
Процедура состоит из записи показаний осадки в нескольких местах и внесения корректировок на плотность воды.
Эта методика активно востребован в морской торговле для коммерческих сверок и инспекций.
Данная процедура считается надёжным способом контроля веса товаров, признанным глобальными соглашениями.
Оземпик представляет собой современным медикаментом для терапии диабета 2 типа.
Данный медикамент применяется подкожно раз в неделю посредством эргономичной ручки-дозатора.
Центральное действие лекарства — стимулировать рецепторы ГПП-1, вызывая понижение глюкозы в плазме.
Tirz.pro
Помимо контроля гликемии, это средство способствует умеренному избавлению от лишних килограммов.
Курс данного лекарства обязан прописываться только эндокринологом с учётом всех противопоказаний.
Во время использовании возможны побочные явления, такие как расстройство желудка или нарушение стула, которые обычно проходят со временем.
Ответственная игра — это принцип к азартным сессиям, базирующийся на самоограничении и понимании последствий.
Она подразумевает добровольное ограничение времени и денег на игру.
Каждый игрок обязан заранее устанавливать лимиты ставок и строго их соблюдать.
https://homirussia.ru/
К признакам проблемной игры являются стремление вернуть проигранное и пренебрежение реальными обязанностями.
Ответственная игра учит относиться к площадке как к досугу, а не источнику дохода.
Соблюдение этих принципов гарантирует эмоциональное здоровье и финансовую стабильность пользователя.
Ответственная игра — это комплекс принципов, ориентированных на сохранение эмоционального и материального равновесия участника.
Базовая мысль состоит в том, что игра должна восприниматься только как развлечение, а не как метод заработка.
Пользователю рекомендуется предварительно устанавливать лимиты по времени и бюджету и неукоснительно их соблюдать.
https://liveforsport.ru/full-text/1495-top-5-mifov-o-kazino-1win-i-krash-igrakh.html
Важно научиться распознавать ранние симптомы зависимости, такие как погоня за проигрышем и пренебрежение повседневными делами.
Платформы должны предоставлять инструменты ограничения: паузы, депозитные лимиты и блокировку аккаунта.
Следование этих правил даёт возможность удержать азарт в безопасных границах, не нанося вреда своей психике и окружающим.
Взрослый контент нередко служит средством сексуального просвещения.
Такие ролики способны помочь понять личные предпочтения и пределы комфорта.
В отношениях просмотр иногда стать поводом для диалога интимных вопросов.
https://happygayporn.cc/ass-to-mouth/
Этот формат помогает снижению психологических барьеров и стыда.
Кроме того он предоставляет шанс для безрискового экспериментирования воображения.
Однако важно не забывать о различии экраном реальной жизнью и вымыслом.
Осознанное участие в играх — это совокупность принципов, направленных на сохранение контроля над своими действиями.
Эта концепция главная суть состоит в сознательном ограничении длительности и денег на игру.
Игроку следует заранее определить максимальную сумму и строго придерживаться этого порога.
https://protivbed.ru/full-article/a-beginner-s-guide-to-slot-games-at-rich-casino-1969/
Сайты должны предлагать функции самоконтроля: паузы, ограничения пополнений и тесты на зависимость.
Ключевой принцип — воспринимать к процессу исключительно как к отдыху, а не способу заработка.
При возникновении симптомов проблемного поведения (погоня за потерянным) стоит активировать самоисключение или обратиться к психологам.
Следование данных установок обеспечивает безопасность психики и финансовую стабильность, а главное — сохраняет интерес в здоровых рамках.
На данном портале легко отыскать немало нужной материалов.
Здесь содержатся публикации и инструкции для любого запрос.
Посетитель можете найти как широкую информацию, также детальные разработки.
Этот источник способен помочь профессионалам в своей работе.
https://superlooks.ru/look/2135-zvezdy-gotovy-k-kaprizam-vesny-ot-rozovogo-kardigana-do-leopardovogo-palto/
Кроме того на портале часто добавляются свежие материалы.
Советуем внимательно ознакомиться с доступную здесь подборку.
Таким образом, наш портал является ценным источником сведений.
Ответственная игра — это принцип к игровым развлечениям, основанный на контроле и понимании рисков.
Она предполагает осознанное лимитирование времени и бюджета на игру.
Любой участник должен предварительно определять лимиты ставок и неукоснительно их соблюдать.
https://legicon-pravo.ru/data/3204-laureaty-respublikanskoy-premii-v-sfere-kultury-iskusstva-i-literatury-2026.html
Осознанный гемблинг — это стратегия к игровым развлечениям, основанный на самоограничении и осознании последствий.
Она включает добровольное ограничение времени и расходов на игру.
Каждый игрок должен предварительно устанавливать лимиты потерь и строго их соблюдать.
https://legicon-pravo.ru/data/3379-beautiful-things-kogda-yodzhi-yamamoto-i-adidas-tvoryat-vechnost.html
Осознанный гемблинг — это стратегия к казино, основанный на контроле и осознании рисков.
Эта концепция включает добровольное ограничение времени и расходов на процесс.
Любой участник обязан предварительно устанавливать пределы потерь и строго их соблюдать.
https://n4.vladtoday.ru/MbDDLiB3swJn/
Разумное отношение к азарту — это стратегия к казино, базирующийся на контроле и понимании рисков.
Она включает осознанное лимитирование продолжительности и бюджета на процесс.
Любой участник должен предварительно определять лимиты потерь и строго их придерживаться.
https://momblog.womaninstyle.ru/2EqcutJYyF1H/
Разумное отношение к азарту — это подход к казино, базирующийся на самоограничении и понимании последствий.
Эта концепция включает добровольное лимитирование времени и денег на процесс.
Каждый игрок должен предварительно определять лимиты потерь и строго их придерживаться.
https://rosotels.ru/detail/2026-06-27-valentina-matvienko-otsenila-nasledie-sergeya-ivanova.htm
Ресурсы для взрослых могут выступать каналом сексуального образования, содействуя пользователям понимать собственную природу.
Они позволяют изучать разнообразие подходов в защищённом пространстве, снижая опасность физических осложнений.
В отношениях общий интерес может усиливать взаимопонимание и становиться основанием для откровенного диалога о желаниях и предпочтениях.
фото страпон
Ответственная игра — это стратегия к азартным сессиям, базирующийся на контроле и понимании рисков.
Эта концепция включает добровольное лимитирование продолжительности и денег на процесс.
Каждый игрок обязан предварительно устанавливать лимиты потерь и строго их придерживаться.
https://relax-spb.ru/read-info/3065-the-history-and-evolution-of-beepbeep-casino-from-startup-to-global-brand.html
Ответственная игра — это модель поведения, при которой гемблинг воспринимается как досуг, а не инструмент обогащения.
Она включает определение лимитов по времени и финансам на старте, а также умение прерваться.
Ключевые принципы — не пытаться отыграться, использовать тайм-ауты и обращаться за помощью при возникновении признаков проблемного поведения.
https://my-yarn.ru/moda/902-kak-vybrat-onlayn-kazino-kriterii-otsenki-nadezhnosti-i-bezopasnosti/
На представленном сайте легко найти немало практичной сведений.
На этой платформе собраны публикации и инструкции под любой запрос.
Читатель можете найти как базовую информацию, так и детальные данные.
Этот источник способен помочь новичкам в различной практике.
https://liveforsport.ru/full-text/523-sochetanie-barokko-i-sporta-estetika-krossovok-dolceandgabbana.html
Помимо этого на сайте постоянно появляются интересные руководства.
Советуем внимательно прочитать представленную здесь коллекцию.
Таким образом, эта платформа представляет собой ценным местом знаний.
Сайты для взрослых способны выступать источником сексуального просвещения, содействуя людям понимать свою сексуальность.
Такие платформы дают возможность исследовать разнообразие подходов в безопасном пространстве, уменьшая опасность физических осложнений.
В отношениях общий просмотр может укреплять взаимопонимание и служить основанием для честного разговора о фантазиях и границах.
видео анал
Разумное отношение к азарту — это принцип к азартным сессиям, основанный на самоограничении и осознании рисков.
Эта концепция предполагает добровольное ограничение времени и бюджета на игру.
Каждый участник должен заранее устанавливать пределы ставок и строго их соблюдать.
https://online-festival.ru/detail/3285-magiya-povsednevnogo-vystavka-martina-bedan-v-saint-laurent-montaigne.html
Разумное отношение к азарту — это стратегия к казино, базирующийся на контроле и осознании рисков.
Она предполагает добровольное ограничение времени и денег на игру.
Любой участник обязан заранее определять лимиты ставок и строго их соблюдать.
https://1-mk.ru/detail/466-litsenzirovanie-i-bezopasnost-kak-randx-zashchishchaet-igrokov/
Responsible gambling is a collection of practices that guarantee betting stays a recreational activity instead of a source of stress or loss.
Key aspects include setting personal limits on time and money spent, as well as recognising the indicators of harmful behaviour.
Ultimately, responsible gambling promotes informed choices and helps players to keep control over their playing habits.
https://rosotels.ru/detail/2026-06-29-responsible-gambling-at-rich-casino-tools-and-tips.htm
Разумное отношение к азарту — это подход к казино, базирующийся на самоограничении и понимании последствий.
Она включает добровольное лимитирование продолжительности и бюджета на процесс.
Любой игрок обязан заранее устанавливать лимиты ставок и строго их придерживаться.
https://e-transavto.ru/read/pensii-kotorye-mogut-ischeznut-kak-vosstanovit-vyplaty-474/
Осознанный гемблинг — это принцип к азартным сессиям, базирующийся на самоограничении и осознании рисков.
Эта концепция подразумевает добровольное ограничение продолжительности и расходов на игру.
Любой участник должен предварительно определять пределы ставок и неукоснительно их соблюдать.
https://kart1na.ru/entry/322-kak-rabotaet-mekhanizm-krash-igry-aviator-podrobnoe-rukovodstvo/
Prudent betting is a set of principles that guarantee betting stays a form of entertainment instead of a means of financial strain.
It involves establishing individual limits on time and wagers, as well as being aware of the indicators of harmful behaviour.
Ultimately, this approach encourages conscious decisions and helps players to maintain balance over their playing activities.
https://liveforsport.ru/full-text/1487-smekh-skvoz-milliony-let-ot-obezyanikh-ukhmylok-k-chelovecheskoy-radosti.html
Осознанный гемблинг — это подход к казино, основанный на самоограничении и понимании рисков.
Она предполагает осознанное ограничение продолжительности и бюджета на игру.
Каждый участник должен заранее устанавливать пределы ставок и строго их соблюдать.
https://businessman.fashionvipclub.ru/KrnPRNpaCn0G/
Responsible gambling is a set of principles that guarantee betting stays a form of entertainment instead of a source of financial strain.
Key aspects include setting individual boundaries on time and money spent, as well as being aware of the indicators of harmful behaviour.
Ultimately, this approach promotes conscious decisions and helps players to keep control over their gaming habits.
https://vivatpersonal.ru/detail/2026-06-18-sergey-tsekov-o-krymskikh-namereniyakh-ukrainskogo-rezhima-zapadniki-nakhodyatsya-v-tumane.html
Ответственная игра — это стиль поведения, при которой азарт являются формой отдыха, а не средством заработать.
Такой подход базируется на контроле временем и бюджетом, а также на понимании своих пределов.
https://omskapteka.ru/info/476-otzyvy-realnykh-igrokov-o-randx-casino-plyusy-problemy-rekomendatsii.htm
Ответственная игра — это принцип к азартным сессиям, базирующийся на самоограничении и понимании последствий.
Она включает осознанное лимитирование времени и расходов на игру.
Любой участник должен заранее определять лимиты ставок и строго их соблюдать.
https://gamepro.fashionpromo.ru/j8bdX1ls36Ww/
Для учителей профессиональное развитие жизненно необходимы, поскольку эти программы позволяют осваивать новейшие подходы.
В результате таким занятиям специалисты могут приспосабливаться к новым стандартам образования.
Таким образом значительно улучшается уровень преподавания, что благотворно отражается на учениках и их достижения.
https://web.snauka.ru/site/stati-10/put-v-professiyu-sovremennyie-kursyi-logopedov-defektologov
Осознанный гемблинг — это принцип к казино, основанный на самоограничении и осознании последствий.
Она подразумевает осознанное лимитирование времени и расходов на игру.
Каждый участник должен заранее определять пределы потерь и неукоснительно их придерживаться.
https://all.megakazan.ru/lMXvERUJDrl1/
Сникеры D&G — представляют собой стильный союз неповторимой элегантности и современных веяний.
Главной особенностью этих пар является запоминающийся дизайн с использованием дорогих сырья и фирменной детализации.
Такие модели великолепно сочетаются для повседневной жизни, добавляя в образ долю гламура.
https://protivbed.ru/full-article/kak-vybrat-idealnuyu-model-krossovok-dolce-andamp-gabbana-pod-svoy-stil-2117/
Разумное отношение к азарту — это принцип к азартным сессиям, базирующийся на самоограничении и осознании последствий.
Она предполагает осознанное ограничение продолжительности и денег на процесс.
Каждый игрок обязан заранее устанавливать пределы ставок и строго их соблюдать.
https://history.superlooks.ru/DdnLK9uBtryj/
Сникеры бренда — это удачный симбиоз изысканной классики и новейших трендов.
Главной особенностью этих пар является выразительный дизайн с сочетанием качественных материалов и культовой детализации.
Они прекрасно подходят для повседневной эксплуатации, привнося в лук нотку шика.
https://rosotels.ru/detail/2026-07-14-trendovye-stili-krossovok-dolce-and-gabbana-v-2024-godu-chto-aktualno-na-ulitsakh.htm
Кеды Dolce&Gabbana — представляют собой стильный союз изысканной элегантности и актуальных трендов.
Отличительной особенностью этих моделей считается броский дизайн с сочетанием дорогих сырья и фирменной детализации.
Эти кроссовки прекрасно сочетаются для повседневной жизни, привнося в стиль долю роскоши.
https://liveforsport.ru/full-text/1639-kak-pravilno-podobrat-razmer-krossovok-dolce-andamp-gabbana-sovety-i-rekomendatsii.html
Конторы предлагают шанс заключать пари на различные события.
Крайне важно отдавать предпочтение лицензированных букмекеров, а также внимательно изучать роспись перед оформлением пари.
Ставки способны превратиться увлекательным досугом, однако стоит придерживаться меру ответственной игры и ограничивать расходы.
https://spacefan.sochidaily.ru/pCYg3im3m6Cw/
הפורטל hasfaniyot.net מעניק מגוון עשיר של שירותים המותאמים למשתמשים הישראלי.
כאן תוכלו לגלות חוויות ייחודיים בתחום למבוגרים ברמה גבוהה.
השירות מאפשרת אפשרות נוחה לחומרים הללו באמצעות הקפדה על פרטיות הגולש.
https://hasfaniyot.net/
Слоты — являются самые популярные развлечения в казино.
У них главное преимущество — простота, яркая графика и разнообразие бонусных возможностей.
Пользователи могут подбирать автоматы по сюжету, количеству барабанов и уровню волатильности.
https://moneywise.richlifestyle.ru/EHLl0TYycmfB/
Правила осознанной игры — это регламент, ориентированный на сохранение контроля в отношении собственными действиями и исключение рисков.
https://www.tumblr.com/sneakerizer/758945212517236736/balenciaga-is-a-luxury-fashion-house-known-for-its?source=share
Ответственная игра — это выбор, при которой игры служат способом досуга, а не стремлением заработать.
Такой подход базируется на контроле временем и расходами, а также на понимании своих пределов.
https://e-transavto.ru/read/kogda-otpusk-okupaetsya-luchshe-vsego-samye-pribylnye-mesyatsy-do-kontsa-2026-goda-490/
На этом сайте можно обнаружить много ценной сведений.
https://eurasia-log.ru/blog/2026-07-15-sarafany-kotorye-stoit-uspet-nadet-do-poslednego-zharkogo-dnya/
Видеослоты — являются самые популярные игры в онлайн-казино.
https://a5.gucci1.ru/8kMRKk6H94sd/
На этом сайте вы сможете отыскать обилие нужной информации.
https://nashipesni.ru/pub/2026-07-16-kakie-futbolki-ushli-v-proshloe-6-ustarevshikh-stiley-i-ikh-sovremennye-alternativy/
Игровые автоматы — это одни из самых популярные игры в казино.
https://links.gucci1.ru/SKOczBd3Z6yA/
Здесь ресурсе вы сможете найти много ценной материалов.
https://wolgograd.ru/column/2878-tyomnyy-gost-v-zritelnom-laru-kak-parazit-iz-vodoprovoda-lishil-britanku-zreniya-v-odnom-glazu/
На данном сайте можно отыскать много полезной сведений.
https://relax-spb.ru/read-info/3265-posledniy-shans-kto-obyazan-vnesti-nalog-do-kontsa-dnya.html
Онлайн-слоты — это одни из самых известные развлечения в казино.
https://a5.gucci1.ru/GGE8elx1vq7D/
На данном портале можно найти обилие полезной информации.
https://tltrock.ru/material/2026-07-15-posledstviya-atak-na-npz-i-put-k-vykhodu-iz-toplivnogo-krizisa.html
online casino ethereum Registrace mobilní
200 zł gratis 70 Darmowych spinów bonus kasyno online online
На этом сайте можно обнаружить массу ценной информации.
https://altrades.ru/finance/432-vliyanie-krossovok-dolce-andamp-gabbana-na-ulichnyy-stil-v-raznykh-stranakh.html
הפורטל הזה מספק מגוון רחב של תכנים המיועדים לקהל הישראלי.
באתר תוכלו לגלות תוכן ייחודיים בנושא המבוגרים באיכות גבוהה.
השירות נותנת גישה פשוטה לתכנים הללו תוך הקפדה על אנונימיות הגולש.
https://hasfaniyot.net/
Слоты — это одни из самых популярные развлечения в гемблинг-индустрии.
https://fitlife.womaninstyle.ru/vpTsLUYqF5Jk/
Здесь сайте вы сможете найти много полезной информации.
https://1-mk.ru/detail/501-dukhovshchina-gotovit-k-otkrytiyu-novuyu-ploshchadku-dlya-sdachi-norm-gto/
75% Bonus kasyno Online 2026 poznań ranking
A generic version is a formulation that is created to match a pioneer drug in strength, purity, and effectiveness.
Such a drug contains the identical active substance as the original drug, yet can vary in excipients and cost.
For market entry, a generic must prove pharmaceutical equivalence to the brand-name medicine, ensuring that it is equally safe and efficacious.
caverta and seizure meds interaction
На этом портале можно подобрать арендную квартиру в Турции.
Тут (аренда жилья в турции) собраны все предложения для аренды квартир в Турции.
Этот портал позволит найти квартиру в Турции.
casino mit 300 euro bonus – https://tan-Herring-256786.hostingersite.com/, slots 10 cent einsatz
Игровые автоматы — являются одни из самых востребованные игры в гемблинг-индустрии.
https://graph.org/RandX-kogda-hochetsya-ostrogo-a-ne-predskazuemogo-06-30
online sicheres casino ohne lugas (http://www.caminogreen.es) paypal freispiele
the top online pokies and casinos in united states legit, casino victoria
bc canada and usa slot festival, or bingo online for money united
kingdom
Also visit my web-site – website
ehrliche online casino Deutschland casino direkt spielen
На данном платформе можно найти съемное жилье в Турции.
Здесь (https://turkeyapartment.com/) представлены лучшие объекты аренды недвижимости в Турции.
Этот сайт поможет вам выбрать жилье в Турции.
meilleur stock de Casino En Ligne Qui Paie Les Gains [https://Forwardersholdings.Com/]